Pressing RMB menu over created curves on viewport or over the curve layer on Curve Tree to access or modify the curve properties.
You can turn on/off this option on Edit > Preferences > Viewport
RMB commands panel
Apply Curves Apply the selected Curves. Save Curve: Save the selected Curve. Find Offset: Create a new curve duplicating the original to a new position based on offset.
Show new curve: Draw real offset for extruding.
Make corners sharp: Make corners sharp.
Preserve curve: don’t delete the original curve used as source.
Offset value: distance to the base curve.
Intersection Tolerance: Change the value to adjust the number of intersection points.
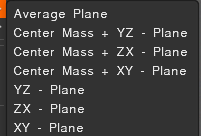
Place on Plane
Average plane
Center mass + YZ – plane
Center masss + ZX – plane
Center mass + XY – plane
YZ – plane
ZX – plane
XY – plane
Curves Operations
Separate Disconnected Curves:
Split Self Intersections: This command adds self-intersection points of the curve. The intersection is also the case if the points on the curves in the space are closer than the intersection tolerance value; by changing which, you can get more or fewer intersection points.
When you select “Split to segments,” you get a subdivision of the curve into successive segments. When you select “Split to clusters,” you get a subdivision of the curve into closed sub-clusters.
Boolean Operations: This command performs the operations of intersection, union, and subtraction over curves.
First of all, the intersection points of the curves are located, and then the operations are performed. The intersection tolerance regulates the number of intersection points. The intersection is considered to be points lying at a distance less than this value.
Simplify Curve: This command deletes the curve points so that the new curve is as similar as possible to the original curve. The number of points is controlled by the parameter “multiplier”, which varies from 0 to 1.
Smoothing Curve: This command smooths the curve. A variable degree specifies the degree of smoothing, the larger the value, the more iterations of smoothing will be applied to the curve. Smoothing is done in two ways. – The first method is averaging (check box “Simple average method” is active). Each point is replaced by the average value of this point and two adjacent points. – The second method (check box “Simple average method” is not active) is that the curve is interpolated and the middle point is replaced by a point on the resulting curve. If the “Subdivide to uniform segments” check box is active, the curve is divided into segments of approximately the same length (this length can be adjusted with the help of the slider), and then smoothing is performed.
Remove sharp corners: This tool removes curve angles other than 180 degrees, replacing them with a circular arc of a given radius. If the option “Apply only to selected vertices” is selected, the operation will be performed at all selected vertices of the curve, regardless of the angle. If this option is not selected, then the operation is performed at all vertices of the curve, which the algorithm considers suitable.
Subdivide Curve: Automatically add vertices to the curve. This command will add one point between every two points of the curve.
Reverse Curve Direction: Invert curve direction.
Find Offset:
Clear Symmetry Dependency: The operation removes the dependence on the curve from which it was obtained as a result of applying symmetry.
Split Sculpt object by Curve: Cutting the model with the curve, applying the bevel. Split and joints may use curves as well.
Make Bevel from Curve: You may do the bevel via the RMB over the curve and look at how the bevel looks in real time.
Brush along curve: Applies brush along the curve with spacing and jitter. Run brush along projection: Edit Pressure Profile: Define how pressure will be distributed along the stroke.
Select/Freeze projection area: Select/Freeze area within closed curves projection. Freeze/Selection to curve:
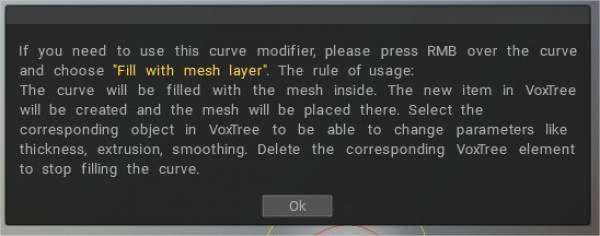
The new item in Sculpt Tree will be created, and the mesh will be placed there. Select the corresponding object in Sculpt Tree to be able to change parameters like thickness, extrusion, and smoothing. Delete the corresponding Sculpt Tree element to stop filling the curve.
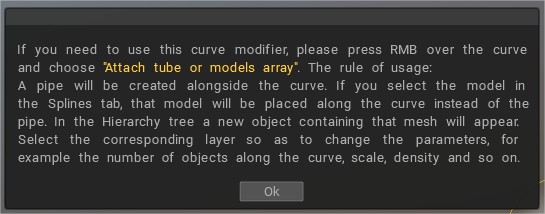
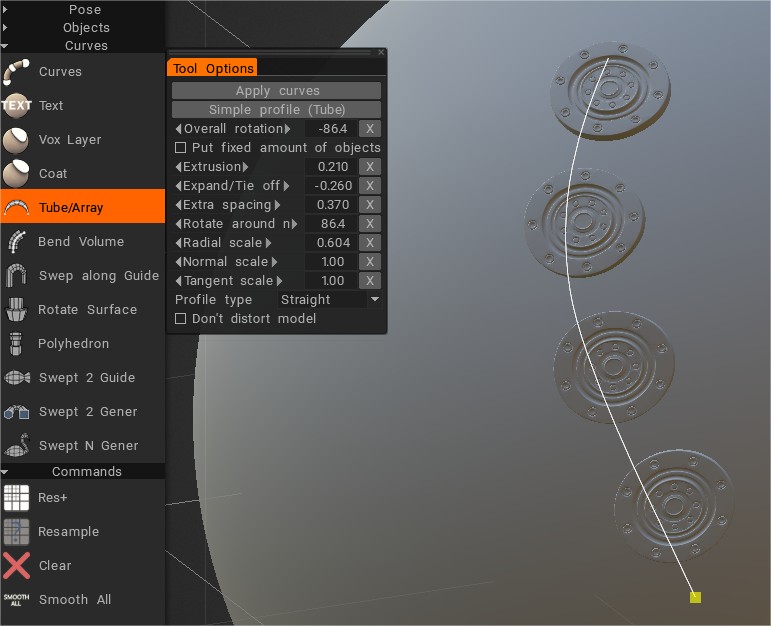
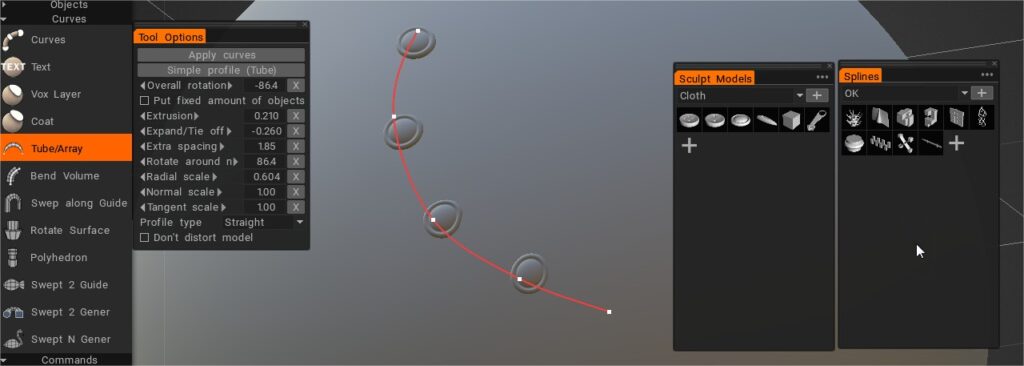
To add new geometry over the mesh’s surface > Select Tube/Array tool. Draw a curve and choose Attach tube or models array.
Splines and also Sculpt models can be used to fill with new geometry (attach tube or models array).
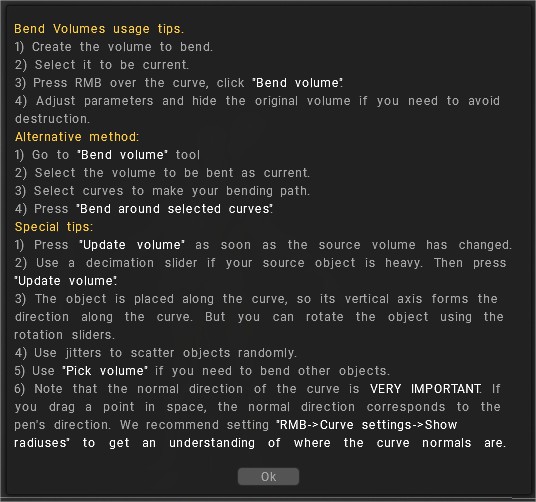
If you select the model in the Splines tab, that model will be placed along the curve instead of the pipe. In the Hierarchy tree, a new object containing that mesh will appear. Select the corresponding layer so as to change the parameters, for example, the number of objects along the curve, scale, density, and so on. Bend Volume: Bend the object around the curve.
Bend Volume: Bend the object around the curve.
Sweep profile along Guide Curve: The sweep profile will be along the selected Guide Curve. After the “Tool Options” dialog appears, You need select profile-curve. The new item in Sculpt tree will be created, and the mesh will be placed there. Select the corresponding object in Sculpt tree to be able to change parameters like thickness, Angle, Twist-Angle, etc. Delete the corresponding Sculpt tree element to stop filling the curve.
You can vary the curve shape using the option “Use Profile Graph”.
Create Rotate Surface: The Rotate surface will be generated by revolution of the selected profile around the selected curve-axis. After the “Tool Options dialog” appears, you need to select the curve axis. The new item in Sculpt tree will be created, and the mesh will be placed there. Select the corresponding object in Sculpt tree to be able to change parameters like thickness, Angle, twist angle, etc. Delete the corresponding Sculpt tree element to stop filling the curve. Create Polyhedron: The Polyhedron will be generated by revolution and moving the selected profile around the selected curve-axis. After the “Tool Options dialog” appears, you need to select the curve axis. The new item in Sculpt tree will be created, and the mesh will be placed there. Select the corresponding object in Sculpt tree to be able to change parameters like thickness, Quantity of facets, and smoothing. Delete the corresponding Sculpt tree element to stop filling the curve.
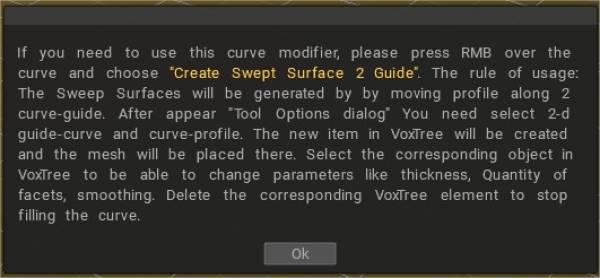
Create Swept Surface 2 Guide:
The Sweep Surfaces will be generated by moving the profile along two curve-guide. After the “Tool Options dialog” appears, you need to select 2-d guide-curve and curve-profile.
The new item in Sculpt Tree will be created, and the mesh will be placed there. Select the corresponding object in Sculpt Tree to be able to change parameters like thickness, Quantity of facets, and smoothing. Delete the corresponding Sculpt Tree element to stop filling the curve. You also can vary the curve shape using the option “Use Profile Graph”.
Create Swept Surface 2 Geners: The Sweep Surface will be generated by moving of 2 profiles along the selected guide curve. After the “Tool Options dialog” appears, you need select curve-profile. The new item in Sculpt Tree will be created, and the mesh will be placed there. Select the corresponding object in Sculpt tree to be able to change parameters like thickness, Quantity of facets, and smoothing. Delete the corresponding Sculpt tree element to stop filling the curve.
Create Swept Surface N Geners: The Sweep Surfaces will be generated by moving N profiles along two curve-guide.
After the “Tool Options dialog” appears, you need select 2-d guide and curve profiles. The new item in Sculpt tree will be created, and the mesh will be placed there.
Select the corresponding object in Sculpt tree to be able to change parameters like thickness, Quantity of facets, and smoothing. Delete the corresponding Sculpt tree element to stop filling the curve.
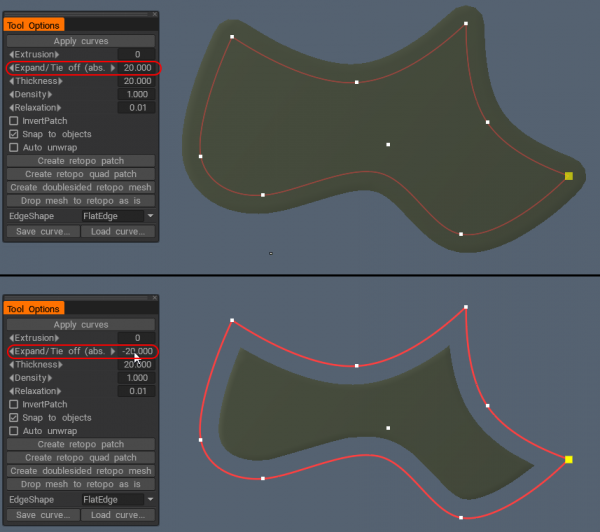
– Now with much better quality of “Expand/tie off” for patches and tubes for curves modifiers.
Snap to surface: Snap curves to the surface.
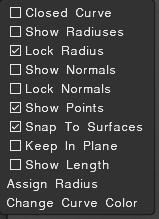
Curve Settings
Closed Curve: Draw a closed curve.
Show radiuses
Lock Radius
Show normals:
Lock normals: Don’t recalculate normals, use normals directly from the object file. If you subdivide mesh this option will be ignored.
Show points
Snap To Surfaces
Keep In Plane
Show length
Assign radius: Assign the same (current) radius to all points of the curve..
 Eesti
Eesti  English
 Українська
 Español
 Deutsch
 Français
 日本語
日本語 Русский
 한국어
한국어 Polski
 中文 (中国)
 Português
 Italiano
 Suomi
Suomi Svenska
 中文 (台灣)
 Dansk
Dansk Slovenčina
 Türkçe
 Nederlands
 Magyar
 ไทย
ไทย हिन्दी
 Ελληνικά
 Tiếng Việt
 Lietuviškai
 Latviešu valoda
 Čeština
 Română
 Norsk Bokmål