• Eesti
  • 3DCoat dokumentatsioon
  • Chapters
    • 3DCoat tutvustus
    • Alustamine
    • Liides ja navigeerimine
    • Brush komponendid
    • Tööruumid Toad
    • Scripting ja Core API
    • Küsimused/Vastused
    • licensing
    • Koolitusõpetused
  • Pilgway
  • Products
    • 3DCoat
    • 3DCoatTextura
    • 3DCoatPrint
    • PBRLibrary
  • Blog Posts
  • Store
  • Eesti Eesti
    • English English
    • Українська Українська
    • Español Español
    • Deutsch Deutsch
    • Français Français
    • 日本語 日本語
    • Русский Русский
    • 한국어 한국어
    • Polski Polski
    • 中文 (中国) 中文 (中国)
    • Português Português
    • Italiano Italiano
    • Suomi Suomi
    • Svenska Svenska
    • 中文 (台灣) 中文 (台灣)
    • Dansk Dansk
    • Slovenčina Slovenčina
    • Türkçe Türkçe
    • Nederlands Nederlands
    • Magyar Magyar
    • ไทย ไทย
    • हिन्दी हिन्दी
    • Ελληνικά Ελληνικά
    • Tiếng Việt Tiếng Việt
    • Lietuviškai Lietuviškai
    • Latviešu valoda Latviešu valoda
    • Čeština Čeština
    • Română Română
    • Norsk Bokmål Norsk Bokmål
  • Creating 3D Character Using 3DCoat
Expand All Collapse All
  • 3DCoat tutvustus
  • Alustamine
    • System requirements
    • Why 3DCoat is Unique?
    • 3DCoat aktiveerimine
    • Käivitusviga
      • Startup error Mac
    • Color management
    • Upgrading permanent license
    • Linux Setup
      • Linux initial setup per-user installation
      • Linux initial setup for system
      • Tablet setup
      • To GTK3 from GTK2
    • Kaustade struktuur
      • Custom documents folder
    • "Resolutsiooni" erinevad vormid
    • Tablet on Window
    • Import ja Export
    • Applinks 3DCoat
      • Blender rakenduse link
        • Blender with the Applink in Linux
      • Blender 4.2/3/4/5 applink
      • Max Applink
      • Houdini applink
      • Lightwave uplink
  • Navigation
    • Dialoogi avamine (kiirmenüü)
    • Navigeerimispaneel
    • Kaamera ja navigeerimine
      • Customize Navigation as Blender
    • Viewport Navigation Gizmo
    • Left tool panel
    •  Activity Bar
    • Navigeerimine 3DConnexion seadmete abil
      • How to compile Spacenavd on non Ubuntu distro
    • Stylus doesn’t work in sculpting
    • Kiirklahvid
  • Liides ja navigeerimine
    • Menüü Fail
    • Redigeeri menüü
      • Calculate Curvature
      • Calculate Occlusion
      • Light Baking Tool
      • Eelistused
    • Kuva menüü
    • Sümmeetria
    • Textures
    • Calculate
    • Kihtide menüü
    • Menüü külmutamine
    • Hide
    • Bake
    • Kurvid 2022
      • Kurvide menüü
      • Curves Properties RMB
      • Täida võrkkihiga
      • Scale of imported curves
    • Windowsi menüü
      • Vahelehtedega Windowsi hüpikaknapaneelid
      • Liugurid
    • Scripts
    • Addons
    • Capture
    • Abi menüü
    • Kohandamine
    • Muutke või looge uus tuba
  • Brush komponendid
    • Brush ülemine riba
    • Harjad üldkasutatav
      • Looge pintsleid ja kleebiseid
      • Alfa valmistamine praegusest skulptuurist
      • Looge 3D-objektist Brush
      • Create brushes based on Curves
      • Load photoshop .abr brushes
    • Insuldid
      • Curves hüpikmenüü
    • Brush valikud
    • Tingimuste piiraja
    • Ribade paneel
    • Šabloonide paneel
    • Nutikad materjalid
      • Lisage uusi pilte või materjale
      • Kinnitage Smart materjal kihile
      • Import Quixel Material
    • Brush eelseadistuste loomine
  • Tööruumid Toad
    • Painting
      • Tekstuuri Painting ja režiimid
        • Per-Pixel Painting
        • Painting (mikrotipp)
        • Ptex Painting
        • Painting (polüvärvimine)
      • Painting tuppa importimine
        • Initial CC subdivision
        • UV Set smoothing
        • Sharp (hard) edge
        • Lukusta normaalsed
        • Laadige pärast mudeli muudatusi uus UV paigutus
        • DAZ Genesis models into 3DCoat
      • Painting tööruumi menüüd
        • Edit menu
        • Tekstuuride menüü
          • Tekstuuriga Baking tööriistad
        • Peida
        • Bake Paint menüü
        • Värvivalija
      • Ülemine riba Painting jaoks
      • Kihtide paneel
        • Segamispaneel
        • Layer and Clipping Masks
      • Painting tööriistad
      • Läbipaistmatus – läbipaistvus
      • Kohandage tööruumi
        • Tweak Toolset
        • Eksportimine Tweak Roomist
      • Maski/materjali eelvaate paneel
      • Eksport Painting
    • UV tööruum
      • UV ülemine riba
      • UV Vasak tööriistapaneel
      • UV eelvaate paneel
      • UV töövoo näide
      • Importimine UV -ruumi
      • Eksportimine UV ruumist
    • Retopoloogia
      • Importimine Retopo ruumi
      • Retopo võrgumenüü ja küpsetusmenüü
        • Virtuaalne peegelrežiim
      • Bake menu
        • Treat Poly Groups as Paint Objects
        • Baking guide
      • Ülemine riba
        • Valige geomeetria
      • Vasakpoolne tööriistapaneel retopoloogiaruumis
        • Üldine eesmärk ja funktsioon
        • Lisage geomeetria
          • Löökide tööriist retopoloogias
        • Retopo Tweak Tools
        • UV tööriistad
        • Retopoloogia ruumi käsud
      • AUTORETOPO
        • Autopo guide
      • Polügrupid
    • Skulptuur
      • Sculpt Layer
      • Skulptuuripuu
      • Brush valikud
      • Top Bar
      • Brush mootor
      • Geomeetria alammenüü
      • Kujundage "Paremklõpsu" menüü
      • Varjutajad
      • Voxel režiim
        • Puhas Voxel
        • Tihedus ja eraldusvõime
        • Savi mootor
        • Voxel tööriistad
        • Pinnatööriistad vokslitel
        • Voxel Adjustment Tools
        • Volumetriline Painting
        • Voxel Objects Tools
      • Pinnarežiim
        • Pinnapealsed tööriistad
        • Pinna kohandatud tööriistad
        • Pinna reguleerimise tööriistad
        • Painting
        • Pinnaobjektide tööriistad
        • Mitmetasandiline eraldusvõime
          • Multires tools
          • Multires adjust
          • Multires commands
      • Skulptuurid kõverad
        • Spline kõverad
        • Splines model creation
      • Vektori nihe
      • Pinna teisendamise tööriistad
        • Voxel teisendustööriistad
        • Instancer
        • Move
        • Pose
        • Fit
        • Reproject
        • Surface Array
      • Voxel primitiivid ja Import
      • Live Booleanid
      • Sculpti ruumi käsud
      • Import skulptuuriruumi
      • Eksportimine skulptuuriruumist
    • Renderda
      • Comparison of different roughness values
      • Renderduspaneeli funktsioonid
      • Plaadimängija
      • Valgustuse võltsing – mitte PBR–
    • Factures
      • Töövoog
    • Lihtsaim
    • Modelleerimine
      • Mesh Menu
      • Vasakpoolne tööriistapaneel modelleerimisruumis
        • Lisage geomeetria
          • Valitud
        • Näpistada
        • Smart Hybrid
        • UV
          • Käsklused
        • Kogu võrk
      • Loft pinna näide Fluffy poolt
      • Blokeerimine Poeboi poolt
      • Import Zbrush Polygroups for UV mapping
    • Kitbash – kiire 3D-mudelite loomine
      • Create kitbash
      • Left tool panel Kitbash
    • 3DPrint
    • Photogrammetry
      • How to install Reality Capture
      • Reality Capture doesn’t show up ?
    • Võrk NURBS-i ruumi külge
    • Nodes
      • Skulptuuride varjutajad Nodes Library
  • Scripting ja Core API
    • Scripting
    • Core API
    • Pythoni API
  • Tasuta 3DCoatPrint

Treat Poly Groups as Paint Objects

165 views 0

Written by Carlos
August 11, 2025

In this mode, each material of the object will be treated as a separate UV set (separate texture) regardless of the initial UV sets.

If you deselect “Treat Poly Groups as Paint Objects, your paint Objects or Poly Groups layers be converted to surface materials.

You only now will have one paint object but with several surface materials.
Rename your Paint object as a combination name of all the Poly Groups layers.

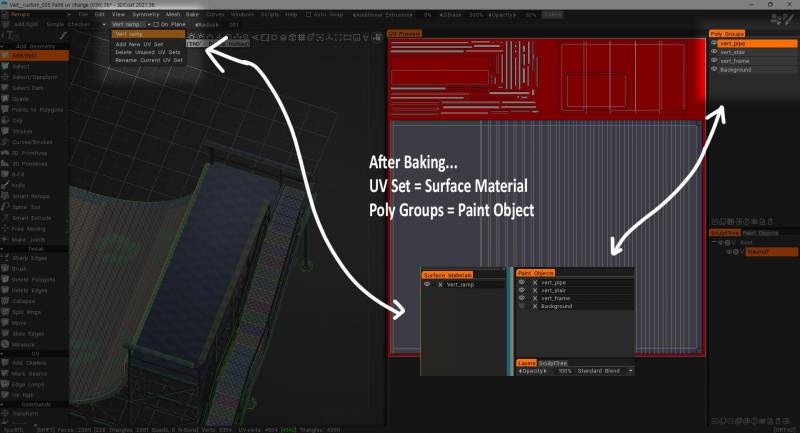
In 3DCoat, baking by polygroup allows you to treat each polygroup as a separate UV set (and thus a separate texture) during the baking process, even if the initial UVs are different.

This is useful for complex models where you might want to apply different materials or texture details to different parts of the model. 

Here’s a more detailed breakdown:

Understanding Polygroup Baking


  • What are Polygroups? Polygroups are a way to group polygons together in a model, often based on their material, shape, or function. 

How it works in 3DCoat:

When you bake with the “Treat Poly Groups as Paint Objects” option enabled, 3DCoat treats each polygroup as a distinct object with its own UVs for baking. This means that the baking process will generate separate texture maps for each polygroup, even if they were originally part of a larger mesh with a single UV set. 

When to use it:

This technique is particularly useful when you want to apply different materials or texture details to different parts of a model, or when you’re working with models that have complex or overlapping UVs. 

Baking Process


Import your model: Import your high-poly model into 3DCoat. 

Create Polygroups: If your model doesn’t have them already, create polygroups in the Retopo room, either manually or using auto-retopology tools. 
Prepare for Baking: In the Retopo room, select the retopologized mesh and navigate to the Bake option. 
Enable “Treat Poly Groups as Paint Objects”: This option tells 3DCoat to treat each polygroup as a separate UV set for baking. 
Choose your settings: Select the desired baking settings, such as the type of normal map (per-pixel or microvertex) and other texture maps you want to bake. 
Bake: Initiate the baking process. 
Result: 3DCoat will generate separate texture maps for each polygroup, allowing you to apply different materials or texture details to each part of your model. 

Benefits of Baking by Polygroup


  • Increased Flexibility: You can apply different materials and textures to different parts of your model.
  • Improved Texture Efficiency: By separating the model into polygroups, you can optimize texture usage and reduce texture stretching.
  • Easier Texture Editing: Each polygroup can be edited as a separate texture, making it easier to refine and adjust details. 

In essence, baking by polygroup in 3DCoat provides a powerful way to manage and apply textures to complex models, allowing for greater artistic control and more efficient texture usage.

Was this helpful?

Yes  No
Related Articles
  • Surface Array
  • Top Bar
  • Curves Properties RMB
  • Left tool panel Kitbash
  • Create kitbash
  • Color management
Previously
Bake menu
Up Next
Baking guide
AI:
Hi! How can I help you?
Attention: This is a beta version of AI chat. Some answers may be wrong. See full version of AI chat