 Ελληνικά
  English
 Українська
 Español
 Deutsch
 Français
 日本語
日本語 Русский
 한국어
한국어 Polski
 中文 (中国)
 Português
 Italiano
 Suomi
Suomi Svenska
 中文 (台灣)
 Dansk
Dansk Slovenčina
 Türkçe
 Nederlands
 Magyar
 ไทย
ไทย हिन्दी
 Tiếng Việt
 Lietuviškai
 Latviešu valoda
 Eesti
Eesti Čeština
 Română
 Norsk Bokmål
Export αρχείων
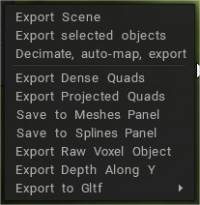
Από το μενού “Αρχείο/ Export” , υπάρχουν οι ακόλουθες επιλογές για την εξαγωγή του γλυπτού σας:
Export σκηνής: Εξάγει όλα τα επίπεδα Voxel ως τριγωνικό πλέγμα στις ακόλουθες διαθέσιμες μορφές – .obj, .lwo, .fbx, .stl και .ply
Export επιλεγμένου αντικειμένου : Εξάγει το τρέχον στρώμα Sculpt ως τριγωνικό πλέγμα στις ακόλουθες διαθέσιμες μορφές .obj, .lwo, .fbx, .stl και .ply.
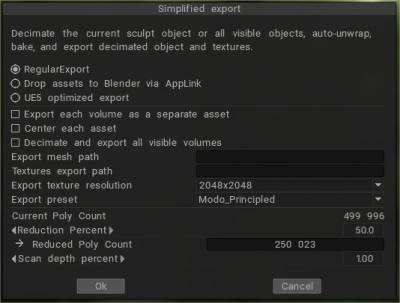
Αποδεκατισμός, αυτόματη export: Τα γλυπτά αντικείμενα μπορούν να εξαχθούν ως χαμηλής υφής πολυ + υφή χρησιμοποιώντας το ειδικό σενάριο που αυτοματοποιεί αυτήν την εργασία: αποδεκατίζει, ψήνει και εξάγει το αντικείμενο + υφές. Αρχείο→ Export → Αποδεκατισμός, αυτόματη χαρτογράφηση, export.
Η αυτόματη εξαγωγή βελτιώθηκε ουσιαστικά:
– (1) δυνατότητα export περιουσιακών στοιχείων απευθείας στο Blender με PBR.
– (2) κεντράρισμα περιουσιακών στοιχείων εάν χρειάζεται.
– (3) export πολλαπλών περιουσιακών στοιχείων.
– (4) προαιρετική δυνατότητα export κάθε στοιχείου στον φάκελό του.
– (5) καλύτερη συμβατότητα με το UE5 (αλλά ακόμα δεν είναι τέλεια επειδή το FBX δεν υποστηρίζει πλήρες PBR).
– (6) δυνατότητα ρύθμισης προσαρμοσμένου βάθους σάρωσης. Ως αποτέλεσμα, η αυτόματη εξαγωγή γίνεται ένα καλό και βολικό εργαλείο δημιουργίας περιουσιακών στοιχείων.
Export Dense Quads: Εξάγει ένα πυκνό, τετραγωνικό πλέγμα που μπορεί να μην είναι πάντα πολλαπλό.
Export Projected Quads: Εξάγει ένα βελτιστοποιημένο τετραγωνικό πλέγμα χρησιμοποιώντας προβολή.
Save to Meshes Panel: Εάν θέλετε να διατηρήσετε το μοντέλο Voxel στον πίνακα “Models” – για μελλοντική και επαναλαμβανόμενη χρήση, αυτή η επιλογή το αποθηκεύει με μια εικονική αναπαράσταση του αντικειμένου. Μπορείτε να export το τρέχον αντικείμενο ως προεπιλογή στον πίνακα Meshes.
Αποθήκευση στον πίνακα Spline: Export του τρέχοντος αντικειμένου ως προφίλ για τον πίνακα Spline.
Export ακατέργαστου αντικειμένου Voxel : Export το τρέχον αντικείμενο Sculpt που βασίζεται σε Voxel ως πίνακα δεδομένων. Εξάγει ακατέργαστα δεδομένα voxel με τη μορφή πίνακα που περιγράφει το αντικείμενο σε 3 διαστάσεις που υποδεικνύουν τον όγκο του.
Export βάθους κατά μήκος Y: Βάθος Export που αποδίδεται κατά μήκος του άξονα Y. Είναι χρήσιμο για την παραγωγή άλφα και πλακιδίων υφών.
Για τη δημιουργία χαρτών ύψους, μπορείτε να σμιλέψετε το βασικό σχήμα για το έδαφος σας και, στη συνέχεια, απλώς να export έναν χάρτη ύψους.
Export σε Gltf: Μπορείτε να export χρησιμοποιώντας δύο επιλογές:
- Gltf Separate (.gltf + .bin + textures): export σε ξεχωριστά αρχεία.
- Gltf Embedded (.gltf): χρησιμοποιήστε αυτήν την επιλογή με ενσωματωμένες υφές.
Διάφορες λειτουργίες για Εξαγωγή βρίσκονται σε αυτό το μενού.
Export βάθους κατά μήκος των βημάτων Y (Ευχαριστώ Ψεκαστήρα)
-στη γλυπτική, περιστρέψτε το μοντέλο στο δωμάτιο για να φαίνεται από πάνω
-πηγαίνετε στο render room, επιλέξτε πάσο βάθους
-ενεργοποιήστε την ομίχλη και προσαρμόστε λίγο για να τη δείτε στο παράθυρο προβολής
-επιστροφή στο δωμάτιο γλυπτικής, αρχείο→ export → export βάθους κατά μήκος Y, επιλέξτε μορφή .tiff ή .exr, φροντίστε να επισημάνετε το πλαίσιο ελέγχου
– Το .tiff θα είναι σε 16 bit, το .exr σε 32 bit
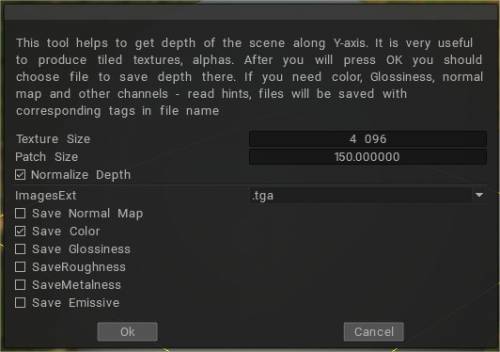
Ψήστε το Brush σας χρησιμοποιώντας το 3D Coat Y Export από τον Anton Tenitsky
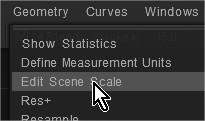
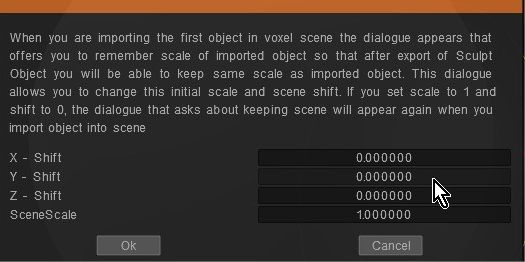
Πώς να αντιμετωπίσετε όταν το μοντέλο που εξάγεται από το 3DCoat αποκλίνει από την προέλευση στο Blender κλπ:
Ελέγξτε εάν η τιμή μετατόπισης συντεταγμένων έχει εισαχθεί με επεξεργασία της κλίμακας σκηνής
Τρισδιάστατη εκτύπωση αρχείων
Από το μενού “Αρχείο/3D-εκτύπωση” , υπάρχουν οι ακόλουθες επιλογές για την εξαγωγή του γλυπτού σας:
Export για τρισδιάστατη εκτύπωση:
Προετοιμασία για δημοσίευση: Export το αντικείμενο και αποδώστε το από διαφορετικές προβολές για καλύτερη παρουσίαση σε υπηρεσίες όπως το Thingiverse.