 Svenska
  English
 Українська
 Español
 Deutsch
 Français
 日本語
日本語 Русский
 한국어
한국어 Polski
 中文 (中国)
 Português
 Italiano
 Suomi
Suomi 中文 (台灣)
 Dansk
Dansk Slovenčina
 Türkçe
 Nederlands
 Magyar
 ไทย
ไทย हिन्दी
 Ελληνικά
 Tiếng Việt
 Lietuviškai
 Latviešu valoda
 Eesti
Eesti Čeština
 Română
 Norsk Bokmål
Export
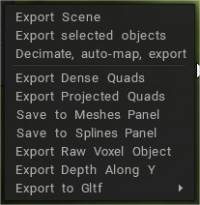
Från menyn “Arkiv/ Export” finns följande alternativ för att exportera din skulptur:
Export scen: Exporterar alla Voxel lager som ett triangulärt nät i följande tillgängliga format – .obj, .lwo, .fbx, .stl och .ply
Export valt objekt : Exporterar det aktuella Sculpt-skiktet som ett triangulärt nät i följande tillgängliga format .obj, .lwo, .fbx, .stl och .ply.
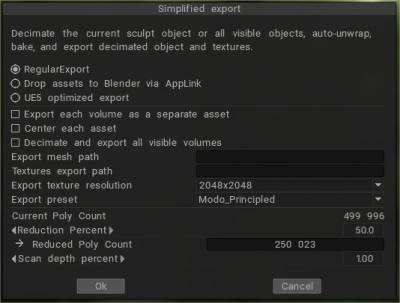
Decimera, automap- export: Skulpteringsobjekt kan exporteras som låg poly + textur med hjälp av det speciella skriptet som automatiserar detta jobb: decimerar, bakar och exporterar objektet + texturer. Arkiv→ Export →Decimera, kartlägga automatiskt, export.
Automatisk export förbättrades väsentligt:
– (1) möjlighet att export tillgångar direkt till Blender med PBR.
– (2) centrera tillgångar vid behov.
– (3) export flera tillgångar.
– (4) valfri möjlighet att export varje tillgång till dess mapp.
– (5) bättre kompatibilitet med UE5 (men fortfarande inte perfekt eftersom FBX inte stöder fullständig PBR).
– (6) möjlighet att ställa in anpassat skanningsdjup. Som ett resultat blir automatisk export ett bra och bekvämt verktyg för att skapa tillgångar.
Export Dense Quads: Exporterar ett tätt, fyrkantigt nät som kanske inte alltid är mångsidigt.
Export projekterade fyrhjulingar: Exporterar ett optimerat fyrkantigt nät med hjälp av projektion.
Save to Meshes Panel: Om du vill behålla din Voxel -modell i “Models”-panelen – för framtida och upprepad användning, sparar det här alternativet den med en ikonisk representation av objektet. Du kan export det aktuella objektet som en förinställning i panelen Meshes.
Spara till Splines-panelen: Export det aktuella objektet som en profil för Spline-panelen.
Export Raw Voxel Object: Export det aktuella Voxel-baserade Sculpt Object som en datamatris. Exporterar rå voxeldata i form av en tabell som beskriver objektet i 3 dimensioner som anger dess volym.
Export längs Y: Export renderat längs Y-axeln. Det är användbart för att producera alfa- och kakelstrukturer.
För att skapa höjdkartor kan du skulptera grundformen för din terräng och sedan helt enkelt export en höjdkarta.
Export till Gltf: Du kan export med två alternativ:
- Gltf Separat (.gltf + .bin + texturer): export till separata filer.
- Gltf Embedded (.gltf): använd det här alternativet med inbäddade texturer.
Olika funktioner för export finns i denna meny.
Export längs Y-steg (Tack Sprayer)
-i sculpt, rumsrotera modellen för att se ovanpå
-gå till rendera rummet, välj djuppass
-slå på dimman och justera lite för att se den i utsiktsplatsen
-gå tillbaka till skulpteringsrummet, fil→ export → export djup längs Y, välj .tiff- eller .exr-format, se till att markera kryssrutan
– .tiff kommer att vara i 16bit, .exr i 32bit
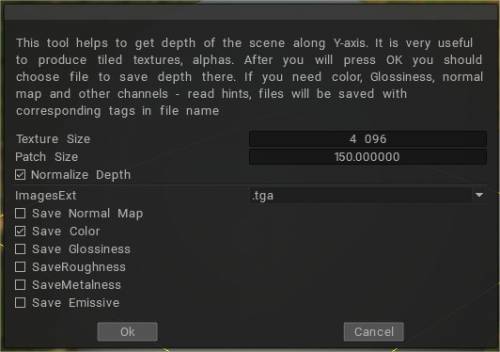
Baka din Brush med 3D Coat Y Export av Anton Tenitsky
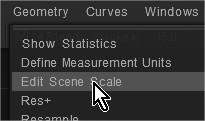
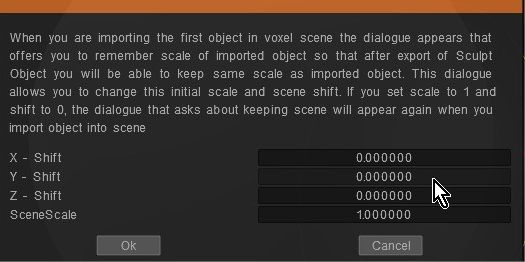
Hur man hanterar när modellen som exporteras från 3DCoat avviker från ursprunget i Blender etc:
Kontrollera om koordinatförskjutningsvärdet har angetts genom att redigera scenskalan
Fil 3D-utskrift
Från menyn “Arkiv/3D-utskrift” finns följande alternativ för att exportera din skulptur:
Export för 3D-utskrift:
Förbered att publicera: Export objektet och rendera det från olika vyer för en bättre presentation i tjänster som Thingiverse.