 Suomi
Suomi  English
 Українська
 Español
 Deutsch
 Français
 日本語
日本語 Русский
 한국어
한국어 Polski
 中文 (中国)
 Português
 Italiano
 Svenska
 中文 (台灣)
 Dansk
Dansk Slovenčina
 Türkçe
 Nederlands
 Magyar
 ไทย
ไทย हिन्दी
 Ελληνικά
 Tiếng Việt
 Lietuviškai
 Latviešu valoda
 Eesti
Eesti Čeština
 Română
 Norsk Bokmål
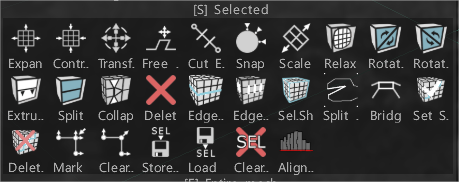
Laajenna: Laajenna valittujen elementtien aluetta. Käytä numeronäppäimistön “+”-näppäintä laajentaaksesi tai “-“-näppäintä supistaaksesi.
Sopimus: Supista valittujen elementtien alue. Käytä numeronäppäimistön “+”-näppäintä laajentaaksesi tai “-“-näppäintä supistaaksesi.
Muunna: Muunna valitut pinnat/pisteet. Jos mitään ei valita, koko verkko muutetaan.
Free Extrude: Purista mihin tahansa suuntaan. Huomioi, että uusia kärkipisteitä ei napsauta automaattisesti, vaan ne napsahtavat myöhemmissä toiminnoissa, jos et poista automaattista snap-toimintoa käytöstä.
Leikkaa reunat: Leikkaa reunat yhtä suureksi osaksi. Käyttäjä määrittää ennalta segmenttien lukumäärän valitussa reunassa.
Kiinnitä: Kiinnitä retopo verkkopisteet pintaan. Se auttaa, jos olet muuttanut kohteen tilaa kohtauksessa ja haluat napsauttaa retopo -verkon uudelleen. Jos olet “Valitse”-työkalussa vertex-tilassa, se vaikuttaa vain valittuihin huippuihin.
Asteikko: Skaalaa valittu tai koko verkko. Jokainen yhdistävä klusteri muunnetaan erikseen.
Rentoudu: Rentouta koko retopo tai osajoukko. Jos olet “Valitse”-työkalussa vertex-tilassa, se vaikuttaa vain valittuihin huippuihin.
Kierrä CW: Kierrä valitut reunat myötäpäivään.
Kierrä CCW: Kierrä valitut reunat vastapäivään.
Purista: Purista valitut reunat.
Halkaisu: Valitse useita reunoja ja napsauta sitten Jaa. Siirrä hiiren osoitinta reunojen yli määrittääksesi jaon sijainti, ja napsauta sitten jakaaksesi. Voit käyttää INSERT-näppäintä käynnistääksesi tämän työkalun ja jakaaksesi valitut reunat.
Kutista: Käytä BKSP:tä kutistaaksesi valitut reunat.
Poista: Käytä DELETE-näppäintä poistaaksesi valitut reunat.
Reunasilmukka: Valitse reunasilmukka painamalla L. Valitse kaksi reunaa yhdestä reunasilmukasta tehosteen rajoittamiseksi.
Reunarengas: Valitse reunarengas painamalla R. Valitse kaksi reunaa yhdestä reunarenkaasta tehosteen rajoittamiseksi.
SelSharp: Valitse terävät reunat.
Split Edge: Halkaise valitut reunat.
Silta: Valitsemalla kaksi reunaa voit luoda kasvot.
Aseta saumat: Merkitse valitut reunat saumoiksi ( UV esikatseluikkunassa).
Poista UV saumat: Poista saumat valittujen reunojen yli ( UV esikatseluikkunassa).
Merkitse teräväksi: Merkitse valitut reunat teräviksi. Normaalit jaetaan näitä reunoja pitkin.
Clear Sharp: selkeät terävät reunat. Normaalia ei jaeta.
Myymälävalikoima: Myymälävalikoima.
Kuorman valinta: Kuorman valinta.
Tyhjennä valinta: Tyhjennä nykyinen valinta.
Tasaa pisteet: Tasaa kärkipisteet tasoittain. Näet kärkien liikesuunnan. Jos valitaan Kasvot, kohdistus voi tapahtua ympyrän tai pallon mukaan.