• Türkçe
  • 3DCoat Belgeleri
  • Chapters
    • 3DCoat Giriş
    • Başlarken
    • Arayüz ve Navigasyon
    • Brush Bileşenleri
    • Çalışma Alanları Odalar
    • Scripting ve Core API
    • Sorular
    • licensing
    • Eğitim Öğreticileri
  • Pilgway
  • Products
    • 3DCoat
    • 3DCoatTextura
    • 3DCoatPrint
    • PBRLibrary
  • Blog Posts
  • Store
  • Türkçe Türkçe
    • English English
    • Українська Українська
    • Español Español
    • Deutsch Deutsch
    • Français Français
    • 日本語 日本語
    • Русский Русский
    • 한국어 한국어
    • Polski Polski
    • 中文 (中国) 中文 (中国)
    • Português Português
    • Italiano Italiano
    • Suomi Suomi
    • Svenska Svenska
    • 中文 (台灣) 中文 (台灣)
    • Dansk Dansk
    • Slovenčina Slovenčina
    • Nederlands Nederlands
    • Magyar Magyar
    • ไทย ไทย
    • हिन्दी हिन्दी
    • Ελληνικά Ελληνικά
    • Tiếng Việt Tiếng Việt
    • Lietuviškai Lietuviškai
    • Latviešu valoda Latviešu valoda
    • Eesti Eesti
    • Čeština Čeština
    • Română Română
    • Norsk Bokmål Norsk Bokmål
  • Creating 3D Character Using 3DCoat
Expand All Collapse All
  • 3DCoat Giriş
  • Başlarken
    • System requirements
    • Why 3DCoat is Unique?
    • 3DCoat Etkinleştirme
    • Başlatma hatası
      • Startup error Mac
    • Color management
    • Upgrading permanent license
    • Linux Setup
      • Linux initial setup per-user installation
      • Linux initial setup for system
      • Tablet setup
      • To GTK3 from GTK2
    • Klasör Yapısı
      • Custom documents folder
    • “Çözüm”ün Farklı Biçimleri
    • Tablet on Window
    • Import ve Export
    • 3DCoat Applinks
      • Blender uygulama bağlantısı
        • Blender with the Applink in Linux
      • Blender 4.2/3/4/5 applink
      • Max Applink
      • Houdini applink
      • Lightwave uplink
  • Navigation
    • Açılış İletişim Kutusu (Hızlı Başlat Menüsü)
    • Gezinme Paneli
    • Kamera ve Navigasyon
      • Customize Navigation as Blender
    • Viewport Navigation Gizmo
    • Left tool panel
    •  Activity Bar
    • 3DConnexion cihazlarını kullanarak gezinme
      • How to compile Spacenavd on non Ubuntu distro
    • Stylus doesn’t work in sculpting
    • kısayol tuşları
  • Arayüz ve Navigasyon
    • Dosya menüsü
    • Düzenle Menüsü
      • Calculate Curvature
      • Calculate Occlusion
      • Light Baking Tool
      • Tercihler
    • Menüyü Görüntüle
    • Simetri
    • Textures
    • Calculate
    • Katmanlar Menüsü
    • Menüyü Dondur
    • Hide
    • Bake
    • Eğriler 2022
      • Eğriler Menüsü
      • Curves Properties RMB
      • Kafes katmanı ile doldurun
      • Scale of imported curves
    • Windows Menüsü
      • Sekmeli Windows Açılır Panelleri
      • Kaydırıcılar
    • Scripts
    • Addons
    • Capture
    • Yardım menüsü
    • özelleştirme
    • Yeni Odayı Değiştirin veya Oluşturun
  • Brush Bileşenleri
    • Brush Üst Çubuğu
    • Fırçalar genel kullanım
      • Fırçalar ve çıkartmalar oluşturun
      • Mevcut heykelden alfa yapma
      • 3B Nesneden Brush Oluşturma
      • Create brushes based on Curves
      • Load photoshop .abr brushes
    • Vuruşlar
      • Eğriler Açılır Menüsü
    • Brush seçenekleri
    • Koşullar Sınırlayıcı
    • Şerit Paneli
    • Şablonlar Paneli
    • Akıllı Malzemeler
      • Yeni görseller veya materyaller ekleyin
      • Akıllı malzemeyi katmana ekleme
      • Import Quixel Material
    • Brush için Hazır Ayarlar nasıl oluşturulur?
  • Çalışma Alanları Odalar
    • Painting
      • Doku Painting ve Modlar
        • Per-Pixel Painting
        • Yer Değiştirme Painting (Mikro-Köşe)
        • Ptex Painting
        • Yüzey Painting (Polypainting)
      • Painting Odasına Aktarma
        • Initial CC subdivision
        • UV Set smoothing
        • Sharp (hard) edge
        • Normalleri Kilitle
        • Model Değişikliklerinden Sonra Yeni UV Düzenini Yükle
        • DAZ Genesis models into 3DCoat
        • ID map
      • Painting Çalışma Alanı Menüleri
        • Edit menu
        • Dokular Menüsü
          • Doku Baking Araçları
        • Saklamak
        • Bake Paint Menüsü
        • Renk Seçici
      • Painting için Üst Çubuk
      • Katmanlar Paneli
        • Karıştırma Paneli
        • Layer and Clipping Masks
      • Painting Odası Araçları
      • Opaklık - Şeffaflık
      • Çalışma alanını ince ayarla
        • İnce Ayar Araç Seti
        • İnce Ayar Odasından Dışa Aktarma
      • Maske/Malzeme Önizleme Paneli
      • Painting Odasından Dışa Aktarma
    • UV Çalışma Alanı
      • UV Üst Çubuk
      • UV Sol araç paneli
      • UV Önizleme Paneli
      • UV iş akışı örneği
      • UV Odasına Aktarma
      • UV Odasından Dışarı Aktarma
    • retopoloji
      • Retopo Odasına Aktarma
      • Retopo Mesh Menüsü ve Fırında Pişirme Menüsü
        • Sanal Ayna Modu
      • Bake menu
        • Treat Poly Groups as Paint Objects
        • Baking guide
      • Üst Çubuk
        • Geometri seçin
      • Retopology odasında sol araç paneli
        • Genel Amaç ve İşlev
        • Geometri Ekle
          • Retopology'deki Vuruşlar aracı
        • Retopo İnce Ayar Araçları
        • UV Araçları
        • Retopoloji odası için komutlar
      • OTORETOPO
        • Autopo guide
      • Çoklu Gruplar
    • Şekil vermek
      • Sculpt Layer
      • Heykel Ağacı
      • Şekillendirme Brush seçenekleri
      • Top Bar
      • Brush motoru
      • Geometri Alt Menüsü
      • “Sağ Tıklama” Menüsünü Şekillendirme
      • gölgelendiriciler
      • Voxel modu
        • Saf Voxel Şekillendirme
        • Yoğunluk ve Çözünürlük
        • Kil Motoru
        • Voxel Araçları
        • Voksellerde yüzey araçları
        • Voxel Ayarlama Araçları
        • Hacimsel Painting
        • Voxel Nesneleri Araçları
      • Yüzey modu
        • Yüzey araçları
        • Yüzey özel araçları
        • Yüzey ayarlama araçları
        • Yüzey Painting
        • Yüzey Nesneleri Araçları
        • Çok Seviyeli Çözünürlük
          • Multires tools
          • Multires adjust
          • Multires commands
      • Eğrileri şekillendirin
        • Spline Eğrileri
        • Splines model creation
      • Vektör Yer Değiştirme
      • Yüzey dönüştürme araçları
        • Voxel Dönüştürme Araçları
        • Instancer
        • Move
        • Pose
        • Fit
        • Reproject
        • Surface Array
      • Voxel Primitifleri ve Import Araçları
      • Canlı Boole'lar
      • Şekillendirme odası için komutlar
      • Heykel Odasına Import
      • Heykel Odasından Dışarı Aktarma
    • render
      • Comparison of different roughness values
      • İşleme Paneli İşlevleri
      • pikap
      • Aydınlatmayı sahte olarak pişirin PBR olmayan -
    • Factures
      • iş akışı
    • en basit
    • modelleme
      • Mesh Menu
      • Modelleme odasında sol araç paneli
        • Geometri Ekle
          • Seçildi
        • Çimdik
        • Smart Hybrid
        • UV
          • Komutlar
        • Tüm Mesh
      • Fluffy'den loft yüzey örneği
      • Poeboi tarafından blokaj
      • Import Zbrush Polygroups for UV mapping
    • Kitbash - Hızlı 3D Model Oluşturma
      • Create kitbash
      • Left tool panel Kitbash
    • 3DPrint
    • Photogrammetry
      • How to install Reality Capture
      • Reality Capture doesn’t show up ?
    • NURBS odasına ağ bağlantısı
    • Nodes
      • Şekillendirici gölgelendiriciler Düğüm Kitaplığı
  • Scripting ve Core API
    • Scripting
    • Core API
    • Python API'si
  • Ücretsiz 3DCoatPrint

Sharp (hard) edge

1329 views 0

Written by Carlos
November 17, 2023

In order to successfully perform a normal bake as intended, there seems to be a trick to the UV development method and smoothing settings.

3DCoat preserves import/export of smoothing groups via normals.
Normals signal that some edge is sharp or smooth.

Smoothing groups are supported via OBJ format. But you need to export normals also from your 3D-model app.

Set sharp edges: Whit this option you can set sharp edges (split normals) over UV seams.

3DCoat uses normals in OBJ file to recover smoothing groups.

It is better to avoid sharp angles between faces (like in example, retopo mesh between A and B), even angle a little less 90 degrees are not recommended, it will lead to problems if you are using 3DCoat’s method for calculating normals (Edit ->Preferences -> Normals calculation).

Maya normals calculation method will work correctly in this case, so if you need sharp angles, use Maya normals calculation in Preferences.

This is related to method of calculation. 3DCoat calculates normals as  weighted average of neighbor faces, weight is proportional to face square. It allows to display bevel between faces correctly.

But if there is sharp angle between big and small faces then vertex normal will be negative to small face normal and baking on that face will fail.
Maya’s method calculates vertex normal as arithmetical average of neighbor faces normals. It is more appropriate for baking, but not good to display meshes without normal map.

Generally we recommend to add bevel between sharp edges.

What does the “angle” in the automatic smoothing setting mean?


Each software has a setting item for automatically applying smoothness. Smoothing is applied to angles that are less than the specified value. So, if you want to avoid applying smoothness to a 90° corner, you will need to set a value smaller than 90°, such as “89°”, or if you want it to be more precise, you should set it to “89.9°”.

There are two main points necessary for normal baking.


Separate UVs with hard edges in UV expansion

On the low-poly side, decide “edges you want to have sharp edges” (hard edges) and “edges you want smoothed” (soft edges).

Avoid smoothing hard edges when baking

Set the value of “Setting items for automatic smoothing” of each software to “89.5°” etc. so that smoothing will not be applied to edges where the angle is 90° or more.

3DCoat can highlight hard edges during UV development

3DCoat has a function that helps you add seams to hard edges during UV development. *In 3DCOAT, “hard edge” is treated as “sharp edge” .

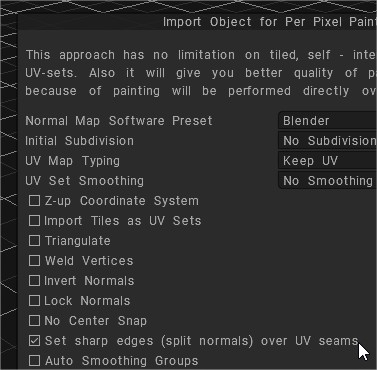
Settings required when importing a model for UV unfolding


In order to highlight hard edges in the “UV” room, you need to pay attention to the following settings when importing the model:

Set sharp edges (normal division) on UV seams: If checked, all “edges with seams” will be set to “also be highlighted as sharp edges” and imported. (This is added when importing a model that has already been UV-developed or to the UV-developed results using “auto mapping “, but I can’t think of a use for it at the moment.)
Auto smoothing group/max angle: The edges highlighted by “Show sharp edges” introduced below are set based on this value. A good value would be “89.5”.
Show Sharp edges: When checked, parts corresponding to sharp edges will be highlighted in red in the viewport. 
SharpSeams: When you use this tool, edges with angles greater than the value specified in “Fold Angle” will be judged as sharp edges, and if you press “OK”, a seam will be added automatically.

Tags:sharp eedge

Was this helpful?

Yes  1 No
Related Articles
  • Factures
  • ID map
  • Surface Array
  • Top Bar
  • Curves Properties RMB
  • Left tool panel Kitbash
Previously
UV Set smoothing
Up Next
Normalleri Kilitle
AI:
Hi! How can I help you?
Attention: This is a beta version of AI chat. Some answers may be wrong. See full version of AI chat