 Eesti
Eesti  English
 Українська
 Español
 Deutsch
 Français
 日本語
日本語 Русский
 한국어
한국어 Polski
 中文 (中国)
 Português
 Italiano
 Suomi
Suomi Svenska
 中文 (台灣)
 Dansk
Dansk Slovenčina
 Türkçe
 Nederlands
 Magyar
 ไทย
ไทย हिन्दी
 Ελληνικά
 Tiếng Việt
 Lietuviškai
 Latviešu valoda
 Čeština
 Română
 Norsk Bokmål
Spline kõverad
See võimaldab teil asetada splainipunkte otse stseenile või rakendada pintslit piki kõverat .
Tekst
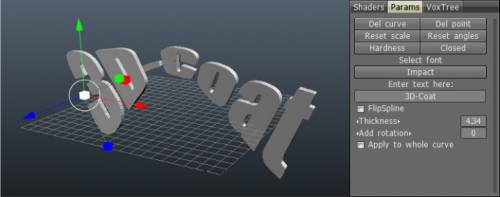
Tekst: see võimaldab paigutada teksti mööda splainkõverat ja luua teksti voksli kujul. Selle parameetrid on identsed Curves tööriistaga, nii et peaksite sellega juba tutvuma pärast ülaltoodud jaotise lugemist. Sellel on mõned ainulaadsed omadused:
Saate valida oma tekstile fondi, loomulikult võite sisestada teksti, mida soovite mahuliseks muuta, ja saate reguleerida selle mahulise teksti paksust.
Vox Layer
Looge praeguse helitugevuse külmutatud ala ümber õhuke kiht. Värvige ala märkimiseks sügavkülmaga ja seejärel vajutage nuppu Rakenda.
Mantel
See tööriist võimaldab kihile katte lisamist mittepurustavalt. See sarnaneb VoxLayeriga, kuid saate ala määratleda kõverate abil ja hiljem nurgapunkte muuta.
Toru/massiiv
Toru kõveral.
Painde helitugevus
Painutage objekt ümber kõvera.
Pühkige mööda juhendit
Pühkitud pind genereeritakse profiili liigutamisega mööda valitud kõvera juhikut. Pärast tööriista suvandite dialoogi ilmumist peate valima profiilikõvera. VoxTree uus üksus luuakse ja võrk paigutatakse sinna. Valige VoxTree’is vastav objekt, et saaksite muuta selliseid parameetreid nagu paksus, nurk, pöördenurk jne. Kõvera täitmise lõpetamiseks kustutage vastav VoxTree element.
Revolutsiooni pind
Valitud profiili pööre ümber valitud kõvera telje genereerib pööramispinna. Pärast “Tööriista valikute dialoogi” ilmumist peate valima kõvera telje. VoxTree uus üksus luuakse ja võrk paigutatakse sinna. Valige VoxTree’is vastav objekt, et saaksite muuta selliseid parameetreid nagu paksus, nurk, keerdnurk jne. Kõvera täitmise lõpetamiseks kustutage vastav VoxTree element.
Polüheder
Polyhedron genereeritakse pöörde ja valitud profiili liigutamise teel ümber valitud kõvera telje. Pärast “Tööriista valikute dialoogi” ilmumist peate valima kõvera telje. VoxTree uus üksus luuakse ja võrk paigutatakse sinna. Valige VoxTree’is vastav objekt, et saaksite muuta selliseid parameetreid nagu paksus, tahkude kogus ja silumine. Kõvera täitmise lõpetamiseks kustutage vastav VoxTree element.
Pinna pööramine: Pööramispind genereeritakse valitud profiili pöördega ümber valitud kõvera telje. Pärast “Tööriista valikute dialoogi” ilmumist peate valima kõvera telje. VoxTree uus üksus luuakse ja võrk paigutatakse sinna. Valige VoxTree’is vastav objekt, et saaksite muuta selliseid parameetreid nagu paksus, nurk, keerdnurk jne. Kõvera täitmise lõpetamiseks kustutage vastav VoxTree element.
Swept 2 Guide
Pühkimispinnad genereeritakse liikuva profiili abil mööda kahte kõvera juhikut. Pärast “Tööriistavalikute dialoogi” ilmumist peate valima kaks kõverat: juhtkõver ja kõvera profiil. Uus üksus luuakse VoxTree’is ja võrk paigutatakse sinna. Valige VoxTree’is vastav objekt, et saaksite muuta selliseid parameetreid nagu paksus, tahkude arv ja silumine. Kõvera täitmise lõpetamiseks kustutage vastav VoxTree objekt.
Swept 2 Gener
Pühkimispind luuakse kahe profiili liigutamisel mööda valitud juhtkõverat. Pärast “Tööriistavalikute dialoogi” ilmumist peate valima teise juhiku ja kõvera profiili. VoxTree uus üksus luuakse ja võrk paigutatakse sinna. Valige VoxTree’is vastav objekt, et saaksite muuta selliseid parameetreid nagu paksus, tahkude kogus ja silumine. Kõvera täitmise lõpetamiseks kustutage vastav VoxTree element.
Pühkinud N-generaator
Pühkimispinnad genereeritakse N profiili liigutamisega mööda kahte kõverjoont. Pärast tööriista valikute dialoogi ilmumist peate valima teise juhiku ja kõvera profiilid. VoxTree uus üksus luuakse ja võrk paigutatakse sinna. Valige VoxTree’is vastav objekt, et saaksite muuta selliseid parameetreid nagu paksus, tahkude kogus ja silumine. Kõvera täitmise lõpetamiseks kustutage vastav VoxTree element.