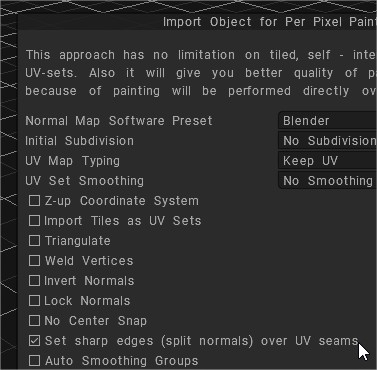
In order to successfully perform a normal bake as intended, there seems to be a trick to the UV development method and smoothing settings.
3DCoat preserves import/export of smoothing groups via normals.
Normals signal that some edge is sharp or smooth.
Smoothing groups are supported via OBJ format. But you need to export normals also from your 3D-model app.

Set sharp edges: Whit this option you can set sharp edges (split normals) over UV seams.
3DCoat uses normals in OBJ file to recover smoothing groups.
It is better to avoid sharp angles between faces (like in example, retopo mesh between A and B), even angle a little less 90 degrees are not recommended, it will lead to problems if you are using 3DCoat’s method for calculating normals (Edit ->Preferences -> Normals calculation).
Maya normals calculation method will work correctly in this case, so if you need sharp angles, use Maya normals calculation in Preferences.
This is related to method of calculation. 3DCoat calculates normals as weighted average of neighbor faces, weight is proportional to face square. It allows to display bevel between faces correctly.
But if there is sharp angle between big and small faces then vertex normal will be negative to small face normal and baking on that face will fail.
Maya’s method calculates vertex normal as arithmetical average of neighbor faces normals. It is more appropriate for baking, but not good to display meshes without normal map.
Generally we recommend to add bevel between sharp edges.
What does the “angle” in the automatic smoothing setting mean?
Each software has a setting item for automatically applying smoothness. Smoothing is applied to angles that are less than the specified value. So, if you want to avoid applying smoothness to a 90° corner, you will need to set a value smaller than 90°, such as “89°”, or if you want it to be more precise, you should set it to “89.9°”.
There are two main points necessary for normal baking.
Separate UVs with hard edges in UV expansion
On the low-poly side, decide “edges you want to have sharp edges” (hard edges) and “edges you want smoothed” (soft edges).
Avoid smoothing hard edges when baking
Set the value of “Setting items for automatic smoothing” of each software to “89.5°” etc. so that smoothing will not be applied to edges where the angle is 90° or more.
3DCoat can highlight hard edges during UV development
3DCoat has a function that helps you add seams to hard edges during UV development. *In 3DCOAT, “hard edge” is treated as “sharp edge” .
Settings required when importing a model for UV unfolding
In order to highlight hard edges in the “UV” room, you need to pay attention to the following settings when importing the model:
Set sharp edges (normal division) on UV seams: If checked, all “edges with seams” will be set to “also be highlighted as sharp edges” and imported. (This is added when importing a model that has already been UV-developed or to the UV-developed results using “auto mapping “, but I can’t think of a use for it at the moment.)
Auto smoothing group/max angle: The edges highlighted by “Show sharp edges” introduced below are set based on this value. A good value would be “89.5”.
Show Sharp edges: When checked, parts corresponding to sharp edges will be highlighted in red in the viewport.
SharpSeams: When you use this tool, edges with angles greater than the value specified in “Fold Angle” will be judged as sharp edges, and if you press “OK”, a seam will be added automatically.
 Latviešu valoda
  English
 Українська
 Español
 Deutsch
 Français
 日本語
日本語 Русский
 한국어
한국어 Polski
 中文 (中国)
 Português
 Italiano
 Suomi
Suomi Svenska
 中文 (台灣)
 Dansk
Dansk Slovenčina
 Türkçe
 Nederlands
 Magyar
 ไทย
ไทย हिन्दी
 Ελληνικά
 Tiếng Việt
 Lietuviškai
 Eesti
Eesti Čeština
 Română
 Norsk Bokmål