 Türkçe
  English
 Українська
 Español
 Deutsch
 Français
 日本語
日本語 Русский
 한국어
한국어 Polski
 中文 (中国)
 Português
 Italiano
 Suomi
Suomi Svenska
 中文 (台灣)
 Dansk
Dansk Slovenčina
 Nederlands
 Magyar
 ไทย
ไทย हिन्दी
 Ελληνικά
 Tiếng Việt
 Lietuviškai
 Latviešu valoda
 Eesti
Eesti Čeština
 Română
 Norsk Bokmål
Texture Export/Import Workflow:
Gloss/Color Specular: In this approach you may export gloss + colored specular textures. Color textures will be darkened in areas where metalness is not zero and corresponding color will be compensated in colored specular channels
Gloss/Metalness: In this approach you will be able to export gloss + metalness. Color texture will remain unbiased.
Roughness/Metalness: In this approach you will be able to export roughness + metalness. Color texture will remain unbiased.
Import
Color/albedo Map: Import Load color/albedo map on the current layer without changing the layer opacity.
Layers color: Import the color channels from a PSD file to all layers.
External AO:
External Curvature:
Roughness:
Metalness map:
Emissive: Load emissive texture. Texture will be loaded to the new layer and get emissive blending mode.
Emissive Intensity: Import emissive intensity as monochrome channel.
The formula Emissive=max(Red,Green,Blue)*Alpha. In so way you may import greyscale texture or white texture with alpha channel to highlight existing color.
Normal Map:
World Space Normal Map:
Displacement Map:
Import Depth Layer:
Import Layer with Depth, Color & Glossiness:
Export
Color/Albedo Maps: Save color/albedo and opacity map to a new file.
All layers Colors: Export the color channel from all layers to a PSD file.
Roughness:
Metalness Map:
Store gloss/roughness in metal alpha: Store glossiness or roughness in alpha channel of metalness texture (in dependence on approach).
Normal Map (World-Space): Save a world-space normal map as a new file.
Normal Map (TS, Low-Poly Mesh): Save a tangent-space normal map for the low-poly mesh.
Normal Map (TS, Layer0 Based): This option is especially important if you imported a model without smoothing. With this option you can export a normal map without artifacts at the edges because tangent space is based on layer 0; not vertex based as in other options. Possible workflow: open a mesh without smoothing, then import a normal map. Add details on another layer (not Layer0 or normal map layer), then export the new normal map using this command.
Normal Map (TS, Mid-poly Mesh): Save a tangent-space normal map for the mid-poly mesh (after subdivision) to a file.
Displacement Map current layer: Save the depth in the current layer to a texture image, edit it in the external graphics editor and load it again. This texture image can also be used as a displacement map.
Displacement Map of visible layers: Save the depth of visible layers to a texture image, edit it in the external graphics editor and load it again. This texture can also be used as a displacement map.
- When you choose Import/Export displacement a context window will appear.
In the drop-down list there are four items for map type: - Zero Level is Grey, Normalized: Zero level is grey (0.5,0.5,0.5) and all channels are ranged from 0 to 1.
- Zero Level is Black, Not Normalized: Every channel contains 32-bit values of displacement. This is the best method for transferring objects between applications. This option provides ideal Mudbox compatibility.
- Zero Level is Black, Normalized: Zero level is black and all values are ranged from -1 to 1.
- Grey – Based, Not Normalized: Zero level is grey (0.5,0.5,0.5) and channels are unchanged.
Export Depth Layer: Export depth layers to an EXR file. Every layer in the scene will correspond to a layer in the EXR file.
Vector Displacement Map: Save vector displacement as RGB, in 16 or 32 bit tiff/exr format. This is the best method for compatibility between 3DC, Mudbox and Modo.
Export Layers w/ Depth, Color & Glossiness: Use this command to transfer blending, color, depth, Glossiness information from one mesh to other with similar UV-set. This command will save 4 files – XML for blending, PSD for color, PSD for Glossiness, EXR for depth. Use File->Import layers with depth, color and Glossiness information to import the data to another model.
Use Original UV: This option is important for models with overlapped UV clusters; for example with mirrored UV’s. In this case you should load the model with the ‘Keep Clusters’ option. (See ‘Open OBJ’) UV-coordinates will be modified so that texture clusters will not overlap each other. If the ‘Use original UV set’ option is checked, then models and textures will be exported with the original UV set. Otherwise the new UV set is exported.
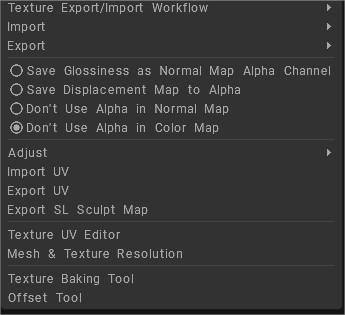
Save Glossiness as Normal Map Alpha Channel: Save the Glossiness channel as an alpha channel in a normal map.
Save Displacement Map to Alpha: Saves the displacement to the alpha channel of the normal map.
Don’t Use Alpha in Normal Map: Normal map will be stored as RGB image.
Don’t Use Alpha in Color Map: Store all textures – normal map and color/albedo as RGB images without alpha.
Adjustments
There are many Layer adjustments commands, such as:
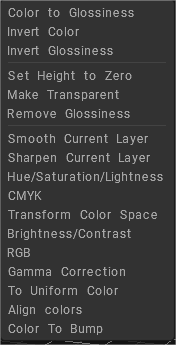
Color to Glossiness: Transform color brightness to the Glossiness channel.
Invert Color: Invert color of this layer.
Invert Glossiness: Invert the Glossiness of this layer.
Set Height to Zero: Set height to zero in all layers.
Make Transparent: The layer will become fully transparent.
Remove Glossiness: The Glossiness channel will be set to zero.
Smooth Current Layer: Smooth the entire current layer.
Sharpen Current Layer: Sharpen the entire current layer.
Hue/Saturation/Lightness: Correct hue, saturation, and lightness for the entire currently selected layer.
CMYK: Modify the CMYK channels.
Transform Color Space: Free transformation in color space. The final color is composed of three colors, and each new color will replace the red, green and blue channels.
Brightness/Contrast: Adjust the brightness and contrast in the current layer.
RGB: Modify the RGB values of the current layer.
Gamma Correction: Perform gamma correction for this layer.
To Uniform Color: Converts the layer texture to uniform, you can use Overlay or Modulate2x to blend the layer with the color of the layers below, and combine multiple textures.
Align colors: The tool adjusts the texture’s color to the color of the layer under the current layer, leaving details of the specified radius.
Color To Bump: Converts the layer texture to Bump, leaving the details at the specified size.
All of them can be viewed with realtime preview and they can be applied not only to the current Layer but also to all the Layers.
Import UV: Imports an object that contains a UV-set. The new UV-set will replace old one.
Export UV: Exports an object without textures. This command could be used in pair with Import UV. You can export a UV-set, adjust it externally and then import it again.
Export SL Sculpt Map: Export a “Second Life”sculpt map.
Texture UV Editor
Open a panel to view or edit textures, and tweak UV-sets.
View and edit textures in the right window. Select different view modes and different UV-sets in the corresponding drop-lists.
Almost all tools and rules that apply to 3D will work in 2D with the exception of sculpting. Navigation in the texture window is similar to the 3D window
With the 2D texture editor open, you can paint in 2D and 3D windows simultaneously.
You can paint in 3D and the results will be shown in the 2D window simultaneously and vice versa.
Pixel-based size: Determine the radius of the brush over the UV window:
1) If this option is enabled, the brush size is defined as the pixel count with the slider in this window.
2) Otherwise, the usual brush radius in 3D space will be used to paint (as it was before).

From the drop down menu, you can choose to paint separately on “Color, Normals, Roughness and Metalness” channels, or your can paint on the “Shaded” version of your UV unwrapped texture.
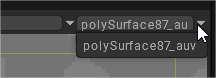
You must select a UV-set in the dropdown list at the top left of the 2D Texture editor window to paint in it.
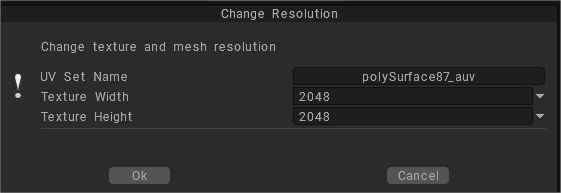
Mesh & Texture Resolution
Use this command to change Mesh & Texture Resolution
Texture Baking Tool
This tool allows you to get projections of color, Glossiness, normal, and displacement maps on meshes with completely different topology. The mesh to project the texture on can have several surface materials, which will result in several exported textures.

Offset tool: You should load only square images with this tool. Offset can only be applied after “Import image plane.
It comes in handy to create tiled textures with bump and specular.
Once a square object is loaded, you will be offered the “Offset tool” window where offset values can be specified: U offset, V offset and texture shifting horizontally and vertically in accordance.
Paint w/Deep Displacement

UV Manager: Open a list containing all the UV-sets associated with the current object. If there are several objects in the scene, separate objects can have a separate UV. Use this command to manage them.
You can group several materials into a single UV-set.
