• Tiếng Việt
  • Tài liệu 3DCoat
  • Chapters
    • Giới thiệu về 3DCoat
    • Bắt đầu
    • Giao diện & Điều hướng
    • Thành phần Brush
    • Phòng làm việc
    • Scripting & Core API
    • Hỏi & Đáp
    • licensing
    • Hướng dẫn đào tạo
  • Pilgway
  • Products
    • 3DCoat
    • 3DCoatTextura
    • 3DCoatPrint
    • PBRLibrary
  • Blog Posts
  • Store
  • Tiếng Việt Tiếng Việt
    • English English
    • Українська Українська
    • Español Español
    • Deutsch Deutsch
    • Français Français
    • 日本語 日本語
    • Русский Русский
    • 한국어 한국어
    • Polski Polski
    • 中文 (中国) 中文 (中国)
    • Português Português
    • Italiano Italiano
    • Suomi Suomi
    • Svenska Svenska
    • 中文 (台灣) 中文 (台灣)
    • Dansk Dansk
    • Slovenčina Slovenčina
    • Türkçe Türkçe
    • Nederlands Nederlands
    • Magyar Magyar
    • ไทย ไทย
    • हिन्दी हिन्दी
    • Ελληνικά Ελληνικά
    • Lietuviškai Lietuviškai
    • Latviešu valoda Latviešu valoda
    • Eesti Eesti
    • Čeština Čeština
    • Română Română
    • Norsk Bokmål Norsk Bokmål
  • Creating 3D Character Using 3DCoat
Expand All Collapse All
  • Giới thiệu về 3DCoat
  • Bắt đầu
    • System requirements
    • Why 3DCoat is Unique?
    • Kích hoạt 3DCoat
    • lỗi khởi động
      • Startup error Mac
    • Color management
    • Upgrading permanent license
    • Linux Setup
      • Linux initial setup per-user installation
      • Linux initial setup for system
      • Tablet setup
      • To GTK3 from GTK2
    • Cấu trúc thư mục
      • Custom documents folder
    • Các hình thức “Nghị quyết” khác nhau
    • Tablet on Window
    • Import Export
    • Applinks trong 3DCoat
      • Liên kết ứng dụng Blender
        • Blender with the Applink in Linux
      • Blender 4.2/3/4/5 applink
      • Max Applink
      • Houdini applink
      • Lightwave uplink
  • Navigation
    • Hộp thoại Mở (Menu Bắt đầu Nhanh)
    • Bảng điều hướng
    • Máy ảnh và Điều hướng
      • Customize Navigation as Blender
    • Viewport Navigation Gizmo
    • Left tool panel
    •  Activity Bar
    • Điều hướng bằng thiết bị 3DConnexion
      • How to compile Spacenavd on non Ubuntu distro
    • Stylus doesn’t work in sculpting
    • phím nóng
  • Giao diện & Điều hướng
    • Danh sách dữ liệu
    • Chỉnh sửa Menu
      • Calculate Curvature
      • Calculate Occlusion
      • Light Baking Tool
      • Sở thích
    • Xem thực đơn
    • Đối diện
    • Textures
    • Calculate
    • Menu lớp
    • Menu đóng băng
    • Hide
    • Bake
    • Đường cong 2022
      • thực đơn đường cong
      • Curves Properties RMB
      • Điền vào lớp lưới
      • Scale of imported curves
    • Menu cửa sổ
      • Bảng điều khiển cửa sổ bật lên được gắn thẻ
      • thanh trượt
    • Scripts
    • Addons
    • Capture
    • Danh sách trợ giúp
    • tùy biến
    • Sửa đổi hoặc tạo phòng mới
  • Thành phần Brush
    • Bàn Brush trên cùng
    • Bàn chải sử dụng chung
      • Tạo bàn chải & đề can
      • Tạo alpha từ tác phẩm điêu khắc hiện tại
      • Tạo Brush từ đối tượng 3D
      • Create brushes based on Curves
      • Load photoshop .abr brushes
    • đột quỵ
      • Menu bật lên đường cong
    • tùy chọn Brush
    • Giới hạn điều kiện
    • Bảng điều khiển dải
    • bảng giấy nến
    • Vật liệu thông minh
      • Thêm hình ảnh hoặc tài liệu mới
      • Đính kèm vật liệu thông minh vào một lớp
      • Import Quixel Material
    • Cách tạo Presets cho Brush
  • Phòng làm việc
    • Painting
      • Painting kết cấu & Chế độ
        • Per-Pixel Painting
        • Painting dịch chuyển (Micro-Vertex)
        • Painting Ptex
        • Painting bề mặt (Polypainting)
      • Nhập khẩu vào phòng Painting
        • Initial CC subdivision
        • UV Set smoothing
        • Sharp (hard) edge
        • Khóa định mức
        • Tải bố cục UV mới sau khi thay đổi mẫu
        • DAZ Genesis models into 3DCoat
      • Menu của Không gian làm việc Painting
        • Edit menu
        • Menu kết cấu
          • Công cụ Baking kết cấu
        • Trốn
        • Thực đơn cho Bake Paint
        • Bộ chọn màu
      • Thanh trên cùng cho Painting
      • Bảng điều khiển lớp
        • Bảng trộn
        • Layer and Clipping Masks
      • dụng cụ phòng Painting
      • Độ mờ - Độ trong suốt
      • Tinh chỉnh không gian làm việc
        • Bộ công cụ tinh chỉnh
        • Xuất từ Tweak Room
      • Bảng xem trước mặt nạ/vật liệu
      • Xuất khẩu từ phòng Painting
    • Không gian làm việc UV
      • Thanh trên cùng UV
      • Bảng công cụ UV Trái
      • Bảng xem trước UV
      • Ví dụ về quy trình làm việc UV
      • Nhập khẩu vào phòng UV
      • Xuất từ phòng UV
    • tái cấu trúc
      • Nhập vào phòng Retopo
      • Menu Retopo Lưới và Menu Nướng
        • Chế độ gương ảo
      • Bake menu
        • Treat Poly Groups as Paint Objects
        • Baking guide
      • thanh trên cùng
        • Chọn hình học
      • Bảng công cụ bên trái trong phòng Retopology
        • Mục đích & chức năng tổng thể
        • Thêm hình học
          • Công cụ Strokes trong Retopology
        • Công cụ tinh chỉnh Retopo
        • Công cụ UV
        • Lệnh cho phòng Retopology
      • AUTORETOPO
        • Autopo guide
      • Nhóm đa
    • điêu khắc
      • Sculpt Layer
      • cây điêu khắc
      • Tùy chọn Sculpt Brush
      • Top Bar
      • Brush
      • Menu con hình học
      • Menu Sculpt “Nhấp chuột phải”
      • Shader
      • chế độ điểm Voxel
        • Điêu khắc Voxel tinh khiết
        • Mật độ và độ phân giải
        • động cơ đất sét
        • Công cụ Voxel
        • Công cụ bề mặt trên Voxels
        • Công cụ điều chỉnh điểm Voxel
        • Painting thể tích
        • Công cụ Đối tượng Voxel
      • chế độ bề mặt
        • công cụ bề mặt
        • Công cụ tùy chỉnh bề mặt
        • Công cụ điều chỉnh bề mặt
        • Painting bề mặt
        • Công cụ đối tượng bề mặt
        • Độ phân giải đa cấp
          • Multires tools
          • Multires adjust
          • Multires commands
      • điêu khắc đường cong
        • Đường cong Spline
        • Splines model creation
      • Véc tơ dịch chuyển
      • Công cụ biến đổi bề mặt
        • Công cụ chuyển đổi Voxel
        • Instancer
        • Move
        • Pose
        • Fit
        • Reproject
        • Surface Array
      • Voxel Primitives & Công cụ Import
      • Boolean trực tiếp
      • Các lệnh cho phòng Sculpt
      • Import vào phòng điêu khắc
      • Xuất từ phòng điêu khắc
    • kết xuất
      • Comparison of different roughness values
      • Kết xuất các chức năng của bảng điều khiển
      • bàn xoay
      • Fakebake ánh sáng -non PBR-
    • Factures
      • quy trình làm việc
    • đơn giản nhất
    • người mẫu
      • Mesh Menu
      • Bảng công cụ bên trái trong phòng Modeling
        • Thêm hình học
          • Đã chọn
        • Tinh chỉnh
        • Smart Hybrid
        • UV
          • Lệnh
        • Toàn bộ lưới
      • Ví dụ bề mặt gác xép của Fluffy
      • Chặn bởi Poeboi
      • Import Zbrush Polygroups for UV mapping
    • Kitbash - Tạo mô hình 3D nhanh
      • Create kitbash
      • Left tool panel Kitbash
    • 3DPrint
    • Photogrammetry
      • How to install Reality Capture
      • Reality Capture doesn’t show up ?
    • Lưới tới phòng NURBS
    • Nodes
      • Thư viện Nodes shader Sculpt
  • Scripting & Core API
    • Scripting
    • Core API
    • API Python
  • 3DCoatPrint miễn phí

Mesh Menu

517 views 0

Written by Carlos
December 7, 2024

Of course, any good tool has more to it than meets the eye. The modeling tools are no exception.

You can find the Mesh and Bake menu in the top toolbar of the Modeling workspace.

Below are listed all of the functions in this menu.

Mesh Menu
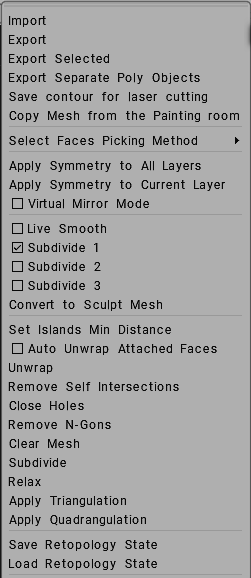

Import: Import an external mesh to continue creating topology started in another 3D modeling program.
Export: Exports a mesh to continue work in an external 3D application.
Export selected: Exports only the selected faces of yourmesh.
Export Separated Poly (Retopo) Objects: Exports each PolyGroup as a separate file. The name of each generated file will contain the group name.
Save Contour for laser cutting: Exports the connected boundary of a UV island to facilitate laser or CNC cutting.
Copy Mesh From Paint Room: Move mesh from the Paint room into the Modeling room. In this case, the objects will be colored; color will be used in baking and merging into the scene.


Select Faces Picking Method: Selects faces based on the following options:
Triangles, Quadrangles, N-Gons, and Stars, and Improve Quad Topology.


Apply symmetry to all layers: Makes all symmetrical operations permanent for all PolyGroups allowing them to be “Baked” into the Paint Room and “Unwrapped” in the UV Room.
Apply symmetry to the current layer: Makes only the selected PolyGroup permanently symmetrically for Merging and Unwrapping.
Virtual mirror mode: This option is applicable only if symmetry is enabled. In this mode, you should create topology only on one side of the symmetry. The opposite side will be shown as in the mirror without the actual creation of polygons. You need only work on one side of the mesh.

Virtual mirror should work for you, whether you have deleted half of your model or not. Even though things might not look perfectly symmetrical in the editing process, using "Apply symmetry..." from the "Retopo" menu should rectify that and produce perfectly mirrored geometry.

After you finish, you may “Apply symmetry” to make the symmetrical topology permanent. If this mode is turned off, polygons will be automatically created on both sides of the symmetry.

Sidenote: To make it always work, you have to select the layer and click the “select all faces of this layer” button. That way, the “apply symmetry” always works perfectly.

Working w/ Symmetry (Retopo/UVs): This video continues the Introduction to working with Symmetry, focusing on the Modeling Room and UVs).


Live Smooth provides the user with a subdivided, higher polygon version in these workspaces, that adapts on the fly to all changes made to the low poly mesh.
Click on live smooth and notice in the sculpt tree panel you immediately get a new subdivided version of the model.
Subdivide with CC levels 1, 2, 3: Choose the subdivision level and see the changes in the viewport.
Convert to Sculpt Mesh: Copy the 3D Polygonal Object in Polygroup and send it to the Sculpt Tree.


Set Islands Min Distance: Set Islands Min Distance.
Auto unwrap attached faces: Check this option to create UVs automatically. Auto-unwrap faces that were created nearby to the already unwrapped islands. Unwrapping will be performed each time when you switch new tool.
Unwrap: Fit all islands onto the UV map. It is the same command found in the “UV Tools” section of the Tool Panel.
Close holes: A valuable option that attempts to repair holes in imported meshes, especially dense scanned meshes.
Remove N-Gons: Remove N-Gons
Clear mesh: Clears the whole mesh from the selected PolyGroup.
Subdivide: Subdivides the whole mesh, using one iteration, from the current PolyGroup.
Catmull-Clark subdivision in retopo room. Two commands are “Subdivide selected” and “Subdivide the whole group”.
Relax: Relaxes the mesh to aid in snapping to the reference surface, for the currently selected PolyGroup.
Apply Triangulation: Triangulation of all visible mesh as an entire.
Apply Quadrangulation: Quadrangulation all visible mesh as an entire.


Save Retopology State: Store the retopology state in a separate file.
Load Retopology State: Restore the retopology state from a separate file.

Tags:mesh menu

Was this helpful?

Yes  No
Related Articles
  • Surface Array
  • Top Bar
  • Curves Properties RMB
  • Left tool panel Kitbash
  • Create kitbash
  • Color management
Previously
người mẫu
Up Next
Bảng công cụ bên trái trong phòng Modeling
AI:
Hi! How can I help you?
Attention: This is a beta version of AI chat. Some answers may be wrong. See full version of AI chat