 Tiếng Việt
  English
 Українська
 Español
 Deutsch
 Français
 日本語
日本語 Русский
 한국어
한국어 Polski
 中文 (中国)
 Português
 Italiano
 Suomi
Suomi Svenska
 中文 (台灣)
 Dansk
Dansk Slovenčina
 Türkçe
 Nederlands
 Magyar
 ไทย
ไทย हिन्दी
 Ελληνικά
 Lietuviškai
 Latviešu valoda
 Eesti
Eesti Čeština
 Română
 Norsk Bokmål
Sử dụng bộ công cụ toàn diện của 3DCoat để đồng bộ hóa liền mạch các mô hình của bạn với tất cả các ứng dụng 3D bên ngoài của bạn. Import dữ liệu hoặc mô hình lưới “thô” còn nguyên vẹn UVs . Các mô hình bên ngoài có thể được nhập dưới dạng lưới tham chiếu hoặc để tạo tất cả các cấu trúc liên kết mới sẵn sàng cho kết cấu.
Nhập và xuất trong 3DCoat là một chủ đề rộng – và bao gồm các nội dung cụ thể có thể được nhập – và chỉ có thể hiểu được nội dung này trong ngữ cảnh Không gian làm việc mà bạn đang nhập chúng vào. Một số nội dung nhập chỉ có ý nghĩa khi bạn xem xét Phòng nơi chúng hoạt động chủ yếu.
Chúng tôi sẽ cho bạn biết bạn nên sử dụng trình đơn nào cho loại nội dung import và export và Phòng nào bạn nên ở khi import các nội dung cụ thể này.
Nhập vào các Không gian làm việc khác nhau
1. Nhập vào không gian làm việc Sculpt
2. Nhập vào không gian làm việc Retopo
3. Nhập vào không gian làm việc UV
4. Nhập vào không gian làm việc Paint
Xuất từ các Không gian làm việc khác nhau
1. Xuất từ không gian làm việc Sculpt
2. Xuất từ không gian làm việc UV
3. Xuất từ không gian làm việc Paint
4. Xuất từ Tweak Room
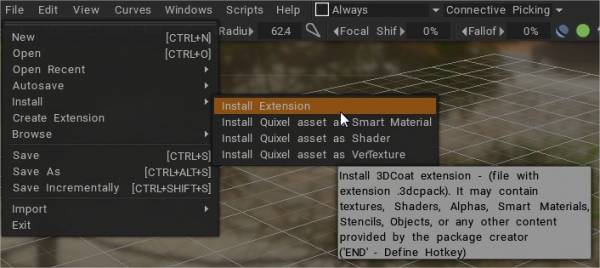
– Đã thêm tính năng tương thích hoàn toàn với Quixel Megascans! Nếu bạn tải xuống tài liệu Quixel trong phần “Tải xuống”, 3DCoat sẽ tự động thông báo cho bạn rằng tài liệu mới đã được tải xuống và sẽ đề nghị bạn cài đặt tài liệu đó làm tài liệu hoặc trình đổ bóng.
Hoàn toàn tương thích với vật liệu Quixel
Import Hoạ tiết di chuyển thủ công
3DCoat 2022 có cấu trúc thư mục hoàn toàn mới. Thực sự hợp lý và hợp lý như nó đã được đề xuất.
Hầu như tất cả bây giờ được phân chia giữa hai thư mục – dữ liệu và UserPrefs.
Theo logic, UserPrefs là nội dung do người dùng tạo.
Dữ liệu là loại công cụ tạm thời.
Thư mục trong tài liệu đã thay đổi; bây giờ là Docs/ 3DCoat-2021/. Ngay cả khi cấu trúc thư mục bị thay đổi, nó vẫn tương thích với cấu trúc trước đó.
Ngay khi 3DCoat phát hiện một số tệp được sao chép sang vị trí mới trong Tài liệu từ vị trí cũ, nó sẽ chuyển đổi tệp sang cấu trúc mới.
Ngoài ra, nếu bạn cài đặt 3dcpack, nó sẽ được cài đặt chính xác (ngoại trừ các cài đặt trước sử dụng các công cụ cũ không có trong bộ công cụ).
Vì vậy, để di chuyển từ phiên bản cũ hơn, bạn có thể sao chép các thư mục từ phiên bản cũ sang Docs/ 3DCoat-2021 hoặc tạo 3dcpack trong phiên bản cũ và cài đặt nó bằng giao diện người dùng.
Video hướng dẫn
Mẹo nhanh: Khắc phục nhập lưới đa giác thấp
Cài đặt Brush Alphas Video này là phần 1/2 bao gồm các phương pháp khác nhau để cài đặt Brush alphas, riêng lẻ hoặc dưới dạng gói cọ vẽ. Điều này bao gồm một minh họa ngắn gọn về việc tạo bàn chải alpha của riêng bạn với mô hình 3D.
Liên kết đến gói bàn chải XMD miễn phí cho 3DCoat ở bên dưới:
https://gumroad.com/mdunnam?#RogB
Sơn bề mặt: Xuất : Video này tiếp tục trình diễn PolyPaint bằng cách bao gồm một ví dụ về xuất đối tượng trực tiếp từ Phòng điêu khắc sang ứng dụng 3D (trong trường hợp này là 3ds Max)… không có UVs… không có Retopo hoạt động.