• Lietuviškai
  • 3DCoat dokumentacija
  • Chapters
    • Įvadas į 3DCoat
    • Darbo pradžia
    • Sąsaja ir navigacija
    • Brush komponentai
    • Darbo erdvės kambariai
    • Scripting ir Core API
    • Klausimai/Atsakymai
    • licensing
    • Mokymo vadovėliai
  • Pilgway
  • Products
    • 3DCoat
    • 3DCoatTextura
    • 3DCoatPrint
    • PBRLibrary
  • Blog Posts
  • Store
  • Lietuviškai Lietuviškai
    • English English
    • Українська Українська
    • Español Español
    • Deutsch Deutsch
    • Français Français
    • 日本語 日本語
    • Русский Русский
    • 한국어 한국어
    • Polski Polski
    • 中文 (中国) 中文 (中国)
    • Português Português
    • Italiano Italiano
    • Suomi Suomi
    • Svenska Svenska
    • 中文 (台灣) 中文 (台灣)
    • Dansk Dansk
    • Slovenčina Slovenčina
    • Türkçe Türkçe
    • Nederlands Nederlands
    • Magyar Magyar
    • ไทย ไทย
    • हिन्दी हिन्दी
    • Ελληνικά Ελληνικά
    • Tiếng Việt Tiếng Việt
    • Latviešu valoda Latviešu valoda
    • Eesti Eesti
    • Čeština Čeština
    • Română Română
    • Norsk Bokmål Norsk Bokmål
  • Creating 3D Character Using 3DCoat
Expand All Collapse All
  • Įvadas į 3DCoat
  • Darbo pradžia
    • System requirements
    • Why 3DCoat is Unique?
    • 3DCoat aktyvinimas
    • Paleidimo klaida
      • Startup error Mac
    • Color management
    • Upgrading permanent license
    • Linux Setup
      • Linux initial setup per-user installation
      • Linux initial setup for system
      • Tablet setup
      • To GTK3 from GTK2
    • Aplankų struktūra
      • Custom documents folder
    • Įvairios „sprendimo“ formos
    • Tablet on Window
    • Import ir Export
    • Applinks 3DCoat
      • Blender programos nuoroda
        • Blender with the Applink in Linux
      • Blender 4.2/3/4/5 applink
      • Max Applink
      • Houdini applink
      • Lightwave uplink
  • Navigation
    • Dialogo lango atidarymas (greito pradžios meniu)
    • Naršymo skydelis
    • Kamera ir navigacija
      • Customize Navigation as Blender
    • Viewport Navigation Gizmo
    • Left tool panel
    •  Activity Bar
    • Navigacija naudojant 3DConnexion įrenginius
      • How to compile Spacenavd on non Ubuntu distro
    • Stylus doesn’t work in sculpting
    • Spartieji klavišai
  • Sąsaja ir navigacija
    • Failo meniu
    • Redagavimo meniu
      • Calculate Curvature
      • Calculate Occlusion
      • Light Baking Tool
      • Parinktys
    • Peržiūros meniu
    • Simetrija
    • Textures
    • Calculate
    • Sluoksnių meniu
    • Užšaldymo meniu
    • Hide
    • Bake
    • Kreivės 2022 m
      • Kreivės meniu
      • Curves Properties RMB
      • Užpildykite tinklelio sluoksniu
      • Scale of imported curves
    • „Windows“ meniu
      • „Windows“ iššokantys skydeliai su skirtukais
      • Slankikliai
    • Scripts
    • Addons
    • Capture
    • Pagalbos meniu
    • Tinkinimas
    • Pakeiskite arba sukurkite naują kambarį
  • Brush komponentai
    • Brush Top Bar
    • Šepečiai bendram naudojimui
      • Sukurkite šepečius ir lipdukus
      • Alfa gamyba iš dabartinės skulptūros
      • Sukurkite Brush iš 3D objekto
      • Create brushes based on Curves
      • Load photoshop .abr brushes
    • Insultai
      • Kreivės iššokantis meniu
    • Brush parinktys
    • Sąlygų ribotuvas
    • Juostelių skydelis
    • Trafaretų skydelis
    • Išmaniosios medžiagos
      • Pridėkite naujų vaizdų ar medžiagų
      • Pritvirtinkite išmaniąją medžiagą prie sluoksnio
      • Import Quixel Material
    • Kaip sukurti išankstinius Brush nustatymus
  • Darbo erdvės kambariai
    • Painting
      • Tekstūros Painting ir režimai
        • Painting Per-Pixel
        • Poslinkio Painting (mikro viršūnė)
        • Ptex Painting
        • Paviršiaus Painting (polidažymas)
      • Įvežimas į Painting kambarį
        • Initial CC subdivision
        • UV Set smoothing
        • Sharp (hard) edge
        • Užraktas normaliai
        • Įkelti naują UV maketą po modelio pakeitimų
        • DAZ Genesis models into 3DCoat
      • Painting darbo srities meniu
        • Edit menu
        • Tekstūros meniu
          • Tekstūriniai Baking įrankiai
        • Slėpti
        • Bake Paint meniu
        • Spalvų rinkiklis
      • Viršutinė Painting juosta
      • Sluoksnių skydelis
        • Maišymo skydelis
        • Layer and Clipping Masks
      • Painting kambario įrankiai
      • Nepermatomumas – skaidrumas
      • Pakoreguokite darbo vietą
        • Tweak Toolset
        • Eksportavimas iš Tweak Room
      • Kaukės / medžiagos peržiūros skydelis
      • Eksportas iš Painting kambario
    • UV darbo vieta
      • UV viršutinė juosta
      • UV Kairysis įrankių skydelis
      • UV peržiūros skydelis
      • UV darbo eigos pavyzdys
      • Importas į UV kambarį
      • Eksportas iš UV kambario
    • Retopologija
      • Importavimas į Retopo kambarį
      • Retopo tinklelio meniu ir kepimo meniu
        • Virtualus veidrodžio režimas
      • Bake menu
        • Treat Poly Groups as Paint Objects
        • Baking guide
      • Viršutinė juosta
        • Pasirinkite geometriją
      • Kairysis įrankių skydelis Retopologijos kambaryje
        • Bendra paskirtis ir funkcija
        • Pridėti geometriją
          • Strokes įrankis retopologijoje
        • „Retopo Tweak“ įrankiai
        • UV įrankiai
        • Retopologijos kambario komandos
      • AUTORETOPO
        • Autopo guide
      • Poli grupės
    • Skulptūra
      • Sculpt Layer
      • Skulptorius medis
      • „Sculpt Brush“ parinktys
      • Top Bar
      • Brush variklis
      • Geometrijos submeniu
      • Sukurkite meniu „Dešiniuoju pelės mygtuku spustelėkite“.
      • Shaders
      • Voxel režimas
        • Pure Voxel Sculpting
        • Tankis ir skiriamoji geba
        • Molio variklis
        • Voxel įrankiai
        • „Voxels“ paviršiaus įrankiai
        • Voxel Adjustment Tools
        • Tūrinis Painting
        • Voxel Objects Tools
      • Paviršiaus režimas
        • Paviršiaus įrankiai
        • Paviršiaus pasirinktiniai įrankiai
        • Paviršiaus reguliavimo įrankiai
        • Paviršiaus Painting
        • Paviršiaus objektų įrankiai
        • Kelių lygių raiška
          • Multires tools
          • Multires adjust
          • Multires commands
      • Smulkinti kreivės
        • Spline kreivės
        • Splines model creation
      • Vektorių poslinkis
      • Paviršiaus transformavimo įrankiai
        • Voxel Transform Tools
        • Instancer
        • Move
        • Pose
        • Fit
        • Reproject
        • Surface Array
      • Voxel primitives & Import Tools
      • Gyvi booleans
      • Skulptūros kambario komandos
      • Import į Sculpt Room
      • Eksportas iš skulptūrų kambario
    • Pateikti
      • Comparison of different roughness values
      • Atvaizdavimo skydelio funkcijos
      • Patefonas
      • Netikras apšvietimas – ne PBR–
    • Factures
      • Darbo eiga
    • Paprasčiausias
    • Modeliavimas
      • Mesh Menu
      • Kairysis įrankių skydelis modeliavimo kambaryje
        • Pridėti geometriją
          • Pasirinkta
        • Keisti
        • Smart Hybrid
        • UV
          • Komandos
        • Visas tinklelis
      • Fluffy palėpės paviršiaus pavyzdys
      • Poeboi blokavo
      • Import Zbrush Polygroups for UV mapping
    • Kitbash – greitas 3D modelių kūrimas
      • Create kitbash
      • Left tool panel Kitbash
    • 3DPrint
    • Photogrammetry
      • How to install Reality Capture
      • Reality Capture doesn’t show up ?
    • Tinklelis į NURBS kambarį
    • Nodes
      • Skulptūruoti šešėliai Nodes Library
  • Scripting ir Core API
    • Scripting
    • Core API
    • Python API
  • Nemokamas 3DCoatPrint

Edit menu

791 views 0

Written by Carlos
July 30, 2024

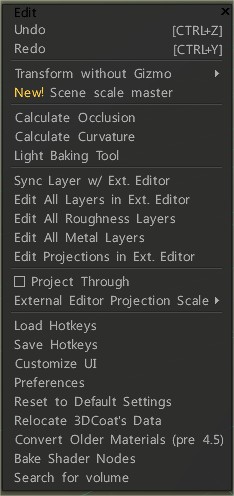
Undo: hotkey Ctrl+Z
Redo: hotkey Ctrl+Y

Transform without Gizmo:


These menu items are intended for assigning hotkeys to transform objects without the gizmo.
1) Press END over the required menu item, and assign the hotkey.
2) Press that hotkey and transform the object.
3) Press SPACE to enter numerical values (if this is a one-dimensional transform).
4) Press SHIFT, CTRL or CTRL+SHIFT for the discrete transform.
5) Press ESC or RMB to cancel the transform.
6) Press LMB to complete the transform.

When you transform the objects using this method, overview of the editing menu in which you will learn about the main editing functions and setting up the scene, you may use hotkeys (regardless of how they are assigned in 3D-Coat)

W – Activate free translation.
E – Activate free rotation.
R – Activate free scaling.
X, Y (or C), Z – Act along the axis for the translation, rotation or scaling, in dependence on the current mode.

– If you are in the translation mode:
X, then Y or SHIFT Z, or ZZ – move an object in plane XY.
Y, then Z or SHIFT X, or XX – move an object in plane YZ.
Z, then X or SHIFT Y, or YY – move an object in plane ZX.
F – Pick new pivot of the transformation.

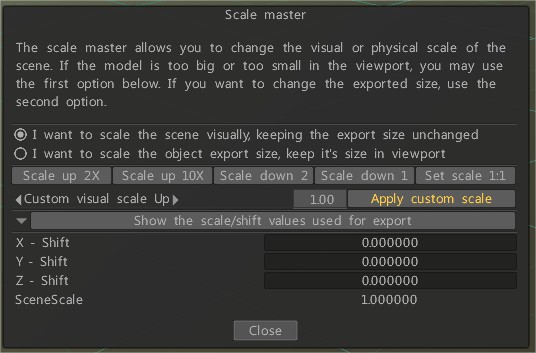
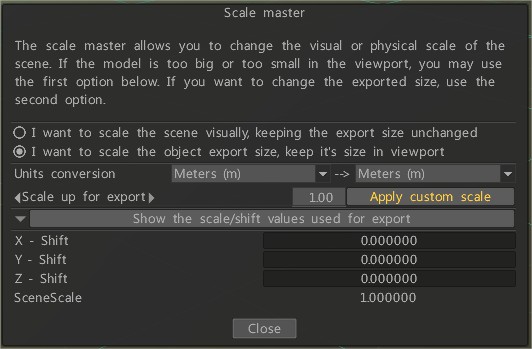
Scale Master


The scale master allows you to change the visual or physical scale of the scene.
If the model is too big or too small in the viewport, you may use the first option below.
If you want to change the exported size, use the second option.
Calculate Occlusion


Calculate Occlusion baker runs a routine that calculates “Ambient Occlusion” (global illumination) based on tracing a number of light rays surrounding an object.

Calculate Curvature


Calculate Curvature: The curvature layer is required to use cavity/curvature as a condition for materials or conditional painting. The command will update the cavity/curvature layer using the current displacement and normal map.

Light Baking Tool


Light Baking Tool: Sometimes you need to bake all lighting into the diffuse color of the texture.
Open shader ball for example, fill layer with any reflective Smart Material, bake your reflection and it creates reflection layer  in texture.


Sync layer with the external editor: This command allows you to synchronize the current layer with an external editor. You can set the path to the editor in Preferences. (The default is Adobe Photoshop.) The alpha channel will contain the transparency mask.
When you call on this command, the program Adobe Photoshop will open automatically with your file. Then you can change it and jump back to 3DCoat by pressing CTRL+S.

Edit All Layers in Ext. Editor: Edit all layers in an external editor. You can change the editor in the Options menu (Adobe Photoshop by default). This editor should be able to edit PSD files.
The texture will be stored as layers and opened as a PSD file in the external editor.
Then you can edit the texture and even add new layers. When you save it, 3DCoat will automatically reload it. Hotkey Ctrl+P
Edit All Roughness/Glossiness Layers: Edit all Roughness/Glossiness layers in an external editor.
Edit All Metal Layers: Edit all Glossiness layers in an external editor.
Edit Projections in Ext. Editor: You can edit the current projection in Adobe Photoshop using layers. You can change the editor in the Preferences menu (Adobe Photoshop by default).
This editor should be able to edit PSD files. The texture will be stored as layers and opened as a PSD file in the external editor. Then you can edit the texture and even add new layers.
When you save it, 3DCoat will automatically reload it. Hotkey Ctrl+Alt+P

When importing a PSD file into Clip Studio Paint, Affinity Photo or Krita; the layer order can sometimes be disrupted, meaning the layers may not appear in the same sequence as they did in Photoshop, potentially placing layers on top of each other that were originally below.
This is a known issue that can occur due to slight differences in how the software handles layer hierarchy.


Project Through: Project the image through all objects, even back faces.
External Editor Projection Scale: Additional scale that will be applied to the projection image to edit in an external editor.
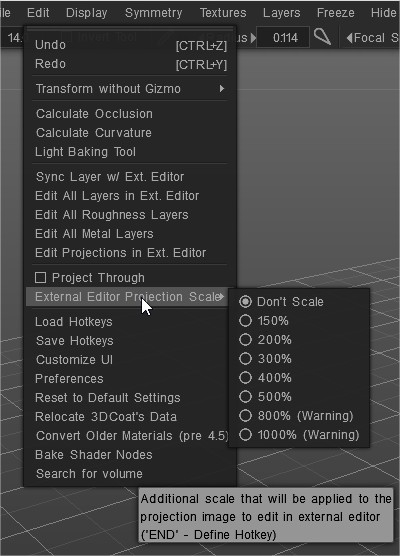
External Editor Scale

Load Hotkeys: Load hotkeys from the file.
Save Hotkeys: Save hotkeys from the file.
Customize UI: Remove/customize UI element.
Preferences: Set Hotkeys, Autosave time, External 2D-Editor, UI colors, and more…

Reset to default settings: Resetting is necessary if the program behaves unstably. Choose which settings you need to reset. Files options*.xml will be deleted. The program will be restarted, so first, save the changes.
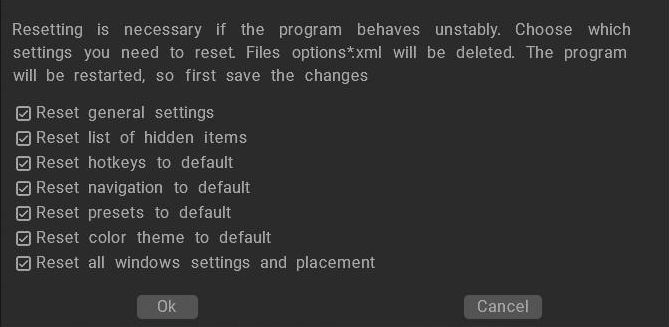
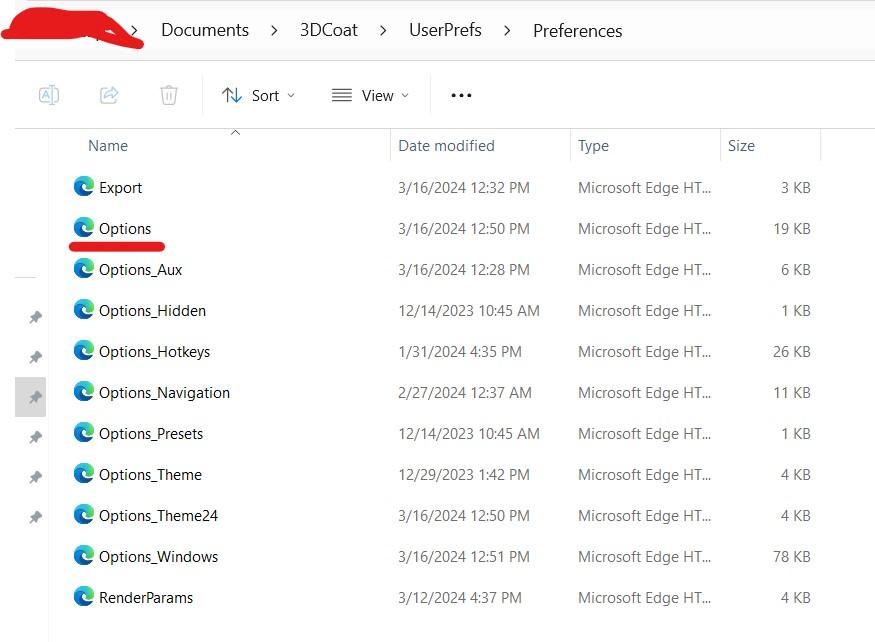
You can also try deleting the Options.xml file.
Make sure 3DC is closed when you do this. 3DCoat will auto create a new options.xml file when reopening 3DCoac.
Location of options.xml file shown in picture.

Relocate 3DCoat’s data: Edit Data Placement.
Convert Older Materials (pre 4.5): Convert Older Materials (pre 4.5)
Bake shader nodes: Bake shader nodes to real color/displacement. It may be helpful for the export.
Search for volume:

Tutorials


Quick Tip AO Baking Troubleshooting: This video demonstrates a Quick Tip about troubleshooting AO baking in 3DCoat, should a user encounter an unreasonable amount of lag.

AO Baking w/ OpenCL & Normal Map utilization: This video covers two major new improvements to AO baking in 3DCoat 4.5. OpenCL acceleration and Normal Map utilization.

Krita and 3DCoat workflow By Paul Geraskin.

Tags:paint edit menu

Was this helpful?

Yes  No
Related Articles
  • Surface Array
  • Top Bar
  • Curves Properties RMB
  • Left tool panel Kitbash
  • Create kitbash
  • Color management
Previously
Painting darbo srities meniu
Up Next
Tekstūros meniu
AI:
Hi! How can I help you?
Attention: This is a beta version of AI chat. Some answers may be wrong. See full version of AI chat