• Latviešu valoda
  • 3DCoat dokumentācija
  • Chapters
    • Ievads 3DCoat
    • Darba sākšana
    • Interfeiss un navigācija
    • Brush sastāvdaļas
    • Darba telpas Istabas
    • Scripting un Core API
    • Jautājumi/Atbildes
    • licensing
    • Apmācības pamācības
  • Pilgway
  • Products
    • 3DCoat
    • 3DCoatTextura
    • 3DCoatPrint
    • PBRLibrary
  • Blog Posts
  • Store
  • Latviešu valoda Latviešu valoda
    • English English
    • Українська Українська
    • Español Español
    • Deutsch Deutsch
    • Français Français
    • 日本語 日本語
    • Русский Русский
    • 한국어 한국어
    • Polski Polski
    • 中文 (中国) 中文 (中国)
    • Português Português
    • Italiano Italiano
    • Suomi Suomi
    • Svenska Svenska
    • 中文 (台灣) 中文 (台灣)
    • Dansk Dansk
    • Slovenčina Slovenčina
    • Türkçe Türkçe
    • Nederlands Nederlands
    • Magyar Magyar
    • ไทย ไทย
    • हिन्दी हिन्दी
    • Ελληνικά Ελληνικά
    • Tiếng Việt Tiếng Việt
    • Lietuviškai Lietuviškai
    • Eesti Eesti
    • Čeština Čeština
    • Română Română
    • Norsk Bokmål Norsk Bokmål
  • Creating 3D Character Using 3DCoat
Expand All Collapse All
  • Ievads 3DCoat
  • Darba sākšana
    • System requirements
    • Why 3DCoat is Unique?
    • 3DCoat aktivizēšana
    • Startēšanas kļūda
      • Startup error Mac
    • Color management
    • Upgrading permanent license
    • Linux Setup
      • Linux initial setup per-user installation
      • Linux initial setup for system
      • Tablet setup
      • To GTK3 from GTK2
    • Mapju struktūra
      • Custom documents folder
    • Dažādas “izšķirtspējas” formas
    • Tablet on Window
    • Import un Export
    • Applinks 3DCoat
      • Blender lietotnes saite
        • Blender with the Applink in Linux
      • Blender 4.2/3/4/5 applink
      • Max Applink
      • Houdini applink
      • Lightwave uplink
  • Navigation
    • Atvēršanas dialoglodziņš (ātrā sākuma izvēlne)
    • Navigācijas panelis
    • Kamera un navigācija
      • Customize Navigation as Blender
    • Viewport Navigation Gizmo
    • Left tool panel
    •  Activity Bar
    • Navigācija, izmantojot 3DConnexion ierīces
      • How to compile Spacenavd on non Ubuntu distro
    • Stylus doesn’t work in sculpting
    • Karstie taustiņi
  • Interfeiss un navigācija
    • Failu izvēlne
    • Rediģēt izvēlni
      • Calculate Curvature
      • Calculate Occlusion
      • Light Baking Tool
      • Preferences
    • Skatīšanas izvēlne
    • Simetrija
    • Textures
    • Calculate
    • Slāņu izvēlne
    • Iesaldēšanas izvēlne
    • Hide
    • Bake
    • Līknes 2022
      • Izvēlne Līknes
      • Curves Properties RMB
      • Piepildiet ar sieta slāni
      • Scale of imported curves
    • Windows izvēlne
      • Windows uznirstošie paneļi ar cilnēm
      • Slīdņi
    • Scripts
    • Addons
    • Capture
    • Palīdzības izvēlne
    • Pielāgošana
    • Mainiet vai izveidojiet jaunu telpu
  • Brush sastāvdaļas
    • Brush Top Bar
    • Birstes vispārējai lietošanai
      • Izveidojiet otas un uzlīmes
      • Alfa veidošana no pašreizējās skulptūras
      • Izveidojiet Brush no 3D objekta
      • Create brushes based on Curves
      • Load photoshop .abr brushes
    • Insulti
      • Līknes uznirstošā izvēlne
    • Brush iespējas
    • Nosacījumu ierobežotājs
    • Sloksnes panelis
    • Trafaretu panelis
    • Gudri materiāli
      • Pievienojiet jaunus attēlus vai materiālus
      • Pievienojiet viedo materiālu slānim
      • Import Quixel Material
    • Kā izveidot Brush sākotnējos iestatījumus
  • Darba telpas Istabas
    • Painting
      • Tekstūru Painting un režīmi
        • Painting uz Per-Pixel
        • Nobīdes Painting (mikrovirsotne)
        • Ptex Painting
        • Virsmas Painting (polikrāsošana)
      • Importēšana Painting telpā
        • Initial CC subdivision
        • UV Set smoothing
        • Sharp (hard) edge
        • Bloķēt Normals
        • Ielādēt jaunu UV izkārtojumu pēc modeļa izmaiņām
        • DAZ Genesis models into 3DCoat
      • Painting darbvietas izvēlnes
        • Edit menu
        • Tekstūru izvēlne
          • Tekstūras Baking rīki
        • Slēpt
        • Bake Paint ēdienkarte
        • Krāsu atlasītājs
      • Painting augšējā josla
      • Slāņu panelis
        • Sajaukšanas panelis
        • Layer and Clipping Masks
      • Painting telpas rīki
      • Necaurredzamība — caurspīdīgums
      • Pielāgojiet darbvietu
        • Tweak Toolset
        • Eksportēšana no Tweak Room
      • Masku/materiālu priekšskatījuma panelis
      • Eksportēšana no Painting telpas
    • UV darbvieta
      • UV augšējā josla
      • UV Kreisais instrumentu panelis
      • UV priekšskatījuma panelis
      • UV darbplūsmas piemērs
      • Importēšana UV telpā
      • Eksportēšana no UV telpas
    • Retopoloģija
      • Importēšana Retopo istabā
      • Retopo Mesh Menu un Bake Menu
        • Virtuālais spoguļa režīms
      • Bake menu
        • Treat Poly Groups as Paint Objects
        • Baking guide
      • Augšējā josla
        • Izvēlieties ģeometriju
      • Kreisais rīku panelis Retopoloģijas telpā
        • Kopējais mērķis un funkcija
        • Pievienojiet ģeometriju
          • Strokes rīks retopoloģijā
        • Retopo Tweak Tools
        • UV instrumenti
        • Komandas retopoloģijas telpai
      • AUTORETOPO
        • Autopo guide
      • Poli grupas
    • Skulpt
      • Sculpt Layer
      • Veidot koku
      • Sculpt Brush iespējas
      • Top Bar
      • Brush dzinējs
      • Ģeometrijas apakšizvēlne
      • Veidojiet izvēlni “Ar peles labo pogu noklikšķiniet”.
      • Ēnotāji
      • Voxel režīms
        • Pure Voxel Sculpting
        • Blīvums un izšķirtspēja
        • Māla dzinējs
        • Voxel Tools
        • Virsmas rīki Voxels
        • Voxel Adjustment Tools
        • Volumetriskā Painting
        • Voxel Objects Tools
      • Virsmas režīms
        • Virsmas instrumenti
        • Virsmas pielāgoti rīki
        • Virsmas regulēšanas instrumenti
        • Virsmu Painting
        • Virsmas objektu rīki
        • Daudzlīmeņu izšķirtspēja
          • Multires tools
          • Multires adjust
          • Multires commands
      • Skulptūras līknes
        • Spline līknes
        • Splines model creation
      • Vektoru nobīde
      • Virsmas transformācijas rīki
        • Voxel Transform Tools
        • Instancer
        • Move
        • Pose
        • Fit
        • Reproject
        • Surface Array
      • Voxel primitīvas un Import rīki
      • Dzīvi Būla skaitļi
      • Komandas Sculpt telpai
      • Import uz Sculpt Room
      • Eksportēšana no Skulptūru telpas
    • Renderēt
      • Comparison of different roughness values
      • Renderēšanas paneļa funkcijas
      • Skaņas atskaņotājs
      • Fakebake apgaismojums — bez PBR—
    • Factures
      • Darbplūsma
    • Vienkāršākais
    • Modelēšana
      • Mesh Menu
      • Kreisais instrumentu panelis modelēšanas telpā
        • Pievienojiet ģeometriju
          • Atlasīts
        • Kniebiens
        • Smart Hybrid
        • UV
          • Komandas
        • Viss tīkls
      • Bēniņu virsmas piemērs no Fluffy
      • Poeboi bloķēšana
      • Import Zbrush Polygroups for UV mapping
    • Kitbash — ātra 3D modeļu izveide
      • Create kitbash
      • Left tool panel Kitbash
    • 3DPrint
    • Photogrammetry
      • How to install Reality Capture
      • Reality Capture doesn’t show up ?
    • Tīkls uz NURBS istabu
    • Nodes
      • Sculpt shaders Nodes Library
  • Scripting un Core API
    • Scripting
    • Core API
    • Python API
  • Bezmaksas 3DCoatPrint

Top Bar

70 views 0

Written by Carlos
November 5, 2025

Located near the top of the interface is the Top Bar.

This panel includes the functions needed to select every type of component from you brush settings.

The Top Tool Bar menu is customized according to which workspace you are working on.

As some pen options are on the top menu bar, you’ll notice that when you change your tool, so will a portion of the menu bar.
These options are On Plane, Steady Stroke, Pressure Dependencies, Radius, Smoothing, Depth, etc.

Conform Retopo Mesh:

On Plane: Constraint strokes to a plane. Use RMB to define plane. Click the Plane Opt. button to further edit how the plane functions.


If you use this option with Plane Tool (like example) this tool acts just like a carpenter’s wood plane does. It will scrape the volume away from the set position and the normal of the brush cursor. You set the brush cursor’s position and normal by clicking and holding the RMB and then dragging along the surface of a voxel object.

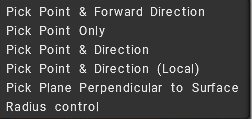
The Type of Surface show modes by which you decide the position of the brush:

1. Pick point & forward direction: This will place the cursor at the last location you used the RMB, facing toward the camera.
2. Pick point only: This will place the cursor at the last location you used the RMB only. Its direction is based on the settings in the parameters tab.
3. Pick point & direction: This will place the cursor at the last location you used the RMB, and its direction will be based on the average normals of the voxels that your brush covers.
4. Pick point & direction (local): This will place the cursor at the last location you used the RMB, and its direction will be based on the single normal of the voxel your brush is centered on.

RMB Action: What action will be performed when the RMB is pressed ?
Pay attention; if you click quickly, the RMB menu appears. Click longer to select a point and a plane. Hold RMB to move the plane’s central point over the surface, but keep it normal.
Press CTRL to move the plane along the normal.
Steady Stroke: In this mode, strokes will be more accurate because of the additional smoothing of trajectory.

Invert Tool: Invert Tool. Toggle the function of the current tool, like holding down the CTRL key.

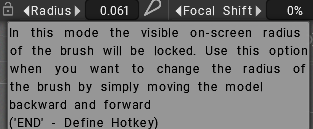
Brush Radius: This allows you to scale up and down the size of your pen in the viewport with a slider or by manually keying in a value. It is relative to the scale of the scene you have set.
Radius lock mode: the wrench icon let lock visible on-screen radius.
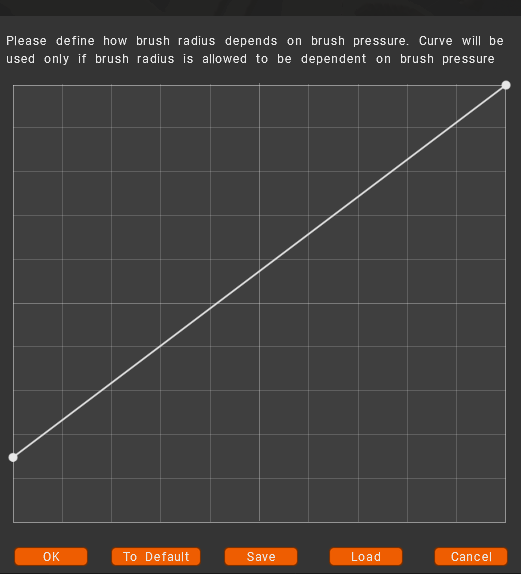
Brush Radius pressure curves Curves


Define how the brush radius depends on brush pressure. The curve will be used only if the brush radius is allowed to be dependent on brush pressure.
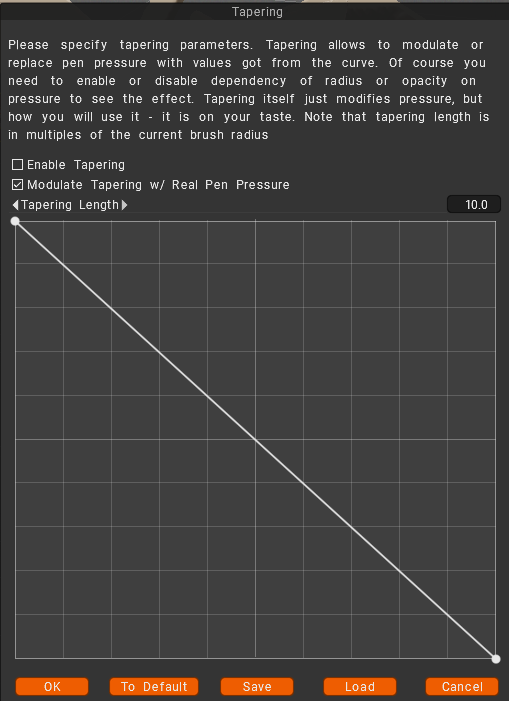
Tapper (for both sculpting and painting brushes)


Taper Modifier: Tapering allows to modulate or replace pen pressure with values got from the curve. Of course, you need to enable or disable the dependency of radius or opacity on pressure to see the effect. Tapering itself just modifies pressure, but how you will use it – it is on your taste. Note that the tapering length is in multiples of the current brush radius.
Focal Shift: This slider adjusts the crispness of the alpha, corrected around the center point. Higher values produce softer edges on most shapes (activate this option on Preferences).
Falloff: This allows you to control the brush with a falloff curve, giving tighter control over the radial area the brush will affect depth.


Depth: This allows you to turn the intensity of the depth of your strokes with a slider or by manually keying in a value.
Lock depth mode: use this option to separate brush depth from brush radius.

Smoothing: This allows you to turn the intensity of the smoothing up and down with a slider or by manually keying in a value.

Paint Tools for Voxel Paint and Vertex Paint


Opacity: This allows you to turn the intensity of the color channels’ transparency up and down with a slider or manually keying in a value.
Glossiness Intensity: This allows you to turn the intensity of the Glossiness channel up and down with a slider or manually keying in a value. A lower value produces a diffuse highlight, higher values produce a sharper highlight.
Roughness: Controls the sharpness of the reflections.
Metalness: Change the Metalness intensity. A higher value produces a higher reflectivity, lower values produce a lower reflectivity.

Conditions Limiter: Another important feature on the Top Bar is the Height/Color Limiter or Conditions.
Select how depth, color and Gloss of your brush strokes are affected by colors, height and other parameters. Remember to set to “Always” when you finish using this option.
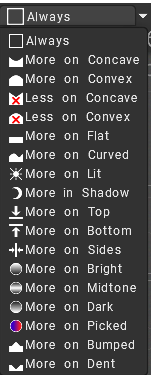
This function allows you to, for example, paint more in a cavity, more on peaks, or more on a specific color or even a mask.

Pen, Mouse, and Lock Icons


These three icons indicate what mode your style is currently in. You can toggle from one to the other simply by LMB clicking on the icon.

The mouse icon locks pen pressure to whatever value you have in the respective setting the icon is next to.
The pen icon allows for pen pressure directly from your stylus. The lock icon will lock the “on screen” size of the pen. It is convenient when you want to change the radius of the pen by simply moving the model back and forward.
The lock icon near the depth slider allows you a variety of pen radius without variation of absolute pen depth. In standard mode, radius and depth are proportional.

Minimizing on the Tool Bar


You can also collapse/expand settings on the toolbar, such as Falloff, Depth, etc. This can be done by clicking in the immediate area around the setting you wish to minimize. The image here shows the area to click to achieve this.

Layer Ghosting Options (For Sculpt Room)


Layer Ghosting Options: There is some capacity to unghost all layers through the “GEOMETRY menu > VISIBILITY/GHOSTING > ISOLATE GHOSTING (SHIFT + G hotkey combo)”.


Was this helpful?

Yes  No
Related Articles
  • Surface Array
  • Curves Properties RMB
  • Left tool panel Kitbash
  • Create kitbash
  • Color management
  • Treat Poly Groups as Paint Objects
Previously
Sculpt Brush iespējas
Up Next
Brush dzinējs
AI:
Hi! How can I help you?
Attention: This is a beta version of AI chat. Some answers may be wrong. See full version of AI chat