• Română
  • Documentația 3DCoat
  • Chapters
    • Introducere în 3DCoat
    • Noțiuni de bază
    • Interfață și navigare
    • Componentele Brush
    • Spații de lucru Camere
    • Scripting și Core API
    • Întrebări și răspunsuri
    • licensing
    • Tutoriale de instruire
  • Pilgway
  • Products
    • 3DCoat
    • 3DCoatTextura
    • 3DCoatPrint
    • PBRLibrary
  • Blog Posts
    • Creating 3D Character Using 3DCoat
  • Store
  • Română Română
    • English English
    • Українська Українська
    • Español Español
    • Deutsch Deutsch
    • Français Français
    • 日本語 日本語
    • Русский Русский
    • 한국어 한국어
    • Polski Polski
    • 中文 (中国) 中文 (中国)
    • Português Português
    • Italiano Italiano
    • Suomi Suomi
    • Svenska Svenska
    • 中文 (台灣) 中文 (台灣)
    • Dansk Dansk
    • Slovenčina Slovenčina
    • Türkçe Türkçe
    • Nederlands Nederlands
    • Magyar Magyar
    • ไทย ไทย
    • हिन्दी हिन्दी
    • Ελληνικά Ελληνικά
    • Tiếng Việt Tiếng Việt
    • Lietuviškai Lietuviškai
    • Latviešu valoda Latviešu valoda
    • Eesti Eesti
    • Čeština Čeština
    • Norsk Bokmål Norsk Bokmål
Expand All Collapse All
  • Introducere în 3DCoat
  • Noțiuni de bază
    • System requirements
    • Why 3DCoat is Unique?
    • Activarea 3DCoat
    • Eroare de pornire
      • Startup error Mac
    • Color management
    • Upgrading permanent license
    • Linux Setup
      • Linux initial setup per-user installation
      • Linux initial setup for system
      • Tablet setup
      • To GTK3 from GTK2
    • Structura folderelor
      • Custom documents folder
    • Diferite forme de „rezoluție”
    • Tablet on Window
    • Import & Export
    • Applinks în 3DCoat
      • Legătura aplicației Blender
        • Blender with the Applink in Linux
      • Blender 4.2/3/4/5 applink
      • Max Applink
      • Houdini applink
      • Lightwave uplink
  • Navigation
    • Deschiderea casetei de dialog (meniu pornire rapidă)
    • Panoul de navigare
    • Cameră și navigație
      • Customize Navigation as Blender
    • Viewport Navigation Gizmo
    • Left tool panel
    •  Activity Bar
    • Navigare folosind dispozitive 3DConnexion
      • How to compile Spacenavd on non Ubuntu distro
    • Space Bar Menu
    • Stylus doesn’t work in sculpting
    • Taste rapide
  • Interfață și navigare
    • Meniul Fișier
    • Meniu Editare
      • Calculate Curvature
      • Calculate Occlusion
      • Light Baking Tool
      • Preferințe
    • Meniu Vizualizare
    • Simetrie
    • Textures
    • Calculate
    • Meniul Straturi
    • Înghețați meniul
    • Hide
    • Bake
    • Curbe 2022
      • Meniul Curbe
      • Curves Properties RMB
      • Umpleți cu strat de plasă
      • Scale of imported curves
    • Meniul Windows
      • Panouri pop-up Windows cu file
      • Glisoare
    • Scripts
    • Addons
    • Capture
    • Meniul de ajutor
    • Personalizare
    • Modificați sau creați o cameră nouă
  • Componentele Brush
    • Brush Top Bar
    • Perii de uz general
      • Creați pensule și decalcomanii
      • Realizarea alfa din sculptura curentă
      • Creați o Brush dintr-un obiect 3D
      • Create brushes based on Curves
      • Load photoshop .abr brushes
    • Accident vascular cerebral
      • Meniu pop-up Curves
    • Opțiuni de Brush
    • Limitator de condiții
    • Panoul de benzi
    • Panoul Șabloane
    • Materiale inteligente
      • Adăugați imagini sau materiale noi
      • Atașați un material Smart la un strat
      • Import Quixel Material
    • Cum se creează presetări pentru Brush
  • Spații de lucru Camere
    • Painting
      • Painting cu textură și moduri
        • Painting Per-Pixel
        • Painting cu deplasare (Micro-Vertex)
        • Painting Ptex
        • Painting de suprafață (polipictura)
      • Import în camera de Painting
        • Initial CC subdivision
        • UV Set smoothing
        • Sharp (hard) edge
        • Blocați Normals
        • Încărcați un nou aspect UV după modificările modelului
        • DAZ Genesis models into 3DCoat
        • ID map
      • Meniurile spațiului de lucru pentru Painting
        • Edit menu
        • Meniul Texturi
          • Instrumente de Baking a texturii
        • Ascunde
        • Meniu pentru Bake Paint
        • Selectorul de culori
      • Surface Materials
      • Bara de sus pentru Painting
      • Panoul Straturi
        • Panoul de amestecare
        • Layer and Clipping Masks
      • Instrumente pentru camera de Painting
      • Opacitate - Transparență
      • Modificați spațiul de lucru
        • Tweak Toolset
        • Se exportă din Camera Tweak
      • Panoul de previzualizare Mască/Material
      • Export din camera de Painting
    • Spațiu de lucru UV
      • UV Top Bar
      • Panoul de instrumente UV stânga
      • Panoul de previzualizare UV
      • Exemplu de flux de lucru UV
      • Importul în camera UV
      • Export din camera UV
    • Retopologie
      • Import în camera Retopo
      • Meniul Retopo Mesh și Meniul Coace
        • Modul oglindă virtuală
      • Bake menu
        • Treat Poly Groups as Paint Objects
        • Baking guide
      • Instrumentul Strokes în Retopologie
      • In capul barului
        • Selectați geometria
      • Panoul de instrumente din stânga în camera Retopologie
        • Scopul și funcția generală
        • Adăugați geometrie
        • Retopo Tweak Tools
        • Instrumente UV
        • Comenzi pentru camera de retopologie
      • AUTORETOPO
        • Autopo guide
      • Poli Grupuri
    • Sculptează
      • Sculpt Layer
      • Sculpt Arborele
      • Opțiuni de Sculpt Brush
      • Top Bar
      • Motor cu Brush
      • Submeniu Geometrie
      • Sculptați meniul „clic dreapta”.
      • Shaders
      • Modul Voxel
        • Pure Voxel Sculpting
        • Densitate și rezoluție
        • Motor de lut
        • Instrumente Voxel
        • Instrumente de suprafață pe Voxels
        • Instrumente de ajustare Voxel
        • Painting volumetrică
        • Instrumente pentru obiecte Voxel
      • Modul de suprafață
        • Instrumente de suprafață
        • Instrumente personalizate pentru suprafață
        • Instrumente de reglare a suprafeței
        • Painting de suprafață
        • Instrumente pentru obiecte de suprafață
        • Rezoluție pe mai multe niveluri
          • Multires tools
          • Multires adjust
          • Multires commands
      • Sculptează curbele
        • Curbe spline
        • Splines model creation
      • Deplasare vectorială
      • Instrumente de transformare a suprafeței
        • Instrumente de transformare Voxel
        • Instancer
        • Move
        • Pose
        • Fit
        • Reproject
        • Surface Array
      • Voxel Primitives și instrumente de Import
      • Booleeni vii
      • Comenzi pentru camera Sculpt
      • Import în Sculpt Room
      • Se exportă din Camera Sculpt
    • Face
      • Comparison of different roughness values
      • Funcțiile panoului de randare
      • Placă turnantă
      • Fakebake the lighting -non PBR-
    • Factures
      • Fluxul de lucru
    • Cel mai simplu
    • Modelare
      • Mesh Menu
      • Panoul de instrumente din stânga în camera de modelare
        • Adăugați geometrie
          • Selectat
        • Ajustare fina
        • Smart Hybrid
        • UV
          • Comenzi
        • Întreaga plasă
      • Exemplu de suprafață de mansardă de Fluffy
      • Blockout de Poeboi
      • Import Zbrush Polygroups for UV mapping
    • Kitbash - Creare rapidă de modele 3D
      • Create kitbash
      • Left tool panel Kitbash
    • 3DPrint
    • Photogrammetry
      • How to install Reality Capture
      • Reality Capture doesn’t show up ?
    • Mesh în camera NURBS
    • Nodes
      • Sculpt shaders Nodes Library
  • Scripting și Core API
    • Scripting
    • Core API
    • API-ul Python
  • 3DCoatPrint gratuit

Surface Materials

34 views 0

Written by Carlos
February 7, 2026

Surface Materials in 3DCoat are the equivalent of polygonal material assignments from other programs, such as Modo or Maya.
If upon import 3DCoat detects any of these Surface Materials, they will be respected and kept, and can also be used to perform various functions in the Paint Room.

2 panels are very useful to isolate paint objects:


  • Windows > Panels > Surface Materials
    Display the objects surface materials list. You can rename, hide, lock surface materials, and change texture sizes for export.
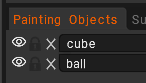
  • Windows > Panels > Painting Objects
    Show the Paint Objects list into a Layer system. You can rename, hide lock and delete objects listed here.

In 3DCoat unlike SPainter the textures are assigned globally by painting Objects or Surface materials, and not by texture sets (uvsets).
So you don’t need to assign the same smart material to every layer or uDim.

Everything can be done inside the Modeling or Retopo Room


1. Go to “Edit > Preferences > Beta > Treat retopo groups as materials”
2. Make poly selections and separate onto different Poly Group layers
3. “Bake Menu > Update Paint Mesh with Retopo Mesh”

You should now see them pop up in the Surface Materials panel.

After you create the Surface Materials, usually go back and undo Step 1 so that can do the usual workflow from there. 

Was this helpful?

Yes  No
Related Articles
  • Space Bar Menu
  • Factures
  • ID map
  • Surface Array
  • Top Bar
  • Curves Properties RMB
Previously
Selectorul de culori
Up Next
Bara de sus pentru Painting
AI:
Hi! How can I help you?
Attention: This is a beta version of AI chat. Some answers may be wrong. See full version of AI chat