 Türkçe
  English
 Українська
 Español
 Deutsch
 Français
 日本語
日本語 Русский
 한국어
한국어 Polski
 中文 (中国)
 Português
 Italiano
 Suomi
Suomi Svenska
 中文 (台灣)
 Dansk
Dansk Slovenčina
 Nederlands
 Magyar
 ไทย
ไทย हिन्दी
 Ελληνικά
 Tiếng Việt
 Lietuviškai
 Latviešu valoda
 Eesti
Eesti Čeština
 Română
 Norsk Bokmål
Tools on Multi resolution mode works in similar way that on Surface mode.
Take note that all tools are not compatible. They are added after new development.

Clay: Surface Clay lets you quickly and fluidly apply mass to your voxel sculpture. The difference between this tool and the Carve brush is that it will also simultaneously smooth the surface after you’ve brushed it, giving it an authentic clay look.
Flatten the surface and extrude using alpha and stencil. Edit brush parameters to set up the brush parameters in correspondence with your needs. You may duplicate the brush with RMB and create your brush preset.
Clay Fast: This is similar to the clay brush but works faster because there is no post-relaxing of the surface.
Draw: The Draw tool is great for quickly adding spontaneous detail, is great for sculpting horns, or anything else like that very quickly. It is similar to the Airbrush tool, but it only operates on the surface of a volumetric object.
The draw tool is great for quickly sculpting horns or anything else like that. It is very much like the airbrush tool. However, it only operates on the surface of a volumetric object. Use LMB to raise the area beneath the cursor. CTRL+LMB indents the surface, and SHIFT+LMB smooths the geometry.
Flatten: It flattens the area underneath your brush based on brush size and intensity.
This mode flattens the surface beneath the cursor by raising or lowering points to a common plane based on brush size and intensity.
Height and angle are averaged from the point directly beneath the center of the cursor, and the effect is expanded to fill the entire cursor area.
Trim Adaptive
Flat Polish
Chisel: Similar to the Flatten tool, but its effect is less extreme, and as you stroke along the object with your brush, it will “chisel” away at the surface.
It works like a scrape but dives into the surface slightly. It is very handy for creating sharp edges. Use CTRL for inverse action.
Lute: This tool allows you to fill cavities as if you are working with the lute. Start to fill with lower pressure and end up with a bigger one to get accurate results. Combine this tool with smoothing to get the perfect result.
Fill: Surface Fill is a great way to fill in small voids, cavities, and gaps in your objects. It is especially effective in very high settings.
Use CTRL to invert the action – to eliminate “embossing”.
Buildup: Similar to the “Build” tool in the Voxel Room.
It behaves like the “Clay” tool but builds the surface up without limits (not only one layer as with clay).
Extrude surface: Expands all vertices outward, uniformly, to a given radius along the surface under your brush, based on your pen Size, Depth, and Extrude direction settings. At the top left of the interface are the Extrude Direction Settings. This allows for user-definable extrusions.
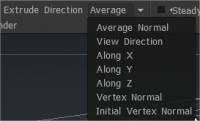
These extrusion methods settings are unique to the following three tools:
Average normal, View direction, Along axis (X, Y or Z), Vertex normal & Initial vertex normal.
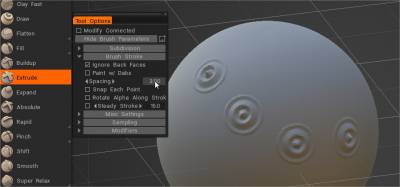
Change spacing to add alpha brushes along strokes.
Pick & Paste: Pick the Vector Displacement Map from the raw surface and drop it into the Alphas panel or duplicate it over the surface.
The Pick & Paste Surface Sculpt Tool, located near the Extrude, allows you to grab a feature from a raw surface, create a Vector Displacement Map (VDM), and use it with Extrude to duplicate the feature. It doesn’t require a flat or nice surface to grab the element; it automatically unwraps and flattens the edge. You can also export VDMs as EXR files to use in other applications. Additionally, you can add external VDM alphas (3 channels, 32-bit, EXR/TIFF) into the Alphas panel and use them in the Surface Extrude.
Expand: Extrude surface along normal vertex direction.
Absolute: Extrudes the surface based on your Brush Size, Depth, and Extrude direction settings, while also maintaining the underlying surface details and topology. Absolute extrusion is relative to the initial surface shape.
Rapid: This tool’s name is very descriptive, as it’s one of the fastest tools in 3DCoat to sculpt general shapes. It doesn’t respect Brush alphas but only brush Size and Intensity. Another great thing about this tool is that if you have two objects in the viewport that are separated from each other in space, it will try its best to form a bridge between them (welding them together as one object). It is very quick for rapid shape building.
Rapid Smooth Scratches: This provides a similar effect that clay sculptors use to “rough out” surface features quickly. Draw scratches along the stroke. Scratches will fade existing geometry as clay.
It simulates a real sculpting rake tool, creating scratches along the stroke. Great for creating muscle fibers and other similar looks. This tool does not respect brush Alphas. The difference between Scratches and Scratches2 is that Scratches2 smooths the edges of the brush stroke, while Scratches does not.
Mud: An interesting surface texture effect, providing rough edges. Very similar to Rapid. However, this tool also has a noise parameter you can adjust to get variously bumped and stroked, similar to quickly applying clay to a real sculpture without smoothing it with water to get that “mud” look. When you have more than one VoxTree object visible in the viewport, this tool will do its best to sculpt on the current layer but will create volume as if it were sculpting on both as one layer. This tool does not respect brush Alphas.
Pinch: This is very great for making very nice tight edges, cavities, and peaks. Surface Pinch is identical to the Voxel Pinch tool, but it is faster and only operates on the surface of a volumetric object.
This is very great for making very nice tight edges, cavities, and peaks. You can better see that in the pictures below. It is identical to the Vox Pinch tool. However, it only operates on the surface of a volumetric object. This option draws the surface area closer to the radial center of the cursor. Use CTRL to expand the surface outward from the center of the cursor.
Smart Pinch: Smart Pinch tries to pinch the surface toward to line picked smartly. The tool picks two points: one on the left and one on the right side of the brush. Then it builds two planes from those points and snaps the surface to the closest plane. Also, it adds a little pinch to underestimate the sharpness of the angle.
Roof Pinch: tries to pinch the surface toward to line picked smartly. The difference with a smart pinch is that this tool keeps the surface noise instead of flattening. The tool picks two points, one on the left and the other on the right side of the brush. Then it builds two planes from that point and pinches the surface to the plane’s intersection.
Shift: This tool drags the surface topology along with the brush. It’s great for producing wrinkles on a character or for making cloth. It is identical to the Vox Follow tool, but it only operates on the surface of a volumetric object.
Slides/drag geometric points of surface topology along the stroking motion relative to screen space with the brush. It’s great for producing wrinkles and so on the character or a creature or for making cloth. It is identical to the Vox Follow tool. However, it only operates on the surface of a volumetric object.
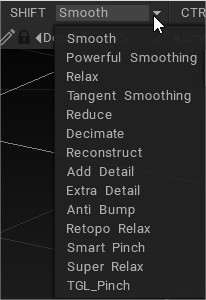
Smooth Tools
Smooth: Produces much more dramatic smoothing than can be achieved with the standard Voxel equivalent.
– Smooth Concave
– Smooth Convex
– Super Relax This is a powerful, valence-independent relax brush. It converts the surface to the regular grid, relaxes, then bakes it back.
– Tangent
Previously, when holding the SHIFT key, one could smooth on the fly… but just standard smoothing was applied. Now, a user can assign different (smoothing) routines and related functions to the SHIFT key, as well as the CTRL + SHIFT combination, including dynamic local subdivision or reduction.
You can perform not only standard smooth actions but use a library of other smooth options to help your work.
Sharpen:
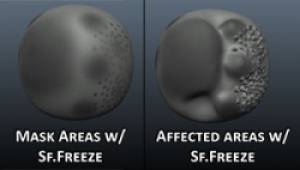
Freeze: A very useful masking tool that allows you to define areas to freeze parts of the surface that be avoided by sculpting tools or inverted to be the focus area for sculpting.
The common shortcuts are CTRL+D to clear frozen parts and CTRL+SHIFT+I to invert freeze.
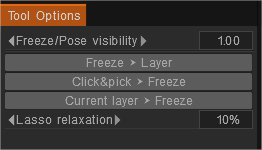
Freeze ⮞ Layer: Store to layer.
Click&pick ⮞ Freeze: Recall the frozen state picking the layer from the scene. Use SHIFT/CTRL to add/subtract.
Current layer ⮞ Freeze: Recall the frozen state from the current layer’s opacity. Use SHIFT/CTRL to add/subtract.
Surface hide: Works as a mask to hide a portion of the model’s surface mesh. Use the “Invert hide” option to hide everything but the masked area. Brush or use Stroke Draw mode to hide portions of the selected VoxTree object. To unhide, choose that option from the Geometry Menu.
Hide the polygons from being seen or edited by stroking over an area. All polygons will be hidden that are under your brush. After hiding some polygons, using the hotkey combinations, CTRL+D will unhide, and CTRL+SHIFT+I will invert the hidden polygons with the visible polygons.
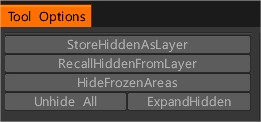
You have possibility to store hidden state to layer and get it back, and also expand hidden.
Snake Clay:
Copy Clay: This tool copies the surface areas. Point to the area you want to copy and click LMB. All that is within the diameter of the brush will be copied. Move the brush to the area where you want to apply the copy and click LMB again. If you want to copy a new area, click “Clear Data”.
Magnify Layers: Magnify depth values based on previous brush strokes (up or down from the surface) on the current Sculpt Layer. Found on Sculpt Layer version.
Erase Layers: Erase Depth values on the current Sculpt Layer. Found on Sculpt Layer version.