 हिन्दी
  English
 Українська
 Español
 Deutsch
 Français
 日本語
日本語 Русский
 한국어
한국어 Polski
 中文 (中国)
 Português
 Italiano
 Suomi
Suomi Svenska
 中文 (台灣)
 Dansk
Dansk Slovenčina
 Türkçe
 Nederlands
 Magyar
 ไทย
ไทย Ελληνικά
 Tiếng Việt
 Lietuviškai
 Latviešu valoda
 Eesti
Eesti Čeština
 Română
 Norsk Bokmål
मेश पर शेडर्स आपको लागू विभिन्न सामग्रियों के साथ अपनी मूर्तिकला के यथार्थवादी या प्रभावशाली रीयल-टाइम पूर्वावलोकन को तुरंत देखने की अनुमति देते हैं।
कुछ समय पहले, 3DCoat मूर्तिकला कार्यक्षेत्र में PBR शेडर्स का उपयोग करने की क्षमता को जोड़ा। हालांकि 3DCoat में स्मार्ट सामग्रियों के प्रतिस्थापन के रूप में इरादा नहीं है, नए भौतिक शेडर्स 3DCoat में उच्च पॉली स्कल्प्स पर GGX प्रकाश और भौतिक रूप से आधारित प्रतिपादन का उपयोग करने का एक शानदार तरीका प्रदान करते हैं।
कुछ शेडर्स को “बेक्ड” Retopo मेश की डिफ्यूज़ कलर लेयर में बेक किया जा सकता है, इस प्रकार कुछ स्थितियों में टेक्सचरिंग प्रक्रिया को सुव्यवस्थित किया जा सकता है।
प्राथमिक शेडर गुणों को संपादित किया जा सकता है, और कुल मिलाकर नए शेडर्स को स्क्रैच से बनाया जा सकता है, जिससे आपको विज़ुअलाइज़ेशन विकल्पों का एक शक्तिशाली सेट मिलता है।
शेडर्स बनाना, उपयोग करना और संपादित करना
मूर्तिकला कक्ष – कस्टम व्यूपोर्ट सामग्री : Anton Tenitsky द्वारा।
आप वर्तमान वस्तु पर लागू करने के लिए शेडर का चयन करने के लिए एलएमबी के साथ क्लिक करें। यदि आप एक शेडर पर आरएमबी क्लिक करते हैं, तो आपको और विकल्प मिलेंगे।
असाइनमेंट के बाद, आप स्कल्प्ट ट्री > आरएमबी मेनू में बनावट के रंग जैसे शेडर गुणों को बदल सकते हैं।
हटाएं: यह आपके द्वारा क्लिक किए गए शेडर को हटा देगा।
आइटम साझा करें: अन्य उपयोगकर्ताओं के साथ साझा करने के लिए आइटम को 3dcpack फ़ाइल के रूप में सहेजें।
आइटम फ़ोल्डर साझा करें: अन्य उपयोगकर्ताओं के साथ साझा करने के लिए आइटम फ़ोल्डर को 3dcpack – फ़ाइल के रूप में साझा करें।
शेडर का नाम बदलें:
नया शेडर बनाएँ: इस शेडर के आधार पर एक नया शेडर बनाएँ। आप एक नया नाम दे सकते हैं और नए टेक्सचर और अन्य पैरामीटर असाइन कर सकते हैं।
डिफ़ॉल्ट शेडर के रूप में चुनें: यह आपके द्वारा क्लिक किए गए शेडर को डिफ़ॉल्ट शेडर के रूप में लागू करेगा। हर बार एक नया वॉल्यूम ऑब्जेक्ट बनाया जाता है, उसके बाद यह नया डिफ़ॉल्ट लागू होगा।
वर्तमान ऑब्जेक्ट की शेडर सेटिंग संपादित करें: वर्तमान ऑब्जेक्ट को असाइन की गई शेडर की सेटिंग संपादित करें।
स्थायी शेडर सेटिंग्स संपादित करें: यदि आप वहां शेडर सेटिंग्स बदलते हैं, तो वे सभी भविष्य की वस्तुओं के लिए बदली रहेंगी जहां इस शेडर का उपयोग किया जाएगा।
इस पूर्वावलोकन को रीफ़्रेश करें:
सभी पूर्वावलोकन रीफ़्रेश करें: ये दो विकल्प केवल शेडर टैब को रीफ़्रेश करते हैं। यदि आप एक नए बनाए गए शेडर के साथ चयन के रूप में दिखाई नहीं दे रहे हैं तो मददगार है।
दृश्यमान पर लागू करें:
उप-वृक्ष पर आवेदन करें:
आइटम यहां ले जाएं…:
छोटा:
सामान्य:
बड़ा:
बेसिक शेडर्स
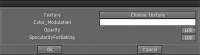
सबसे बुनियादी प्रकार के शेडर में बिल्कुल कोई कस्टम सेटिंग नहीं होती है (जैसे डिफ़ॉल्ट शेडर)। वे वही हैं जो वे हैं और उन्हें संशोधित नहीं किया जा सकता है।
दूसरे प्रकार के बेसिक शेडर में एडजस्टेबल पैरामीटर होते हैं, जैसा कि ऊपर डायलॉग में दिखाया गया है – जो एक शेडर का चयन करके, शेडर आइकन पर राइट-क्लिक करके और पॉप-अप मेनू से “एडिट” कमांड में से एक को चुनकर प्राप्त किया जा सकता है।
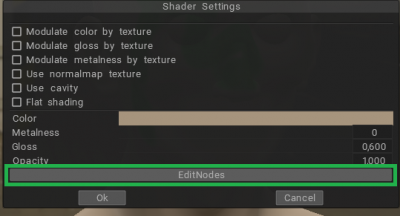
कॉम्प्लेक्स शेडर्स
इस प्रकार के शेडर्स में कई अतिरिक्त गुण होते हैं जिनमें बनावट का उपयोग शामिल होता है (अनिवार्य नहीं)।
ऊपर दिखाया गया मुख्य “एडिट डायलॉग” है, जिसमें नॉर्मल और बम्प, सिमुलेशन, रिफ्लेक्शन सिमुलेशन और कैविटी सिमुलेशन जैसी चीजों को नियंत्रित करने के लिए बनावट का उपयोग शामिल है।
प्रयोग यहां सफलता की कुंजी है।
कई नए शेडर्स वर्षों से उपयोगकर्ताओं द्वारा बनाए गए हैं और हमारे फोरम के “3DCoat Exchange लाइब्रेरी” भाग में पाए जा सकते हैं।

– संस्करण 2021 पर, PBR मूर्तिकला शेड्स अपडेट किए गए हैं; यदि आप एक normal map निर्दिष्ट करते हैं, तो normal map प्रकार का स्वतः पता लगाया जाता है; साथ ही, आप तीनों विमानों में से प्रत्येक को अलग-अलग शेडर्स पैरामीटर में घुमा सकते हैं।
यह उदाहरण के लिए, दीवार का सही शेडर बनाना संभव बनाता है। साथ ही, शेडर सेटिंग्स में सामान्य मानचित्रों के आर/जी चैनलों को फ़्लॉप करना संभव है।
PBR शेडर बनावट के साथ-साथ सही ढंग से बेक किया गया।
मैटकैप शेडर्स
ये विशेष शेडर्स अपनी विशेषताओं को एक निश्चित प्रकार की बनावट फ़ाइल से प्राप्त करते हैं, जिसमें कृत्रिम प्रकाश व्यवस्था, रंग, स्पेक्युलर, पारदर्शिता और छायांकन गुण होते हैं।
इन बनावट फ़ाइलों को बनाने के लिए विशेष सॉफ़्टवेयर की आवश्यकता होती है, और “3DCoat एक्सचेंज लाइब्रेरी” अनुभाग में फ़ोरम पर ठोस बनावट बनाने के लिए सॉफ़्टवेयर और तकनीकों के लिंक मिल सकते हैं।
नोड संपादक का उपयोग करते हुए प्रक्रियात्मक शेडर्स
नोड संपादक आपको एचएलएसएल शेडर्स को दृष्टि से बनाने में सक्षम बनाता है। कोड लिखने के बजाय, आप ग्राफ़ फ्रेमवर्क में नोड्स बनाते और कनेक्ट करते हैं। यह तत्काल प्रतिक्रिया देता है जो आपके परिवर्तनों को दर्शाता है, और यह शेडर निर्माण के लिए नए उपयोगकर्ताओं के लिए काफी सरल है।
नोड संपादक विवरण
एक नोड उपलब्ध बंदरगाहों के आधार पर शेडर संपादक पर इनपुट, आउटपुट या ऑपरेशन को परिभाषित करता है । एक नोड में कितने भी इनपुट और/या आउटपुट पोर्ट हो सकते हैं। इन Ports को Edges से जोड़कर आप एक ग्राफ बनाते हैं। एक नोड में कई नियंत्रण भी हो सकते हैं; नोड पर ऐसे नियंत्रण होते हैं जिनमें पोर्ट नहीं होते हैं।
आप नोड के ऊपरी-दाएँ कोने में संक्षिप्त बटन पर क्लिक करके एक नोड को संक्षिप्त कर सकते हैं। यह सभी असंबद्ध बंदरगाहों को छुपाएगा।
नोड के घटक बंदरगाह और किनारे हैं।
पत्तन
एक पोर्ट एक नोड पर एक इनपुट या आउटपुट को परिभाषित करता है । किनारों को एक पोर्ट से जोड़ने से डेटा को शेडर ग्राफ़ नोड नेटवर्क के माध्यम से प्रवाहित करने की अनुमति मिलती है।
प्रत्येक पोर्ट में एक डेटा प्रकार होता है जो परिभाषित करता है कि किनारों को किससे जोड़ा जा सकता है। प्रत्येक डेटा प्रकार के प्रकार की पहचान करने के लिए एक संबंधित रंग होता है। केवल एक किनारे को किसी भी इनपुट पोर्ट से जोड़ा जा सकता है, लेकिन कई किनारों को एक आउटपुट पोर्ट से जोड़ा जा सकता है।
आप बाएं माउस बटन के साथ पोर्ट से एज खींचकर और खाली वर्कस्पेस क्षेत्र में इसे जारी करके एक प्रासंगिक क्रिएट नोड मेनू खोल सकते हैं।
डिफ़ॉल्ट इनपुट: प्रत्येक इनपुट पोर्ट, नोड के बाईं ओर एक पोर्ट जिसका अर्थ है कि यह नोड में डेटा इनपुट करने के लिए है, में एक डिफ़ॉल्ट इनपुट होता है। यह पोर्ट से जुड़ा एक छोटा क्षेत्र है जब कोई एज कनेक्ट नहीं होता है। यह फ़ील्ड पोर्ट के डेटा प्रकार के लिए इनपुट प्रदर्शित करेगा जब तक कि पोर्ट में पोर्ट बाइंडिंग न हो।
यदि किसी पोर्ट में पोर्ट बाइंडिंग है, तो डिफ़ॉल्ट इनपुट फ़ील्ड एक विशेष फ़ील्ड प्रदर्शित कर सकती है, जैसे कि UV चैनल चुनने के लिए एक ड्रॉपडाउन, या सिर्फ एक लेबल जो आपको इच्छित इनपुट को समझने में मदद करता है, जैसे ज्यामिति डेटा के लिए अंतरिक्ष लेबल समन्वयित करना।
किनारा
एक किनारा दो बंदरगाहों के बीच एक संबंध को परिभाषित करता है । किनारे परिभाषित करते हैं कि शेडर संपादक नोड नेटवर्क के माध्यम से डेटा कैसे प्रवाहित होता है। उन्हें केवल इनपुट पोर्ट से आउटपुट पोर्ट से जोड़ा जा सकता है।
प्रत्येक एज में एक डेटा प्रकार होता है जो परिभाषित करता है कि इसे किस पोर्ट से जोड़ा जा सकता है। प्रत्येक डेटा प्रकार के प्रकार की पहचान करने के लिए एक संबंधित रंग होता है।
आप बाईं माउस बटन के साथ पोर्ट से क्लिक करके और खींचकर एक नया एज बना सकते हैं। किनारों को डिलीट (विंडोज), कमांड + बैकस्पेस (OSX), या संदर्भ मेनू से नोड पर राइट-क्लिक करके हटाया जा सकता है।
आप बाएं माउस बटन के साथ पोर्ट से एज खींचकर और खाली वर्कस्पेस क्षेत्र में इसे जारी करके एक प्रासंगिक क्रिएट नोड मेनू खोल सकते हैं।
शेडर ग्राफ़ में कई उपलब्ध नोड हैं। सभी उपलब्ध नोड्स की पूरी सूची के लिए नोड लाइब्रेरी देखें।
ट्यूटोरियल
एलेक्सन007 द्वारा नोड ग्राफ संपादक का उपयोग करके मूर्तिकला वस्तुओं के लिए प्रक्रियात्मक शेडर बनाएं ।
शेडर नोड को बेक करें
एक बार जब आप अपना प्रक्रियात्मक शेडर प्राप्त कर लेते हैं, तो यह प्रक्रियात्मक ज्यामिति को bake के लिए उपयोग की जाने वाली कमांड है:
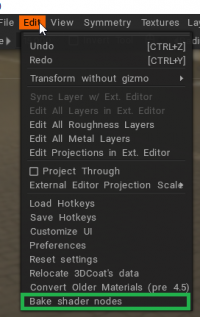
बेक शेडर नोड्स: नोड संपादक से वास्तविक रंग/विस्थापन के लिए प्रक्रियात्मक जाल विकृतियों और सामग्रियों को बेक करें। यह export के लिए मददगार हो सकता है।
ट्यूटोरियल
टून शेडर्स : यह वीडियो हाल ही में जोड़े गए टून शेडर्स के उपयोग को 3DCoat के मूर्तिकला कार्यक्षेत्र में प्रदर्शित करता है।
PBR शेडर्स : यह वीडियो 3DCoat के स्कल्प्ट कार्यक्षेत्र में नए PBR शेडर सिस्टम का प्रदर्शन शुरू करता है, जिसमें नया SKIN शेडर भी शामिल है जो सही SSS (रेंडर कार्यक्षेत्र में) प्रस्तुत करता है।
नए PBR शेडर्स में एक नया स्किन शेडर शामिल है जो 3DCoat के रेंडर वर्कस्पेस में सही SSS को रेंडर कर सकता है। ट्यूटोरियल पैनल में कई शेडर विकल्पों में से कुछ के माध्यम से चलता है और दिखाता है कि काम करते समय आप डिफ़ॉल्ट शेडर कैसे बदल सकते हैं या अपने शेडर बना सकते हैं।