• Português
  • Documentação 3DCoat
  • Chapters
    • Introdução ao 3DCoat
    • Começando
    • Interface e Navegação
    • Componentes do Brush
    • Espaços de Trabalho Salas
    • API de Scripting e Core API
    • Perguntas e Respostas
    • licensing
    • Tutoriais de treinamento
  • Pilgway
  • Products
    • 3DCoat
    • 3DCoatTextura
    • 3DCoatPrint
    • PBRLibrary
  • Blog Posts
  • Store
  • Português Português
    • English English
    • Українська Українська
    • Español Español
    • Deutsch Deutsch
    • Français Français
    • 日本語 日本語
    • Русский Русский
    • 한국어 한국어
    • Polski Polski
    • 中文 (中国) 中文 (中国)
    • Italiano Italiano
    • Suomi Suomi
    • Svenska Svenska
    • 中文 (台灣) 中文 (台灣)
    • Dansk Dansk
    • Slovenčina Slovenčina
    • Türkçe Türkçe
    • Nederlands Nederlands
    • Magyar Magyar
    • ไทย ไทย
    • हिन्दी हिन्दी
    • Ελληνικά Ελληνικά
    • Tiếng Việt Tiếng Việt
    • Lietuviškai Lietuviškai
    • Latviešu valoda Latviešu valoda
    • Eesti Eesti
    • Čeština Čeština
    • Română Română
    • Norsk Bokmål Norsk Bokmål
  • Creating 3D Character Using 3DCoat
Expand All Collapse All
  • Introdução ao 3DCoat
  • Começando
    • System requirements
    • Why 3DCoat is Unique?
    • Ativando 3DCoat
    • erro de inicialização
      • Startup error Mac
    • Color management
    • Upgrading permanent license
    • Linux Setup
      • Linux initial setup per-user installation
      • Linux initial setup for system
      • Tablet setup
      • To GTK3 from GTK2
    • Estrutura de Pastas
      • Custom documents folder
    • Diferentes formas de “resolução”
    • Tablet on Window
    • Import e Export
    • Applinks em 3DCoat
      • Link do aplicativo Blender
        • Blender with the Applink in Linux
      • Blender 4.2/3/4/5 applink
      • Max Applink
      • Houdini applink
      • Lightwave uplink
  • Navigation
    • Diálogo de abertura (Menu de início rápido)
    • Painel de navegação
    • Câmera e navegação
      • Customize Navigation as Blender
    • Viewport Navigation Gizmo
    • Left tool panel
    •  Activity Bar
    • Navegação usando dispositivos 3DConnexion
      • How to compile Spacenavd on non Ubuntu distro
    • Stylus doesn’t work in sculpting
    • Teclas de atalho
  • Interface e Navegação
    • Menu de arquivo
    • Editar menu
      • Calculate Curvature
      • Calculate Occlusion
      • Light Baking Tool
      • Preferências
    • Ver Menu
    • Simetria
    • Textures
    • Calculate
    • Menu de Camadas
    • Menu Congelar
    • Hide
    • Bake
    • Curvas 2022
      • Menu de Curvas
      • Curves Properties RMB
      • Preencher com camada de malha
      • Scale of imported curves
    • Menu do Windows
      • Painéis pop-up do Windows com guias
      • Controles deslizantes
    • Scripts
    • Addons
    • Capture
    • menu de ajuda
    • Costumização
    • Modifique ou crie uma nova sala
  • Componentes do Brush
    • Brush Barra Superior
    • Pincéis de uso geral
      • Crie pincéis e decalques
      • Fazendo alfa a partir da escultura atual
      • Crie um Brush a partir de um objeto 3D
      • Create brushes based on Curves
      • Load photoshop .abr brushes
    • Strokes
      • Menu pop-up Curvas
    • Opções de Brush
    • Limitador de Condições
    • Painel de tiras
    • Painel de estênceis
    • Materiais Inteligentes
      • Adicione novas imagens ou materiais
      • Anexe um material inteligente a uma camada
      • Import Quixel Material
    • Como criar predefinições para Brush
  • Espaços de Trabalho Salas
    • Painting
      • Painting de texturas e modos
        • Painting por Per-Pixel
        • Painting de Deslocamento (Micro-Vértice)
        • Painting Ptex
        • Painting de Superfície (Polipintura)
      • Importando para a sala de Painting
        • Initial CC subdivision
        • UV Set smoothing
        • Sharp (hard) edge
        • Bloquear normais
        • Carregar novo layout UV após alterações no modelo
        • DAZ Genesis models into 3DCoat
      • Menus da área de trabalho de Painting
        • Edit menu
        • Menu de Texturas
          • Ferramentas de Baking de textura
        • Esconder
        • Menu para o Bake Paint
        • O seletor de cores
      • Barra superior para a Painting
      • O Painel de Camadas
        • O Painel de Mistura
        • Layer and Clipping Masks
      • Ferramentas da sala de Painting
      • Opacidade - Transparência
      • Ajustar espaço de trabalho
        • Ajuste o conjunto de ferramentas
        • Exportando da Tweak Room
      • Painel de visualização de máscara/material
      • Exportando da sala de Painting
    • espaço de trabalho UV
      • Barra Superior UV
      • Painel de ferramentas UV Esquerda
      • Painel de visualização UV
      • exemplo de fluxo de trabalho UV
      • Importando para a sala UV
      • Exportando da Sala UV
    • Retopologia
      • Importando para a sala Retopo
      • Menu Retopo Mesh e Menu Bake
        • Modo Espelho Virtual
      • Bake menu
        • Treat Poly Groups as Paint Objects
        • Baking guide
      • Barra superior
        • Selecione a geometria
      • Painel de ferramentas esquerdo na sala de Retopologia
        • Objetivo geral e função
        • Adicionar geometria
          • Ferramenta Strokes em Retopologia
        • Ferramentas de ajuste de Retopo
        • Ferramentas UV
        • Comandos para sala de Retopologia
      • AUTORETOPO
        • Autopo guide
      • Grupos poli
    • Esculpir
      • Sculpt Layer
      • esculpir árvore
      • Opções de Brush de escultura
      • Top Bar
      • Motor de Brush
      • Submenu Geometria
      • Esculpir o menu “Clique com o botão direito”
      • Shaders
      • modo Voxel
        • Escultura Pura de Voxel
        • Densidade e resolução
        • Máquina de Barro
        • Ferramentas Voxel
        • Ferramentas de superfície em Voxels
        • Ferramentas de ajuste de Voxel
        • Painting Volumétrica
        • Ferramentas de Objetos Voxel
      • Modo de superfície
        • Ferramentas de superfície
        • Ferramentas personalizadas de superfície
        • Ferramentas de ajuste de superfície
        • Painting de superfície
        • Ferramentas de Objetos de Superfície
        • Resolução multinível
          • Multires tools
          • Multires adjust
          • Multires commands
      • Esculpir curvas
        • Curvas Spline
        • Splines model creation
      • Deslocamento do Vetor
      • Ferramentas de transformação de superfície
        • Ferramentas de Transformação Voxel
        • Instancer
        • Move
        • Pose
        • Fit
        • Reproject
        • Surface Array
      • Primitivos Voxel e Ferramentas de Import
      • Booleanos ativos
      • Comandos para a sala Sculpt
      • Import para Sala de Escultura
      • Exportando da sala de esculpir
    • Renderizar
      • Comparison of different roughness values
      • Funções do painel de renderização
      • toca discos
      • Fakebake a iluminação -não PBR-
    • Factures
      • fluxo de trabalho
    • mais simples
    • Modelagem
      • Mesh Menu
      • Painel de ferramentas esquerdo na sala de modelagem
        • Adicionar geometria
          • Selecionado
        • Puxão
        • Smart Hybrid
        • UV
          • Comandos
        • Malha inteira
      • Exemplo de superfície de loft por Fluffy
      • Bloqueio por Poeboi
      • Import Zbrush Polygroups for UV mapping
    • Kitbash - Criação Rápida de Modelos 3D
      • Create kitbash
      • Left tool panel Kitbash
    • 3DPrint
    • Photogrammetry
      • How to install Reality Capture
      • Reality Capture doesn’t show up ?
    • Malha para sala NURBS
    • Nodes
      • Biblioteca de nós de shaders de esculpir
  • API de Scripting e Core API
    • Scripting
    • Core API
    • API do Python
  • 3DCoatPrint gratuita

Addons

1309 views 0

Written by Carlos
March 2, 2024

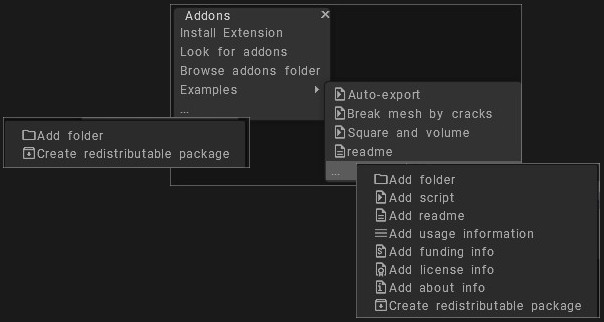
The Addons system introduced to connect scripts developers and users. It allows easy sharing the scripts, providing instructions, funding information (if the author needs it).

Several useful examples included, for example, the realistic destruction with random cracks.

Addons are included into regular File->Create extensions.

Install Extensions: Install 3DCoat extension – (file with extension .3dcpack). It may contain textures, Shaders, Alphas, Smart Materials, Stencils, Objects, scripts, or any other content provided by the package creator.
Look for addons: Go to the forum and seek scripts.
Browse addons folder: Browse addons folder where you downloaded the 3DC extensions.

Examples

Several official examples are provided to demonstrate the usage of Addons. Addons are placed in the UserPrefs/Addons/ folder as a set of folders and subfolders.

You may add .py and .cpp files there. Each file appears in the tree of the Addons submenu.
If the name of a file or folder starts with a . or _, it will not appear in the tree.

The txt files also appear as menu items; this readme.txt is an example.

If a file has the .url extension, it opens as a URL in the browser.
If a txt file contains a URL, such as “https://pilgway.com/files/3dcoat/PythonAPI/index.html”, an “Open URL” button appears below the dialog.

Press using LMB over the 3dots at bottom

This command are more scripts examples that helps you to be use when you create your addons that are ready to be distributed.
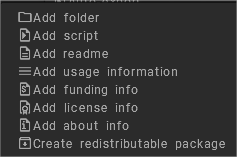
Add folder:
Add script: let you chose one of the recently executed scripts.
Add readme:
Add usage information:
Add funding info:
Add license info:
Add about info:
Create redistributable package:

Tags:addons

Was this helpful?

Yes  No
Related Articles
  • Surface Array
  • Top Bar
  • Curves Properties RMB
  • Left tool panel Kitbash
  • Create kitbash
  • Color management
Previously
Scripts
Up Next
Capture
AI:
Hi! How can I help you?
Attention: This is a beta version of AI chat. Some answers may be wrong. See full version of AI chat