• 한국어
  • 3DCoat 설명서
  • Chapters
    • 3DCoat 소개
    • 시작하기
    • 인터페이스 및 탐색
    • Brush 구성 요소
    • 작업 공간 방
    • Scripting 및 Core API
    • 질문과 답변
    • licensing
    • 교육 자습서
  • Pilgway
  • Products
    • 3DCoat
    • 3DCoatTextura
    • 3DCoatPrint
    • PBRLibrary
  • Blog Posts
  • Store
  • 한국어 한국어
    • English English
    • Українська Українська
    • Español Español
    • Deutsch Deutsch
    • Français Français
    • 日本語 日本語
    • Русский Русский
    • Polski Polski
    • 中文 (中国) 中文 (中国)
    • Português Português
    • Italiano Italiano
    • Suomi Suomi
    • Svenska Svenska
    • 中文 (台灣) 中文 (台灣)
    • Dansk Dansk
    • Slovenčina Slovenčina
    • Türkçe Türkçe
    • Nederlands Nederlands
    • Magyar Magyar
    • ไทย ไทย
    • हिन्दी हिन्दी
    • Ελληνικά Ελληνικά
    • Tiếng Việt Tiếng Việt
    • Lietuviškai Lietuviškai
    • Latviešu valoda Latviešu valoda
    • Eesti Eesti
    • Čeština Čeština
    • Română Română
    • Norsk Bokmål Norsk Bokmål
  • Creating 3D Character Using 3DCoat
Expand All Collapse All
  • 3DCoat 소개
  • 시작하기
    • System requirements
    • Why 3DCoat is Unique?
    • 3DCoat 활성화
    • 시작 오류
      • Startup error Mac
    • Color management
    • Upgrading permanent license
    • Linux Setup
      • Linux initial setup per-user installation
      • Linux initial setup for system
      • Tablet setup
      • To GTK3 from GTK2
    • 폴더 구조
      • Custom documents folder
    • 다양한 형태의 "결의안"
    • Tablet on Window
    • Import 및 Export
    • 3DCoat 의 Applinks
      • Blender 앱link
        • Blender with the Applink in Linux
      • Blender 4.2/3/4/5 applink
      • Max Applink
      • Houdini applink
      • Lightwave uplink
  • Navigation
    • 열기 대화 상자(빠른 시작 메뉴)
    • 탐색 패널
    • 카메라 및 내비게이션
      • Customize Navigation as Blender
    • Viewport Navigation Gizmo
    • Left tool panel
    •  Activity Bar
    • 3DConnexion 장치를 사용한 탐색
      • How to compile Spacenavd on non Ubuntu distro
    • Stylus doesn’t work in sculpting
    • 단축키
  • 인터페이스 및 탐색
    • 파일 메뉴
    • 편집 메뉴
      • Calculate Curvature
      • Calculate Occlusion
      • Light Baking Tool
      • 기본 설정
    • 메뉴 보기
    • 대칭
    • Textures
    • Calculate
    • 레이어 메뉴
    • 정지 메뉴
    • Hide
    • Bake
    • 곡선 2022
      • 곡선 메뉴
      • Curves Properties RMB
      • 메쉬 레이어로 채우기
      • Scale of imported curves
    • 윈도우 메뉴
      • 탭 Windows 팝업 패널
      • 슬라이더
    • Scripts
    • Addons
    • Capture
    • 도움말 메뉴
    • 커스터마이징
    • 새 방 수정 또는 만들기
  • Brush 구성 요소
    • Brush 상단 바
    • 브러쉬 일반 사용
      • 브러시 및 데칼 만들기
      • 현재 조각에서 알파 만들기
      • 3D 개체에서 Brush 만들기
      • Create brushes based on Curves
      • Load photoshop .abr brushes
    • 스트로크
      • 곡선 팝업 메뉴
    • Brush 옵션
    • 조건 제한기
    • 스트립 패널
    • 스텐실 패널
    • 스마트 소재
      • 새로운 이미지 또는 자료 추가
      • 스마트 재료를 레이어에 연결
      • Import Quixel Material
    • Brush 용 사전 설정을 만드는 방법
  • 작업 공간 방
    • Painting
      • 텍스처 Painting 및 모드
        • Per-Pixel Painting
        • 변위 Painting (Micro-Vertex)
        • Ptex Painting
        • 표면 Painting (폴리페인팅)
      • Painting 룸으로 가져오기
        • Initial CC subdivision
        • UV Set smoothing
        • Sharp (hard) edge
        • 법선 잠금
        • 모델 변경 후 새 UV 레이아웃 로드
        • DAZ Genesis models into 3DCoat
      • Painting 작업 영역의 메뉴
        • Edit menu
        • 텍스처 메뉴
          • 텍스처 Baking 도구
        • 숨다
        • Bake Paint 용 메뉴
        • 색상 선택기
      • Painting 위한 상단 바
      • 레이어 패널
        • 블렌딩 패널
        • Layer and Clipping Masks
      • Painting 룸 도구
      • 불투명도 - 투명도
      • 작업 공간 조정
        • 조정 도구 세트
        • Tweak Room에서 내보내기
      • 마스크/재료 미리보기 패널
      • Painting 룸에서 내보내기
    • UV 작업 공간
      • UV 탑 바
      • UV 왼쪽 도구 패널
      • UV 미리보기 패널
      • UV 워크플로우 예시
      • UV 룸으로 가져오기
      • UV Room에서 내보내기
    • 리토폴로지
      • Retopo Room으로 가져오기
      • Retopo Mesh 메뉴 및 Bake 메뉴
        • 가상 미러 모드
      • Bake menu
        • Treat Poly Groups as Paint Objects
        • Baking guide
      • 탑바
        • 지오메트리 선택
      • 리토폴로지 룸의 왼쪽 도구 패널
        • 전반적인 목적 및 기능
        • 형상 추가
          • 리토폴로지의 스트로크 도구
        • Retopo 조정 도구
        • UV 도구
        • 리토폴로지 룸 명령
      • 오토레토포
        • Autopo guide
      • 폴리 그룹
    • 조각하다
      • Sculpt Layer
      • 조각 나무
      • 조각 Brush 옵션
      • Top Bar
      • Brush 엔진
      • 형상 하위 메뉴
      • 조각 "오른쪽 클릭" 메뉴
      • 셰이더
      • Voxel 모드
        • 순수한 Voxel 조각
        • 밀도 및 해상도
        • 클레이 엔진
        • Voxel 도구
        • 복셀의 표면 도구
        • Voxel 조정 도구
        • 볼륨 Painting
        • Voxel 개체 도구
      • 표면 모드
        • 표면 도구
        • 표면 맞춤 도구
        • 표면 조정 도구
        • 표면 Painting
        • 표면 개체 도구
        • 다중 레벨 해상도
          • Multires tools
          • Multires adjust
          • Multires commands
      • 조각 곡선
        • 스플라인 곡선
        • Splines model creation
      • 벡터 변위
      • 표면 변환 도구
        • Voxel 변환 도구
        • Instancer
        • Move
        • Pose
        • Fit
        • Reproject
        • Surface Array
      • Voxel 프리미티브 및 Import 도구
      • 라이브 부울
      • 조각실 명령
      • 조각실로 Import
      • 조각실에서 내보내기
    • 세우다
      • Comparison of different roughness values
      • 렌더 패널 기능
      • 턴테이블
      • 조명을 페이크 베이크 -비 PBR-
    • Factures
      • 워크플로우
    • 가장 단순함
    • 모델링
      • Mesh Menu
      • 모델링 룸의 왼쪽 도구 패널
        • 형상 추가
          • 선택된
        • 비틀기
        • Smart Hybrid
        • UV
          • 명령
        • 전체 메시
      • Fluffy의 로프트 표면 예
      • Poeboi의 블록아웃
      • Import Zbrush Polygroups for UV mapping
    • Kitbash - 빠른 3D 모델 생성
      • Create kitbash
      • Left tool panel Kitbash
    • 3DPrint
    • Photogrammetry
      • How to install Reality Capture
      • Reality Capture doesn’t show up ?
    • 메시를 NURBS 룸으로
    • Nodes
      • 조각 셰이더 노드 라이브러리
  • Scripting 및 Core API
    • Scripting
    • Core API
    • 파이썬 API
  • 무료 3DCoatPrint

Pose

459 views 0

Written by Carlos
May 12, 2025
Pose tool

You can also use Soft Selection feature for the Pose tool in the Sculpt workspace.

Pose: This tool is great for quickly changing the rotation, scale, and translation of a selection.
You can determine the selection in several ways. You can use a line, ring, or sphere, and you can even paint on it with a Brush or an object.
Check the Airbrush mode when using “Select with a pen” to increase the selection area smoothly.

After a selection is made, a special posing gizmo will appear.
Switching off Regular Gizmo, the tool has three states: Rotate, Scale, and Translate.
You can switch modes by clicking on the long red rectangular bar at the base of the gizmo. In each state, the gizmo has a set of parameters in the Tool Options Panel.

Finally, as with all tools in 3DCoat, the pose tool respects symmetry, as well as all selection modes, like drag rectangle, lasso, etc. Now, the Pose tool works on all visible objects (through all volumes).
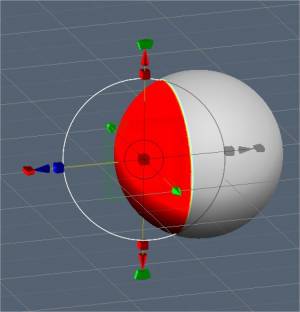
Let’s now take a look at some of the Pose Mode parameters:
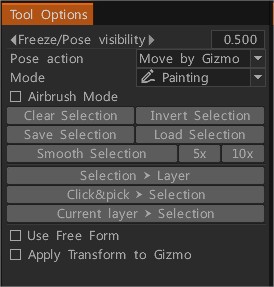
  • Freeze/Pose visibility: The opacity of the pose or freeze selection.
  • Pose Action: you have two options:
  1. Move by Gizmo.
  2. Normal Extrude.
  • Mode: The method of selection for the Pose tool.
    • Line: This mode lets you draw a line-based gradient for use with the pose tool gizmo. It starts with your initial LMB click and ends with the release of the LMB.
    • Ring: This selects a ring-based gradient. It starts with your initial LMB click and ends with the release of the LMB.
    • Sphere: This selects a spherical gradient. It starts with your initial LMB click and ends with the release of the LMB.
  • Snap to angle: Activate if you need the Snap to Angle selection.
  • Paint: Select by brushing over an element. Selecting with pen mode lets you directly brush on your selection. The pen size directly affects the selection area. Furthermore, you can also smooth your selected area by holding “Shift + LMB”. This is a great way to select things quickly if you just need tiny little details selected.
  • Note: “Paint Select” mode is very useful. With the Pose tool, you can use almost any selection method in the “E” Panel, like drag rectangle, lasso, etc. You can also subtract your selection using the normal tool while holding the CTRL key.
    • Airbrush mode: Activate airbrush mode. You can also smoothly select areas instead of having a hard-edged selection. It makes for tidy deformations around the edges of your selection.
  • Select Object: If you have multiple objects in your Sculpt Tree, this mode can come in handy. Simply click on the object you want to deform using the Pose tool, which will place the entire volume as your selection.

  • Edit Pose falloff:
  • Clear Selection:
  • Invert Selection: Invert pose selection.
  • Save Selection: Save pose selection to the file. It is recommended to use this in surface mode. If the mesh structure is changed due to voxelization, you will not be able to apply the previous store selection.
  • Load Selection: Load pose selection from the file. If the mesh structure changes, you cannot restore selection, so use it in surface mode whenever possible.
  • Smooth Selection: Smooth Pose Selection. Smooth all-in pose tool – it smooths all volumes selection if “through all volumes” is selected. Also, there are buttons 5x and 10x near the Smooth command to smooth faster.
  • Store selection to the Layer: Store Pose Selection As Layer.
  • Pick selection from the Layer: Recall Selection By Click. Press the button, then click on the layer in the scene to recall the frozen state. Use SHIFT to add the selection, and CTRL to subtract.
  • Current layer > Selection: Recall the selection from the current layer’s opacity. Use SHIFT/CTRL to add/subtract the selection.

– Use Free Form: This feature allows a lattice to deform the selected Pose area. Select from several lattice shapes to transform the Pose selection.
– Apply Transform to Gizmo: Apply Transform to the entire Gizmo.

  • Regular Gizmo: Use a regular gizmo instead of a line-based one. Below you have settings to select a control type if regular gizmo o line-based is selected.
  • Hide Gizmo: Hide the gizmo to select an area more accurately.
  • Adjust Transition Area: Adjust the area that joins un-selected and completely selected areas. It allows makes bending more accurate and natural.
  • Move Only Gizmo: Move the gizmo but don’t transform the object.
  • Leave Rotated Axes: After rotating, axes will remain in the final state. Otherwise, they will return to X, Y, and Z orientation.
  1. Pick Pivot: Click to pick the pivot point from the surface.
    • Pick Position Only: Pick the position and Y-axis from the pen’s normal; and the position, X, and Z-axis from the pen’s orientation.
    • Pick Normal & Position: Pick the position and Y-axis from the pen’s normal and position X and Z axis from the pen’s orientation.
    • Pick View Direction & Position: Pick gizmo position from the pick point, Y axis from the forward direction, X – right, Z – upper.
  • Reset Axis.
  • Reset Space: Reset the object’s local space so it will be scaled uniformly along all axes, and local axis directions will orient to global X, Y, and Z.
  • Center in Local Space: Center gizmo in local space. Axis will be oriented along the local axis if you check “Leave rotated gizmo”.
  • To Main Axis: Direct gizmo axis along the main geometrical axis of the object.
  • To Center Mass: Move the gizmo to the center of mass.
  • To Bound Center: Move the gizmo to the center of the bound box.
  • Align to View:
  • Apply Transform to Gizmo: Apply to transform to the entire gizmo.

Pose Tool Poly Groups: This video demonstrates a few new feature additions to the Pose Tool in 3DCoat 4.9.
One is angle snapping for precise linear selections. The other is Poly Group functionality built into the Pose tool.

Was this helpful?

Yes  No
Related Articles
  • Surface Array
  • Top Bar
  • Curves Properties RMB
  • Left tool panel Kitbash
  • Create kitbash
  • Color management
Previously
Move
Up Next
Fit
AI:
Hi! How can I help you?
Attention: This is a beta version of AI chat. Some answers may be wrong. See full version of AI chat