• 한국어
  • 3DCoat 설명서
  • Chapters
    • 3DCoat 소개
    • 시작하기
    • 인터페이스 및 탐색
    • Brush 구성 요소
    • 작업 공간 방
    • Scripting 및 Core API
    • 질문과 답변
    • licensing
    • 교육 자습서
  • Pilgway
  • Products
    • 3DCoat
    • 3DCoatTextura
    • 3DCoatPrint
    • PBRLibrary
  • Blog Posts
  • Store
  • 한국어 한국어
    • English English
    • Українська Українська
    • Español Español
    • Deutsch Deutsch
    • Français Français
    • 日本語 日本語
    • Русский Русский
    • Polski Polski
    • 中文 (中国) 中文 (中国)
    • Português Português
    • Italiano Italiano
    • Suomi Suomi
    • Svenska Svenska
    • 中文 (台灣) 中文 (台灣)
    • Dansk Dansk
    • Slovenčina Slovenčina
    • Türkçe Türkçe
    • Nederlands Nederlands
    • Magyar Magyar
    • ไทย ไทย
    • हिन्दी हिन्दी
    • Ελληνικά Ελληνικά
    • Tiếng Việt Tiếng Việt
    • Lietuviškai Lietuviškai
    • Latviešu valoda Latviešu valoda
    • Eesti Eesti
    • Čeština Čeština
    • Română Română
    • Norsk Bokmål Norsk Bokmål
  • Creating 3D Character Using 3DCoat
Expand All Collapse All
  • 3DCoat 소개
  • 시작하기
    • System requirements
    • Why 3DCoat is Unique?
    • 3DCoat 활성화
    • 시작 오류
      • Startup error Mac
    • Color management
    • Upgrading permanent license
    • Linux Setup
      • Linux initial setup per-user installation
      • Linux initial setup for system
      • Tablet setup
      • To GTK3 from GTK2
    • 폴더 구조
      • Custom documents folder
    • 다양한 형태의 "결의안"
    • Tablet on Window
    • Import 및 Export
    • 3DCoat 의 Applinks
      • Blender 앱link
        • Blender with the Applink in Linux
      • Blender 4.2/3/4/5 applink
      • Max Applink
      • Houdini applink
      • Lightwave uplink
  • Navigation
    • 열기 대화 상자(빠른 시작 메뉴)
    • 탐색 패널
    • 카메라 및 내비게이션
      • Customize Navigation as Blender
    • Viewport Navigation Gizmo
    • Left tool panel
    •  Activity Bar
    • 3DConnexion 장치를 사용한 탐색
      • How to compile Spacenavd on non Ubuntu distro
    • Stylus doesn’t work in sculpting
    • 단축키
  • 인터페이스 및 탐색
    • 파일 메뉴
    • 편집 메뉴
      • Calculate Curvature
      • Calculate Occlusion
      • Light Baking Tool
      • 기본 설정
    • 메뉴 보기
    • 대칭
    • Textures
    • Calculate
    • 레이어 메뉴
    • 정지 메뉴
    • Hide
    • Bake
    • 곡선 2022
      • 곡선 메뉴
      • Curves Properties RMB
      • 메쉬 레이어로 채우기
      • Scale of imported curves
    • 윈도우 메뉴
      • 탭 Windows 팝업 패널
      • 슬라이더
    • Scripts
    • Addons
    • Capture
    • 도움말 메뉴
    • 커스터마이징
    • 새 방 수정 또는 만들기
  • Brush 구성 요소
    • Brush 상단 바
    • 브러쉬 일반 사용
      • 브러시 및 데칼 만들기
      • 현재 조각에서 알파 만들기
      • 3D 개체에서 Brush 만들기
      • Create brushes based on Curves
      • Load photoshop .abr brushes
    • 스트로크
      • 곡선 팝업 메뉴
    • Brush 옵션
    • 조건 제한기
    • 스트립 패널
    • 스텐실 패널
    • 스마트 소재
      • 새로운 이미지 또는 자료 추가
      • 스마트 재료를 레이어에 연결
      • Import Quixel Material
    • Brush 용 사전 설정을 만드는 방법
  • 작업 공간 방
    • Painting
      • 텍스처 Painting 및 모드
        • Per-Pixel Painting
        • 변위 Painting (Micro-Vertex)
        • Ptex Painting
        • 표면 Painting (폴리페인팅)
      • Painting 룸으로 가져오기
        • Initial CC subdivision
        • UV Set smoothing
        • Sharp (hard) edge
        • 법선 잠금
        • 모델 변경 후 새 UV 레이아웃 로드
        • DAZ Genesis models into 3DCoat
      • Painting 작업 영역의 메뉴
        • Edit menu
        • 텍스처 메뉴
          • 텍스처 Baking 도구
        • 숨다
        • Bake Paint 용 메뉴
        • 색상 선택기
      • Painting 위한 상단 바
      • 레이어 패널
        • 블렌딩 패널
        • Layer and Clipping Masks
      • Painting 룸 도구
      • 불투명도 - 투명도
      • 작업 공간 조정
        • 조정 도구 세트
        • Tweak Room에서 내보내기
      • 마스크/재료 미리보기 패널
      • Painting 룸에서 내보내기
    • UV 작업 공간
      • UV 탑 바
      • UV 왼쪽 도구 패널
      • UV 미리보기 패널
      • UV 워크플로우 예시
      • UV 룸으로 가져오기
      • UV Room에서 내보내기
    • 리토폴로지
      • Retopo Room으로 가져오기
      • Retopo Mesh 메뉴 및 Bake 메뉴
        • 가상 미러 모드
      • Bake menu
        • Treat Poly Groups as Paint Objects
        • Baking guide
      • 탑바
        • 지오메트리 선택
      • 리토폴로지 룸의 왼쪽 도구 패널
        • 전반적인 목적 및 기능
        • 형상 추가
          • 리토폴로지의 스트로크 도구
        • Retopo 조정 도구
        • UV 도구
        • 리토폴로지 룸 명령
      • 오토레토포
        • Autopo guide
      • 폴리 그룹
    • 조각하다
      • Sculpt Layer
      • 조각 나무
      • 조각 Brush 옵션
      • Top Bar
      • Brush 엔진
      • 형상 하위 메뉴
      • 조각 "오른쪽 클릭" 메뉴
      • 셰이더
      • Voxel 모드
        • 순수한 Voxel 조각
        • 밀도 및 해상도
        • 클레이 엔진
        • Voxel 도구
        • 복셀의 표면 도구
        • Voxel 조정 도구
        • 볼륨 Painting
        • Voxel 개체 도구
      • 표면 모드
        • 표면 도구
        • 표면 맞춤 도구
        • 표면 조정 도구
        • 표면 Painting
        • 표면 개체 도구
        • 다중 레벨 해상도
          • Multires tools
          • Multires adjust
          • Multires commands
      • 조각 곡선
        • 스플라인 곡선
        • Splines model creation
      • 벡터 변위
      • 표면 변환 도구
        • Voxel 변환 도구
        • Instancer
        • Move
        • Pose
        • Fit
        • Reproject
        • Surface Array
      • Voxel 프리미티브 및 Import 도구
      • 라이브 부울
      • 조각실 명령
      • 조각실로 Import
      • 조각실에서 내보내기
    • 세우다
      • Comparison of different roughness values
      • 렌더 패널 기능
      • 턴테이블
      • 조명을 페이크 베이크 -비 PBR-
    • Factures
      • 워크플로우
    • 가장 단순함
    • 모델링
      • Mesh Menu
      • 모델링 룸의 왼쪽 도구 패널
        • 형상 추가
          • 선택된
        • 비틀기
        • Smart Hybrid
        • UV
          • 명령
        • 전체 메시
      • Fluffy의 로프트 표면 예
      • Poeboi의 블록아웃
      • Import Zbrush Polygroups for UV mapping
    • Kitbash - 빠른 3D 모델 생성
      • Create kitbash
      • Left tool panel Kitbash
    • 3DPrint
    • Photogrammetry
      • How to install Reality Capture
      • Reality Capture doesn’t show up ?
    • 메시를 NURBS 룸으로
    • Nodes
      • 조각 셰이더 노드 라이브러리
  • Scripting 및 Core API
    • Scripting
    • Core API
    • 파이썬 API
  • 무료 3DCoatPrint

Baking guide

520 views 0

Written by Carlos
January 11, 2025

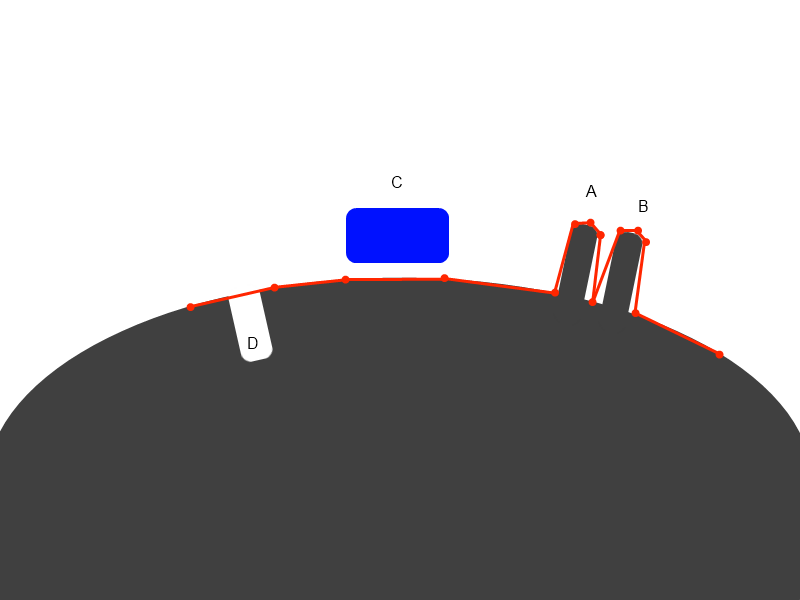
Let we have mesh like on example. This is pictured schematically as side view, objects to be baked are
grey and blue, red is retopo mesh.

If you will try to bake in retopo room using Retopo->Bake with NM (to get normalmap) you will see the
dialog:

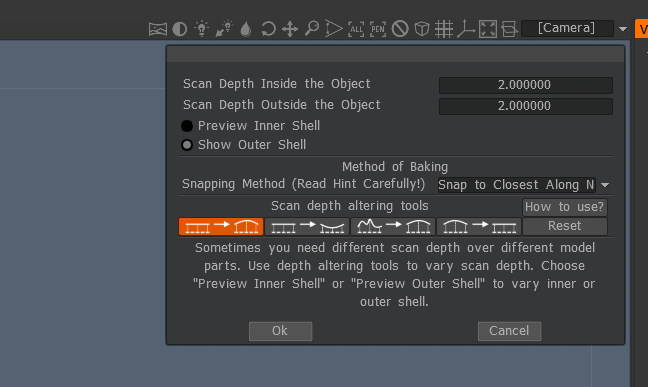
Let us look on settings. The principle of baking is scanning along retopo mesh normal to get to the baked
object surface. Later we will describe several approaches for this purpose.

Scan depth settings are well understood from this picture:

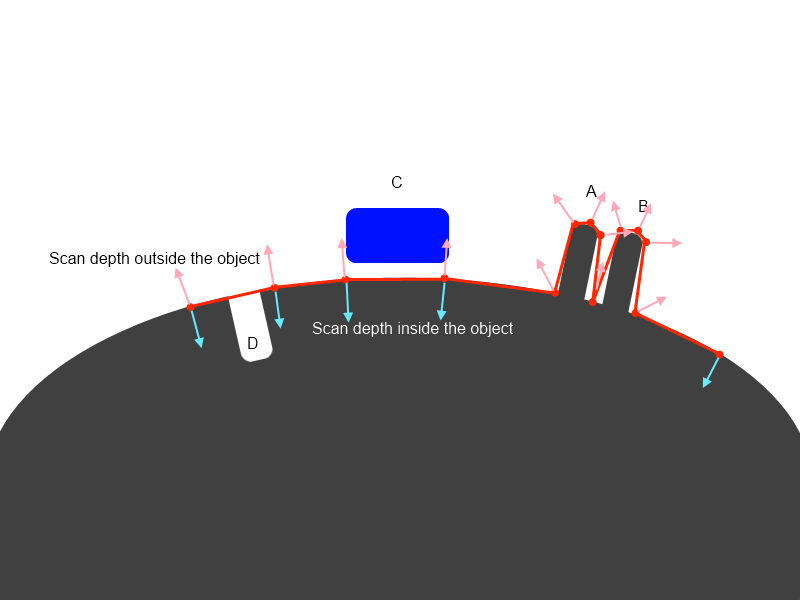
It are lengths or rays that follow normal direction. The longer rays, the more distant objects will be
taken into account. But if you will make it too long A and B will be baked incorrectly, if you will set it too
short, C and D will not be captured. We will describe later how to solve such problems in 3D-Coat. Let us
continue options discovering.

There are 2 methods of baking


1) Snap to closest along normal:
It is simplest approach that will work well in simple cases. It is default mode. In this case the point
closest to the retopo mesh will be baked. You may set bigger scan depth for this method and it still will
work. In our example you may set it twice longer and it will correctly capture details A, B, D. But C will
not be captured at all because grey surface is closest to the retopo mesh.

2) Snap to outer surface:
This method is intended for complex cases and rather pro users. It captures most distant details in
normal direction. Let us look on our example. If we will set outer scan distance twice longer then C will
be correctly baked, but A and B will not because of most outer will be neighbor spike and you will get
mess on normalmap. So you should not set big scan distance for this method. But if you will set it too
small so that A and B will be captured, C will not be captured.

For this purpose “Scan depth altering tools” introduced. Use the tools to alter scan depth, separately for
outer and inner shells of scanning depth. Grow, decrease, smooth or erase field. Use CTRL to invert
action and SHIFT to smooth field.

There are several additional tips for baking:


  • If you made not successful pass of baking and want to try it again, delete object that was add during
    baking process in paint room using Objects palette. Usually it is last object in Objects palette (Windows-Popups->Objects).
  • If you like result and want to export lowpoly mesh and textures – delete your reference objects (hide voxel objects or delete paint object) and export from paint room using File->Export or Textures->Export.
  • It is convenient to hide reference objects after baking to estimate result. Use VoxTree to hide voxels and Objects to hide paint and reference objects. Don’t forget to turn it on again if you want to bake them again!
  • It is much better to use Retopo->Bake with NM / Bake into scene (microverts) / Bake with Ptex instead of using Retopo->Texture baking tool because of much better flexibility.
  • If you are baking for microverts/ptex to get displacement and can’t get good result because of spikes in just several single points, use Layers->Clamp depth of the layer to cut off problematic spikes.
  • If you retopo each voxel layer separately you will get set of intersecting retopo layers. It usually happens if you are using Autopo. It is problematic to bake all that straightforward. If you have same names for retopo and voxel layers use Retopo->Use names correspondence for baking.
    You may also check if all is correct using Retopo->Check groups and volumes correspondence.
  • If you have huge reference mesh 5-100 M don’t try to import it as reference mesh, it will fail anyway. Use File->Import for vertex painting instead. It will work much better. You may use startup screen options.
  • It is better to avoid sharp angles between faces (like in example, retopo mesh between A and B), even angle a little less 90 degrees are not recommended, it will lead to problems if you are using 3DCoat’s method for calculating normals (Edit->Preferences->Normals calculation).
    Maya normals calculation method will work correctly in this case, so if you need sharp angles, use Maya normals calculation in Preferences.
    This is related to method of calculation. 3DCoat calculates normals as weighted average of neighbor faces, weight is proportional to face square. It allows to display bevel between faces correctly.
    But if there is sharp angle between big and small faces then vertex normal will be negative to small face normal and baking on that face will fail. Maya’s method calculates vertex normal as arithmetical average of neighbor faces normals. It is more appropriate for baking, but not good to display meshes without normalmap.
    Generally we recommend to add bevel between sharp edges.
Tags:baking guide

Was this helpful?

Yes  No
Related Articles
  • Surface Array
  • Top Bar
  • Curves Properties RMB
  • Left tool panel Kitbash
  • Create kitbash
  • Color management
Previously
Treat Poly Groups as Paint Objects
Up Next
탑바
AI:
Hi! How can I help you?
Attention: This is a beta version of AI chat. Some answers may be wrong. See full version of AI chat