• Nederlands
  • 3DCoat documentatie
  • Chapters
    • Inleiding tot 3DCoat
    • Aan de slag
    • Interface & Navigatie
    • Brush Componenten
    • Werkruimten Kamers
    • Scripting en Core API
    • Vragen
    • licensing
    • Trainingshandleidingen
  • Pilgway
  • Products
    • 3DCoat
    • 3DCoatTextura
    • 3DCoatPrint
    • PBRLibrary
  • Blog Posts
  • Store
  • Nederlands Nederlands
    • English English
    • Українська Українська
    • Español Español
    • Deutsch Deutsch
    • Français Français
    • 日本語 日本語
    • Русский Русский
    • 한국어 한국어
    • Polski Polski
    • 中文 (中国) 中文 (中国)
    • Português Português
    • Italiano Italiano
    • Suomi Suomi
    • Svenska Svenska
    • 中文 (台灣) 中文 (台灣)
    • Dansk Dansk
    • Slovenčina Slovenčina
    • Türkçe Türkçe
    • Magyar Magyar
    • ไทย ไทย
    • हिन्दी हिन्दी
    • Ελληνικά Ελληνικά
    • Tiếng Việt Tiếng Việt
    • Lietuviškai Lietuviškai
    • Latviešu valoda Latviešu valoda
    • Eesti Eesti
    • Čeština Čeština
    • Română Română
    • Norsk Bokmål Norsk Bokmål
  • Creating 3D Character Using 3DCoat
Expand All Collapse All
  • Inleiding tot 3DCoat
  • Aan de slag
    • System requirements
    • Why 3DCoat is Unique?
    • 3DCoat activeren
    • Opstartfout
      • Startup error Mac
    • Color management
    • Upgrading permanent license
    • Linux Setup
      • Linux initial setup per-user installation
      • Linux initial setup for system
      • Tablet setup
      • To GTK3 from GTK2
    • Mappen structuur
      • Custom documents folder
    • Verschillende vormen van "oplossing"
    • Tablet on Window
    • Import en Export
    • Applinks in 3DCoat
      • Blender -applink
        • Blender with the Applink in Linux
      • Blender 4.2/3/4/5 applink
      • Max Applink
      • Houdini applink
      • Lightwave uplink
  • Navigation
    • Dialoogvenster openen (snelstartmenu)
    • Navigatiepaneel
    • Camera en navigatie
      • Customize Navigation as Blender
    • Viewport Navigation Gizmo
    • Left tool panel
    •  Activity Bar
    • Navigatie met behulp van 3DConnexion-apparaten
      • How to compile Spacenavd on non Ubuntu distro
    • Stylus doesn’t work in sculpting
    • Sneltoetsen
  • Interface & Navigatie
    • Bestandsmenu
    • Menu bewerken
      • Calculate Curvature
      • Calculate Occlusion
      • Light Baking Tool
      • Voorkeuren
    • Menu bekijken
    • Symmetrie
    • Textures
    • Calculate
    • Lagen-menu
    • Menu bevriezen
    • Hide
    • Bake
    • Bochten 2022
      • Curven-menu
      • Curves Properties RMB
      • Vul met mesh-laag
      • Scale of imported curves
    • Windows-menu
      • Windows-pop-upvensters met tabbladen
      • Schuifregelaars
    • Scripts
    • Addons
    • Capture
    • Help-menu
    • Maatwerk
    • Wijzig of maak een nieuwe kamer
  • Brush Componenten
    • Brush bovenste balk
    • Borstels algemeen gebruik
      • Borstels en emblemen maken
      • Alfa maken van huidige beeldhouwkunst
      • Maak een Brush van een 3D-object
      • Create brushes based on Curves
      • Load photoshop .abr brushes
    • Beroertes
      • Pop-upmenu Curven
    • Brush opties
    • Voorwaarden Begrenzer
    • Strips-paneel
    • Stencils paneel
    • Slimme materialen
      • Voeg nieuwe afbeeldingen of materialen toe
      • Bevestig een Smart-materiaal aan een laag
      • Import Quixel Material
    • Voorinstellingen voor Brush maken
  • Werkruimten Kamers
    • Painting
      • Textuur Painting en modi
        • Per-Pixel Painting
        • Verplaatsing Painting (Micro-Vertex)
        • Ptex Painting
        • Oppervlakte Painting (Polypainting)
      • Importeren in de Painting
        • Initial CC subdivision
        • UV Set smoothing
        • Sharp (hard) edge
        • Normalen vergrendelen
        • Laad een nieuwe UV indeling na modelwijzigingen
        • DAZ Genesis models into 3DCoat
      • Menu's van de Painting
        • Edit menu
        • Texturen-menu
          • Textuur Baking
        • Verbergen
        • Menu voor de Bake Paint
        • De kleurkiezer
      • Bovenste balk voor het Painting
      • Het Lagenpaneel
        • Het mengpaneel
        • Layer and Clipping Masks
      • Gereedschap voor het Painting van kamers
      • Dekking - Transparantie
      • Tweak werkruimte
        • Tweak-toolset
        • Exporteren vanuit de Tweak Room
      • Voorbeeldvenster masker/materiaal
      • Exporteren vanuit de Painting
    • UV werkruimte
      • UV bovenbalk
      • UV Linker gereedschapspaneel
      • UV voorbeeldpaneel
      • UV workflow voorbeeld
      • Importeren in de UV kamer
      • Exporteren vanuit de UV kamer
    • Retopologie
      • Importeren in de Retopo Room
      • Retopo Mesh-menu en bakmenu
        • Virtuele spiegelmodus
      • Bake menu
        • Treat Poly Groups as Paint Objects
        • Baking guide
      • Bovenste balk
        • Selecteer geometrie
      • Linker gereedschapspaneel in Retopology-kamer
        • Algemeen doel en functie
        • Geometrie toevoegen
          • Strokes-tool in Retopology
        • Retopo Tweak-tools
        • UV hulpmiddelen
        • Commando's voor Retopologie kamer
      • AUTORETOPO
        • Autopo guide
      • Polygroepen
    • Beeldhouwen
      • Sculpt Layer
      • Boom beeldhouwen
      • Beeldhouwen Brush opties
      • Top Bar
      • Brush
      • Submenu Geometrie
      • Beeldhouwen "Rechtsklik" -menu
      • Schaduwen
      • Voxel modus
        • Pure Voxel -beeldhouwkunst
        • Dichtheid en resolutie
        • Clay-motor
        • Voxel tools
        • Oppervlaktetools op Voxels
        • Voxel aanpassingstools
        • Volumetrisch Painting
        • Hulpmiddelen voor Voxel objecten
      • Oppervlakte-modus
        • Oppervlak gereedschap
        • Oppervlak aangepaste tools
        • Hulpmiddelen voor het aanpassen van oppervlakken
        • Oppervlakte Painting
        • Hulpmiddelen voor oppervlakteobjecten
        • Resolutie op meerdere niveaus
          • Multires tools
          • Multires adjust
          • Multires commands
      • Bochten beeldhouwen
        • Spline-curven
        • Splines model creation
      • Vectorverplaatsing
      • Hulpmiddelen voor oppervlaktetransformatie
        • Hulpmiddelen voor Voxel transformatie
        • Instancer
        • Move
        • Pose
        • Fit
        • Reproject
        • Surface Array
      • Voxel primitieven en Import
      • Levende booleans
      • Opdrachten voor beeldhouwkamer
      • Import naar beeldhouwkamer
      • Exporteren vanuit de beeldhouwkamer
    • Veroorzaken
      • Comparison of different roughness values
      • Paneelfuncties renderen
      • Draaitafel
      • Fakebake de verlichting -niet PBR
    • Factures
      • Werkstroom
    • eenvoudigste
    • Modellering
      • Mesh Menu
      • Linker gereedschapspaneel in de modelleerkamer
        • Geometrie toevoegen
          • Geselecteerd
        • Aanpassing
        • Smart Hybrid
        • UV
          • Commando's
        • Geheel gaas
      • Voorbeeld loftoppervlak van Fluffy
      • Blokkade door Poeboi
      • Import Zbrush Polygroups for UV mapping
    • Kitbash - Snelle creatie van 3D-modellen
      • Create kitbash
      • Left tool panel Kitbash
    • 3DPrint
    • Photogrammetry
      • How to install Reality Capture
      • Reality Capture doesn’t show up ?
    • Mesh naar NURBS-kamer
    • Nodes
      • Sculpt shaders Nodes-bibliotheek
  • Scripting en Core API
    • Scripting
    • Core API
    • Python-API
  • Gratis 3DCoatPrint

Calculate Curvature

1524 views 1

Written by Carlos
March 8, 2024

The curvature layer is required to use cavity/curvature as a condition for materials or conditional painting. The command will update the cavity/curvature layer using the current displacement and normal map.

Pay attention that B&W curvature consists of two components.

  • First is local curvature that allows to detect small details and scratches.
  • Second is long-range curvature that flows smoothly and allows to detect large details.

Set intensity for both types of curvature.

Cavity Black & White


This is the old method of calculation of Curvature maps.

You can deactivate the new simplified curvature RGB baker in Preferences and get that old school window with settings.
Go to Edit Menu > Preferences, on the Tools section select use RGB cavity as the default cavity calculation method.
After that you will have that full window in Edit > Calculate Curvature.
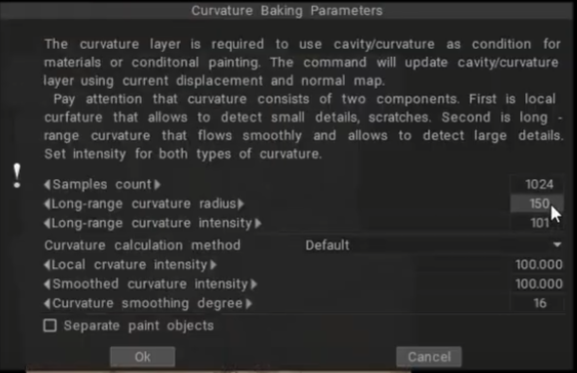
If you open an old project with B&W Curvature, but Preferences is set to RGB Curvature a warning panel popups.

When you uncheck the RGB curvature baking you will instead use the legacy curvature baking tool which bakes another type of map called the cavity map.
Basically which like the name suggests focuses instead on cavities and smaller details which are very useful for texturing characters and stuff with features like skin or those reptilian scales which have those tiny crown sections between each individual scale which you might want to color black or something to give it more realism.
Another good thing about the legacy baker is that it lets you just remove all the huge details (Long-range intensity) altogether and just focus on the small ones.

Cavity RGB


The RGB cavity was introduced as the default calculation method in Texturing.
This is a very significant feature for the PBR Painting over the Texture/Mesh.

This video demonstrates how the improved cavity technology works.
This is an improved technology already called the RGB cavity.

  • First, you need to make sure that the RGB cavity version is enabled, to do this, go to the Edit Menu > Preferences, go to the Tools section, and select use RGB cavity as the default cavity calculation method.
  • After enabling the function, delete your old Curvature layer first if any.
  • Go to the Texture Menu and then select the Calculate Curvature option. In order for the Calculation to be made you need to wait a bit.
  • When you first run the Curvature using RGB Cavity, the Light Baking Panel comes up. Do not change (Local Curvature RGB). Next it will run the Curvature Calculation.
  • Now we can see how a Cavity map (RGB) appeared in the layers.
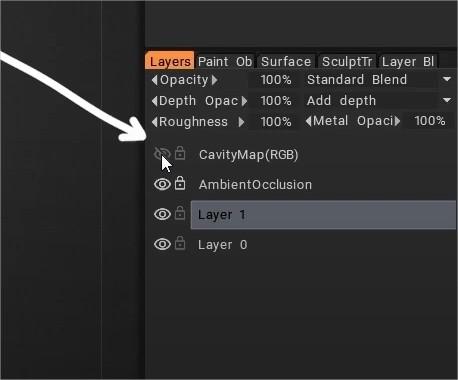
We see that with the new technology, the map looks like a lot of colors.
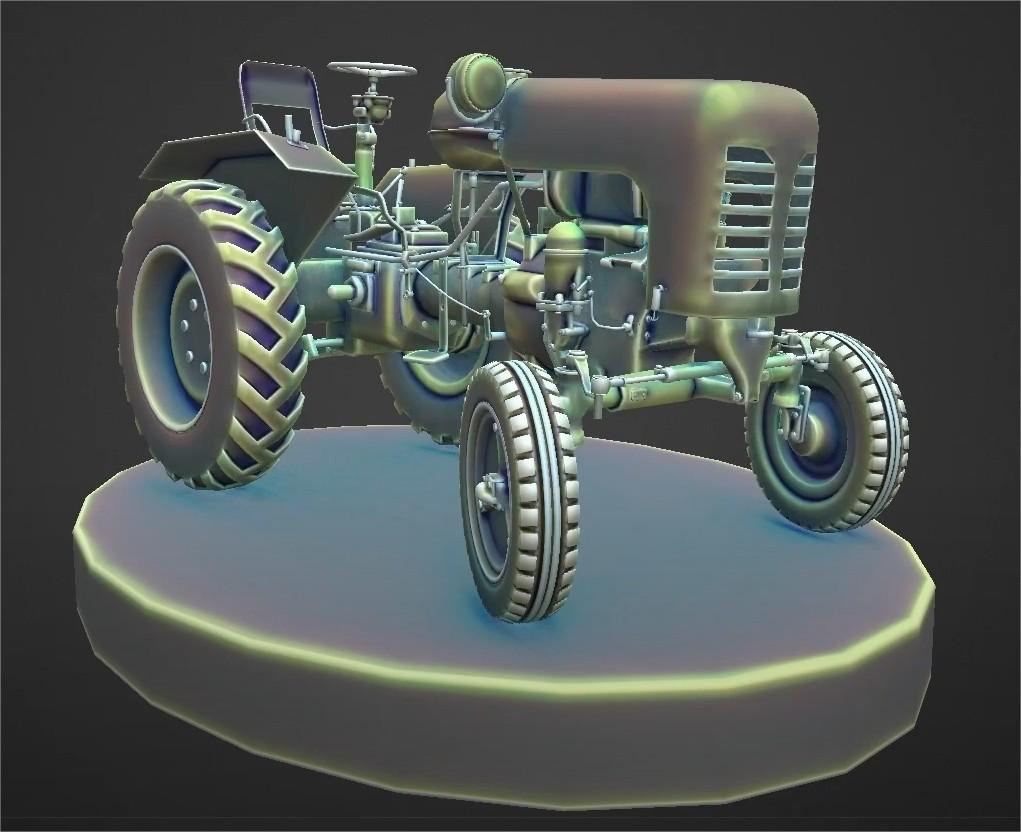
The map must be closed by default now.

Let’s create Smart material to see how it works


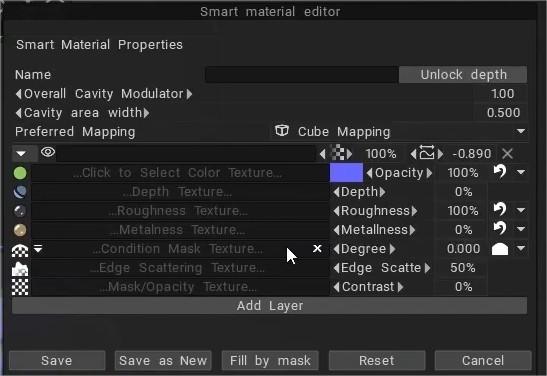
First you need to add Conditions to Degree value (more on convex like example) to see “vase” options.
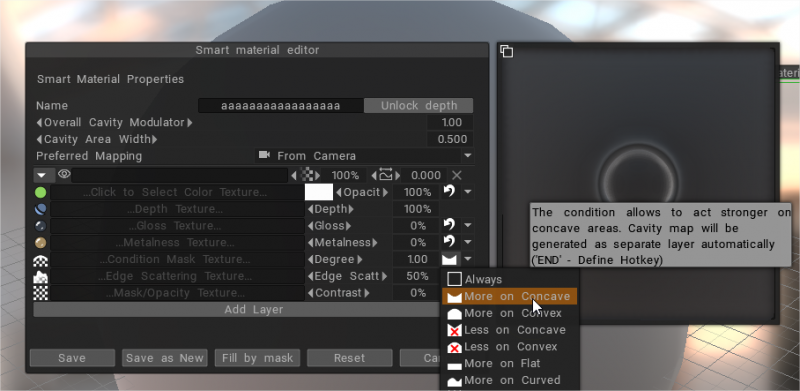
Focus on a new edit icon -it looks like a vase-, this was added and did not exist before and it is with the spin edges that the update function is configured.
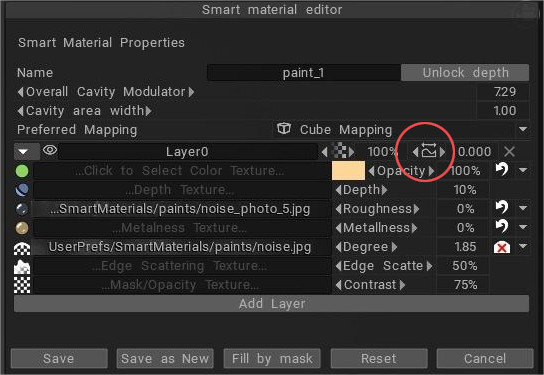
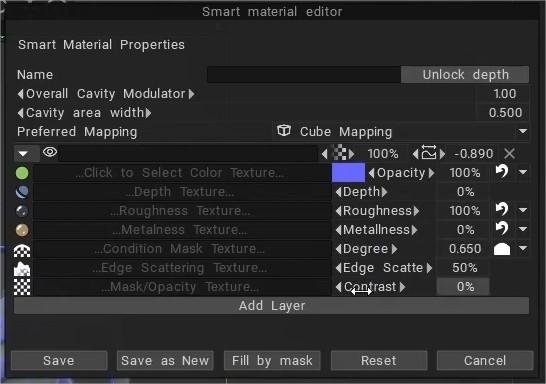
The new parameter is responsible for the radius cavity. It is also affected by degree and contrast adjustments.

Adjusting Cavity Area Width and Overall Cavity Modulator can give you some nice effects like several layers of old paint on top of each other. 

It is the additional cavity width values


  • The 0 value means that the cavity is taken from the materials settings as-is.
  • Values less mean sharper cavity, more than 0.5 – widening of the cavity.
  • Off course you need a RGB cavity layer in the scene to vary the cavity width.

It works only on such conditions:
More on concave, more on convex, less on concave, less on convex, more or flat, and more on curved (you can use any of these modes).

ConditionsMask.jpg

The new parameter is responsible for the radius cavity. It is also affected by degree and contrast adjustments.

Contrast.jpg

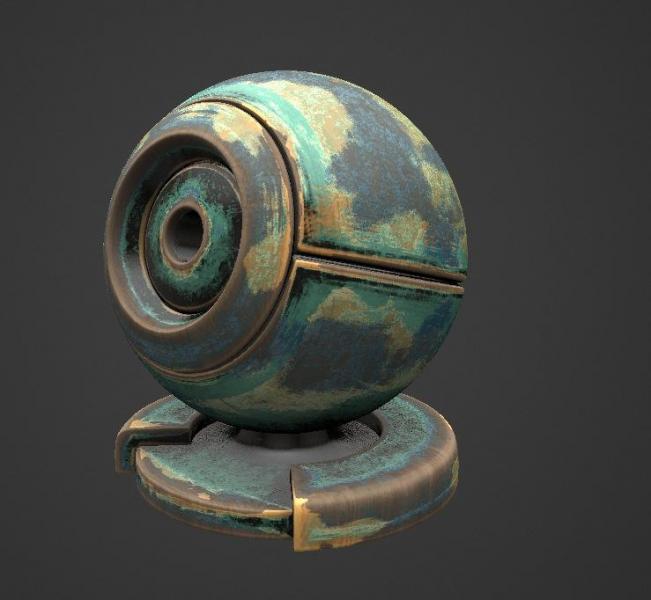
How it works applied on Smart Materials


On this test, all Smart Materials was applied with Cube Mapping.

overlay.jpg

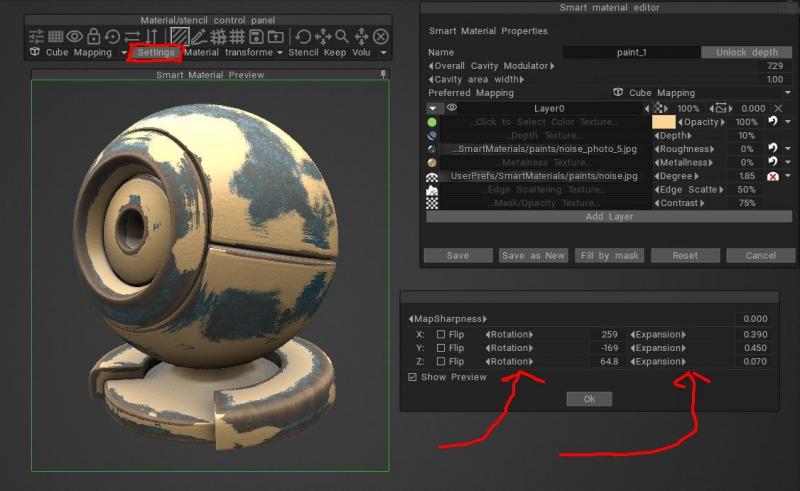
Open the real time preview window, placing it over the model.
This is the most important because you get the real time view of the smart material and how it will be applied.
We do not go by as seen on the Smart Material Editor’s ball because we want real time feedback in this case.

Go to Material Stencil Control Panel -> Settings.
Change the rotation of the cube map on the XYZ axis ( per axis) and the expansion per axis as well is
shown in Picture.
You can preview in real time as the texture moves over the surface.

Last picture shown, to further increase variation, how to use a layer blend mode.  
Was used the Overlay blend mode on the top layer.
You can adjust the strength of the blend mode by using the Opacity adjustment.

It was the second layer in the stack. 

Blue paint.jpg
map sharpness.jpg

Start Adjusting the Cavity Modulator and Cavity Area Width till you get the effect you want. 
It is included a picture of the blue paint settings, it was the blue metal but looks like blue paint.

The new RGB cavity curvature calculation and Cavity Area Width plus Cavity Modulator is great. Lots to explore here. Have fun exploring!

Three parameters to tweak curvature


Once you’ve calculated your curvature map, from the Edit menu–> Calculate curvature, you can use these three parameters to tweak it.

Tutorials


Using multiple curvature maps in 3DCoat: Did you know that you can regenerate your curvature maps in 3DCoat, and use whichever one you want later on.

Was this helpful?

1 Yes  1 No
Related Articles
  • Surface Array
  • Top Bar
  • Curves Properties RMB
  • Left tool panel Kitbash
  • Create kitbash
  • Color management
Previously
Menu bewerken
Up Next
Calculate Occlusion
AI:
Hi! How can I help you?
Attention: This is a beta version of AI chat. Some answers may be wrong. See full version of AI chat