• Português
  • Documentação 3DCoat
  • Chapters
    • Introdução ao 3DCoat
    • Começando
    • Interface e Navegação
    • Componentes do Brush
    • Espaços de Trabalho Salas
    • API de Scripting e Core API
    • Perguntas e Respostas
    • licensing
    • Tutoriais de treinamento
  • Pilgway
  • Products
    • 3DCoat
    • 3DCoatTextura
    • 3DCoatPrint
    • PBRLibrary
  • Blog Posts
  • Store
  • Português Português
    • English English
    • Українська Українська
    • Español Español
    • Deutsch Deutsch
    • Français Français
    • 日本語 日本語
    • Русский Русский
    • 한국어 한국어
    • Polski Polski
    • 中文 (中国) 中文 (中国)
    • Italiano Italiano
    • Suomi Suomi
    • Svenska Svenska
    • 中文 (台灣) 中文 (台灣)
    • Dansk Dansk
    • Slovenčina Slovenčina
    • Türkçe Türkçe
    • Nederlands Nederlands
    • Magyar Magyar
    • ไทย ไทย
    • हिन्दी हिन्दी
    • Ελληνικά Ελληνικά
    • Tiếng Việt Tiếng Việt
    • Lietuviškai Lietuviškai
    • Latviešu valoda Latviešu valoda
    • Eesti Eesti
    • Čeština Čeština
    • Română Română
    • Norsk Bokmål Norsk Bokmål
  • Creating 3D Character Using 3DCoat
Expand All Collapse All
  • Introdução ao 3DCoat
  • Começando
    • System requirements
    • Why 3DCoat is Unique?
    • Ativando 3DCoat
    • erro de inicialização
      • Startup error Mac
    • Color management
    • Upgrading permanent license
    • Linux Setup
      • Linux initial setup per-user installation
      • Linux initial setup for system
      • Tablet setup
      • To GTK3 from GTK2
    • Estrutura de Pastas
      • Custom documents folder
    • Diferentes formas de “resolução”
    • Tablet on Window
    • Import e Export
    • Applinks em 3DCoat
      • Link do aplicativo Blender
        • Blender with the Applink in Linux
      • Blender 4.2/3/4/5 applink
      • Max Applink
      • Houdini applink
      • Lightwave uplink
  • Navigation
    • Diálogo de abertura (Menu de início rápido)
    • Painel de navegação
    • Câmera e navegação
      • Customize Navigation as Blender
    • Viewport Navigation Gizmo
    • Left tool panel
    •  Activity Bar
    • Navegação usando dispositivos 3DConnexion
      • How to compile Spacenavd on non Ubuntu distro
    • Stylus doesn’t work in sculpting
    • Teclas de atalho
  • Interface e Navegação
    • Menu de arquivo
    • Editar menu
      • Calculate Curvature
      • Calculate Occlusion
      • Light Baking Tool
      • Preferências
    • Ver Menu
    • Simetria
    • Textures
    • Calculate
    • Menu de Camadas
    • Menu Congelar
    • Hide
    • Bake
    • Curvas 2022
      • Menu de Curvas
      • Curves Properties RMB
      • Preencher com camada de malha
      • Scale of imported curves
    • Menu do Windows
      • Painéis pop-up do Windows com guias
      • Controles deslizantes
    • Scripts
    • Addons
    • Capture
    • menu de ajuda
    • Costumização
    • Modifique ou crie uma nova sala
  • Componentes do Brush
    • Brush Barra Superior
    • Pincéis de uso geral
      • Crie pincéis e decalques
      • Fazendo alfa a partir da escultura atual
      • Crie um Brush a partir de um objeto 3D
      • Create brushes based on Curves
      • Load photoshop .abr brushes
    • Strokes
      • Menu pop-up Curvas
    • Opções de Brush
    • Limitador de Condições
    • Painel de tiras
    • Painel de estênceis
    • Materiais Inteligentes
      • Adicione novas imagens ou materiais
      • Anexe um material inteligente a uma camada
      • Import Quixel Material
    • Como criar predefinições para Brush
  • Espaços de Trabalho Salas
    • Painting
      • Painting de texturas e modos
        • Painting por Per-Pixel
        • Painting de Deslocamento (Micro-Vértice)
        • Painting Ptex
        • Painting de Superfície (Polipintura)
      • Importando para a sala de Painting
        • Initial CC subdivision
        • UV Set smoothing
        • Sharp (hard) edge
        • Bloquear normais
        • Carregar novo layout UV após alterações no modelo
        • DAZ Genesis models into 3DCoat
      • Menus da área de trabalho de Painting
        • Edit menu
        • Menu de Texturas
          • Ferramentas de Baking de textura
        • Esconder
        • Menu para o Bake Paint
        • O seletor de cores
      • Barra superior para a Painting
      • O Painel de Camadas
        • O Painel de Mistura
        • Layer and Clipping Masks
      • Ferramentas da sala de Painting
      • Opacidade - Transparência
      • Ajustar espaço de trabalho
        • Ajuste o conjunto de ferramentas
        • Exportando da Tweak Room
      • Painel de visualização de máscara/material
      • Exportando da sala de Painting
    • espaço de trabalho UV
      • Barra Superior UV
      • Painel de ferramentas UV Esquerda
      • Painel de visualização UV
      • exemplo de fluxo de trabalho UV
      • Importando para a sala UV
      • Exportando da Sala UV
    • Retopologia
      • Importando para a sala Retopo
      • Menu Retopo Mesh e Menu Bake
        • Modo Espelho Virtual
      • Bake menu
        • Treat Poly Groups as Paint Objects
        • Baking guide
      • Barra superior
        • Selecione a geometria
      • Painel de ferramentas esquerdo na sala de Retopologia
        • Objetivo geral e função
        • Adicionar geometria
          • Ferramenta Strokes em Retopologia
        • Ferramentas de ajuste de Retopo
        • Ferramentas UV
        • Comandos para sala de Retopologia
      • AUTORETOPO
        • Autopo guide
      • Grupos poli
    • Esculpir
      • Sculpt Layer
      • esculpir árvore
      • Opções de Brush de escultura
      • Top Bar
      • Motor de Brush
      • Submenu Geometria
      • Esculpir o menu “Clique com o botão direito”
      • Shaders
      • modo Voxel
        • Escultura Pura de Voxel
        • Densidade e resolução
        • Máquina de Barro
        • Ferramentas Voxel
        • Ferramentas de superfície em Voxels
        • Ferramentas de ajuste de Voxel
        • Painting Volumétrica
        • Ferramentas de Objetos Voxel
      • Modo de superfície
        • Ferramentas de superfície
        • Ferramentas personalizadas de superfície
        • Ferramentas de ajuste de superfície
        • Painting de superfície
        • Ferramentas de Objetos de Superfície
        • Resolução multinível
          • Multires tools
          • Multires adjust
          • Multires commands
      • Esculpir curvas
        • Curvas Spline
        • Splines model creation
      • Deslocamento do Vetor
      • Ferramentas de transformação de superfície
        • Ferramentas de Transformação Voxel
        • Instancer
        • Move
        • Pose
        • Fit
        • Reproject
        • Surface Array
      • Primitivos Voxel e Ferramentas de Import
      • Booleanos ativos
      • Comandos para a sala Sculpt
      • Import para Sala de Escultura
      • Exportando da sala de esculpir
    • Renderizar
      • Comparison of different roughness values
      • Funções do painel de renderização
      • toca discos
      • Fakebake a iluminação -não PBR-
    • Factures
      • fluxo de trabalho
    • mais simples
    • Modelagem
      • Mesh Menu
      • Painel de ferramentas esquerdo na sala de modelagem
        • Adicionar geometria
          • Selecionado
        • Puxão
        • Smart Hybrid
        • UV
          • Comandos
        • Malha inteira
      • Exemplo de superfície de loft por Fluffy
      • Bloqueio por Poeboi
      • Import Zbrush Polygroups for UV mapping
    • Kitbash - Criação Rápida de Modelos 3D
      • Create kitbash
      • Left tool panel Kitbash
    • 3DPrint
    • Photogrammetry
      • How to install Reality Capture
      • Reality Capture doesn’t show up ?
    • Malha para sala NURBS
    • Nodes
      • Biblioteca de nós de shaders de esculpir
  • API de Scripting e Core API
    • Scripting
    • Core API
    • API do Python
  • 3DCoatPrint gratuita

Lightwave uplink

722 views 0

Written by Carlos
July 11, 2024

ODTools 3DCoat Applink is now a part of LightWave 2023.

OD 3DCoat Applink allows you to transfer data from Lightwave to 3DCoat and back. The plugin exists both as a generic Layout plugin, as well as a modeler plugin:
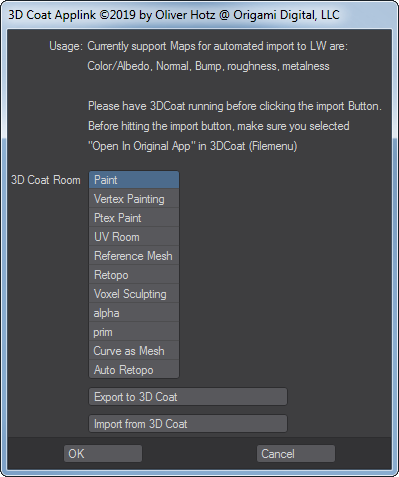
Options:

  • 3DCoat Room: Defines the room in which you want to open the currently selected mesh
  • Export to 3DCoat: Exports the currently selected mesh into the chosen room in 3DCoat
  • Import : Imports the changed mesh as a new mesh in Lightwave. Textures are automatically setup with a principled material

Workflow:

  • Upon first start, you are prompted for your 3DCoat install folder as well as the 3DCoat exchange folder (which is usually in your documents/3d-coat folder. This is not a folder that you create, but a folder that is setup by 3dCoat so be sure to select the right folder. Its called Exchange. Once setup, the paths are stored in the configuration. The configuration file can be found in your Lightwave config folder and can be removed should you want to re-setup the paths
  • The object you want to export to 3DCoat has to be saved first
  • Once you are finished with modifications in 3DCoat, select “Open In Original App” under the 3DCoat file menu
  • In Lightwave you can then hit the Import from 3DCoat button and the new mesh will be loaded. The original object is not overwritten or replaced
Tags:lightwave applink

Was this helpful?

Yes  No
Related Articles
  • Surface Array
  • Top Bar
  • Curves Properties RMB
  • Left tool panel Kitbash
  • Create kitbash
  • Color management
Previously
Houdini applink
Up Next
Navigation
AI:
Hi! How can I help you?
Attention: This is a beta version of AI chat. Some answers may be wrong. See full version of AI chat