 Suomi
Suomi  English
 Українська
 Español
 Deutsch
 Français
 日本語
日本語 Русский
 한국어
한국어 Polski
 中文 (中国)
 Português
 Italiano
 Svenska
 中文 (台灣)
 Dansk
Dansk Slovenčina
 Türkçe
 Nederlands
 Magyar
 ไทย
ไทย हिन्दी
 Ελληνικά
 Tiếng Việt
 Lietuviškai
 Latviešu valoda
 Eesti
Eesti Čeština
 Română
 Norsk Bokmål
Onnistuin selvittämään yhdistämisprosessin olemassa olevaan geometriaan siltattaessa kahden reunan välillä. (Se tuli hieman selvemmäksi, kun huomasin, että valittu reuna peitti loft-toiminnossa käytetyn kolmannen käyrän).
On syytä huomata, että järjestys, jossa kaksi profiilikäyrää näkyvät Tool Options -ikkunassa, voi vaikuttaa tuloksena olevaan verkkoon. Listan ensimmäisen käyrän solmujen määrä (yhdessä U Spans -arvolle asetetun arvon kanssa) määrittää luotujen polygonien määrän ja järjestyksen, jossa käyrät näkyvät, mikä määrittää tuloksena olevan verkon kärkinormaalien suunnan. Lisäksi oletetaan, että käyrä, joka määrittelee reunan, jonka aiot luoda, näkyy luettelossa ensimmäisenä. Siinä tapauksessa tulos, kun painat Käytä, ei ehkä ole kohdistettu oikein olemassa olevaan verkkoosi (menemättä liian paljon yksityiskohtiin, sillä näyttää olevan jotain tekemistä sen kanssa, kuinka kärkinormaalit vaikuttavat siihen, miten 3D Coat luo lofted-pinnan).
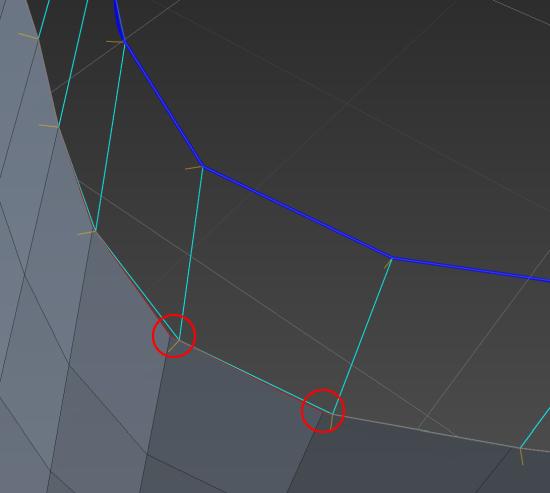
Vaiheessa 3 luodun poikkileikkauskäyrän lisääminen näyttää ratkaisevan ongelman listattujen profiilikäyrien järjestyksestä huolimatta, mutta joskus se voi kääntää tuloksena olevan verkon kärkinormaalit, joten on hyvä idea ottaa käyttöön Piirrä normaali -vaihtoehto ja sitten voi tarvittaessa vaihtaa Käänteinen normaali -asetuksen.
Kuten sanoin, en ole tutustunut Loft-työkaluun, mutta tämä vaikuttaa melko luotettavalta tavalta saada haluttu tulos. Pidän kuitenkin parempana Smart Retopo -työkalua, joka voi saavuttaa samanlaisia tuloksia käyttämällä vähemmän käyriä.
Sinun tarvitsee vain luoda käyrä reunalle, jonka haluat luoda, ja aktivoida sitten Smart Retopo -työkalu, asettaa tilaksi Quadrangulation , paina Lisää profiili -painiketta ja valitse käyrä ja aseta sitten tarvittava määrä U-väliä . Sinun on ehkä säädettävä nopeasti käyrän molempien päiden sijaintia varmistaaksesi, että se napsahtaa olemassa olevan verkon oikeisiin pisteisiin, mutta kun molemmat päät on sijoitettu oikein, sinun pitäisi nähdä jotain tällaista…
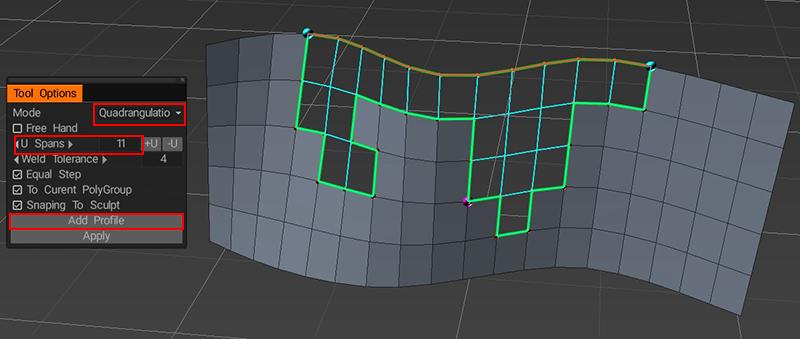
(Aluksi sinun pitäisi nähdä vain vihreä reunus, mutta jos painat Käytä-painiketta, se esikatselee tuloksia ja Käytä -painikkeen painaminen toisen kerran luo meshin).
Kuten näette, Smart Retopo -työkalu voi täyttää epäsäännöllisiä muotoja, mikä voi olla ongelmallista ja/tai aikaa vievää Loft-työkalua käytettäessä, mutta suosittelen silti molempien käytön opettelemista. Kuten useimmissa asioissa 3DCoat, on useita tapoja saavuttaa samat tulokset, ja mikä menetelmä toimii parhaiten, riippuu suuresti henkilökohtaisista mieltymyksistäsi ja yleisestä työnkulusta. Toivottavasti yllä olevat tiedot auttavat sinua päättämään, mikä lähestymistapa sopii sinulle parhaiten. ![]()
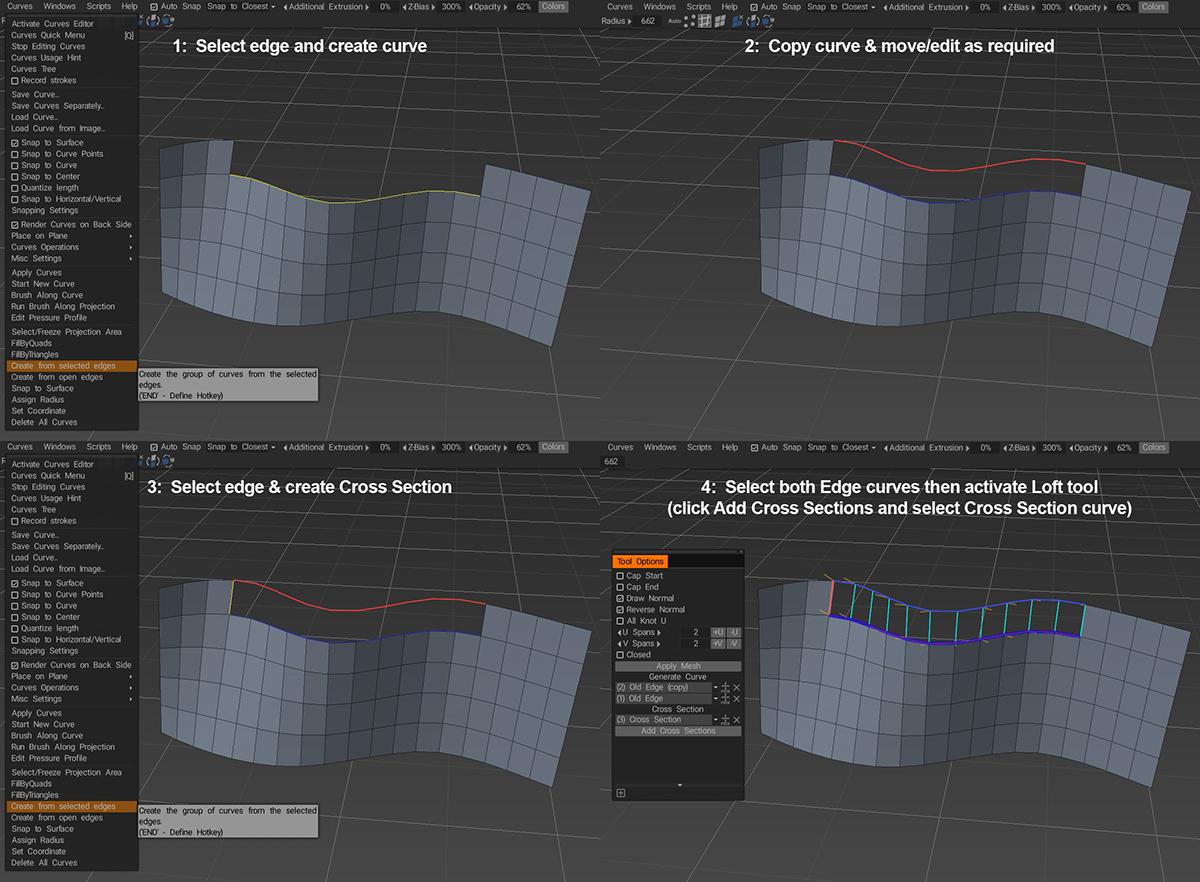
Kertaaksesi, valitse vain reuna, jonka haluat nostaa, ja valitse Luo valituista reunoista Käyrät -valikosta. Valitse sitten äskettäin luotu käyrä ja alkuperäinen käyrä ja aktivoi Loft Surface -työkalu Lisää geometria -paneelissa…
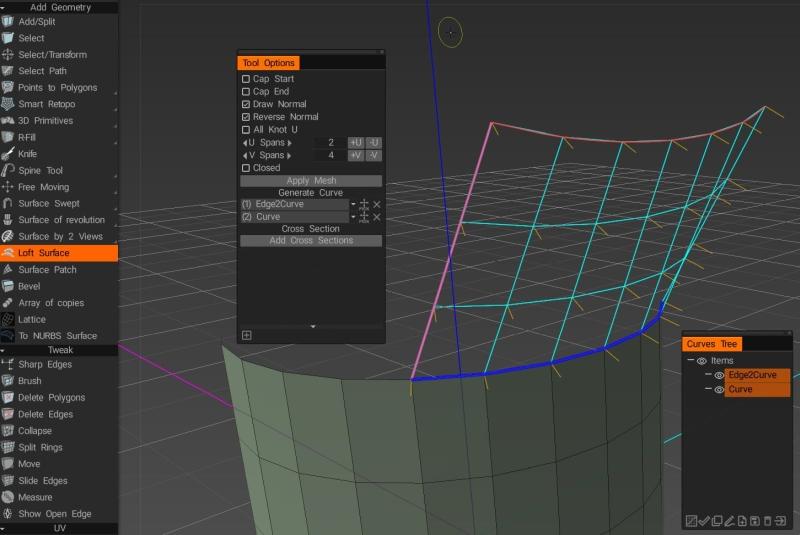
… määritä sitten vain V-välit, tarkista, että normaalit osoittavat oikeaan suuntaan ja paina Käytä verkkoa.