• Nederlands
  • 3DCoat documentatie
  • Chapters
    • Inleiding tot 3DCoat
    • Aan de slag
    • Interface & Navigatie
    • Brush Componenten
    • Werkruimten Kamers
    • Scripting en Core API
    • Vragen
    • licensing
    • Trainingshandleidingen
  • Pilgway
  • Products
    • 3DCoat
    • 3DCoatTextura
    • 3DCoatPrint
    • PBRLibrary
  • Blog Posts
  • Store
  • Nederlands Nederlands
    • English English
    • Українська Українська
    • Español Español
    • Deutsch Deutsch
    • Français Français
    • 日本語 日本語
    • Русский Русский
    • 한국어 한국어
    • Polski Polski
    • 中文 (中国) 中文 (中国)
    • Português Português
    • Italiano Italiano
    • Suomi Suomi
    • Svenska Svenska
    • 中文 (台灣) 中文 (台灣)
    • Dansk Dansk
    • Slovenčina Slovenčina
    • Türkçe Türkçe
    • Magyar Magyar
    • ไทย ไทย
    • हिन्दी हिन्दी
    • Ελληνικά Ελληνικά
    • Tiếng Việt Tiếng Việt
    • Lietuviškai Lietuviškai
    • Latviešu valoda Latviešu valoda
    • Eesti Eesti
    • Čeština Čeština
    • Română Română
    • Norsk Bokmål Norsk Bokmål
  • Creating 3D Character Using 3DCoat
Expand All Collapse All
  • Inleiding tot 3DCoat
  • Aan de slag
    • System requirements
    • Why 3DCoat is Unique?
    • 3DCoat activeren
    • Opstartfout
      • Startup error Mac
    • Color management
    • Upgrading permanent license
    • Linux Setup
      • Linux initial setup per-user installation
      • Linux initial setup for system
      • Tablet setup
      • To GTK3 from GTK2
    • Mappen structuur
      • Custom documents folder
    • Verschillende vormen van "oplossing"
    • Tablet on Window
    • Import en Export
    • Applinks in 3DCoat
      • Blender -applink
        • Blender with the Applink in Linux
      • Blender 4.2/3/4/5 applink
      • Max Applink
      • Houdini applink
      • Lightwave uplink
  • Navigation
    • Dialoogvenster openen (snelstartmenu)
    • Navigatiepaneel
    • Camera en navigatie
      • Customize Navigation as Blender
    • Viewport Navigation Gizmo
    • Left tool panel
    •  Activity Bar
    • Navigatie met behulp van 3DConnexion-apparaten
      • How to compile Spacenavd on non Ubuntu distro
    • Stylus doesn’t work in sculpting
    • Sneltoetsen
  • Interface & Navigatie
    • Bestandsmenu
    • Menu bewerken
      • Calculate Curvature
      • Calculate Occlusion
      • Light Baking Tool
      • Voorkeuren
    • Menu bekijken
    • Symmetrie
    • Textures
    • Calculate
    • Lagen-menu
    • Menu bevriezen
    • Hide
    • Bake
    • Bochten 2022
      • Curven-menu
      • Curves Properties RMB
      • Vul met mesh-laag
      • Scale of imported curves
    • Windows-menu
      • Windows-pop-upvensters met tabbladen
      • Schuifregelaars
    • Scripts
    • Addons
    • Capture
    • Help-menu
    • Maatwerk
    • Wijzig of maak een nieuwe kamer
  • Brush Componenten
    • Brush bovenste balk
    • Borstels algemeen gebruik
      • Borstels en emblemen maken
      • Alfa maken van huidige beeldhouwkunst
      • Maak een Brush van een 3D-object
      • Create brushes based on Curves
      • Load photoshop .abr brushes
    • Beroertes
      • Pop-upmenu Curven
    • Brush opties
    • Voorwaarden Begrenzer
    • Strips-paneel
    • Stencils paneel
    • Slimme materialen
      • Voeg nieuwe afbeeldingen of materialen toe
      • Bevestig een Smart-materiaal aan een laag
      • Import Quixel Material
    • Voorinstellingen voor Brush maken
  • Werkruimten Kamers
    • Painting
      • Textuur Painting en modi
        • Per-Pixel Painting
        • Verplaatsing Painting (Micro-Vertex)
        • Ptex Painting
        • Oppervlakte Painting (Polypainting)
      • Importeren in de Painting
        • Initial CC subdivision
        • UV Set smoothing
        • Sharp (hard) edge
        • Normalen vergrendelen
        • Laad een nieuwe UV indeling na modelwijzigingen
        • DAZ Genesis models into 3DCoat
      • Menu's van de Painting
        • Edit menu
        • Texturen-menu
          • Textuur Baking
        • Verbergen
        • Menu voor de Bake Paint
        • De kleurkiezer
      • Bovenste balk voor het Painting
      • Het Lagenpaneel
        • Het mengpaneel
        • Layer and Clipping Masks
      • Gereedschap voor het Painting van kamers
      • Dekking - Transparantie
      • Tweak werkruimte
        • Tweak-toolset
        • Exporteren vanuit de Tweak Room
      • Voorbeeldvenster masker/materiaal
      • Exporteren vanuit de Painting
    • UV werkruimte
      • UV bovenbalk
      • UV Linker gereedschapspaneel
      • UV voorbeeldpaneel
      • UV workflow voorbeeld
      • Importeren in de UV kamer
      • Exporteren vanuit de UV kamer
    • Retopologie
      • Importeren in de Retopo Room
      • Retopo Mesh-menu en bakmenu
        • Virtuele spiegelmodus
      • Bake menu
        • Treat Poly Groups as Paint Objects
        • Baking guide
      • Bovenste balk
        • Selecteer geometrie
      • Linker gereedschapspaneel in Retopology-kamer
        • Algemeen doel en functie
        • Geometrie toevoegen
          • Strokes-tool in Retopology
        • Retopo Tweak-tools
        • UV hulpmiddelen
        • Commando's voor Retopologie kamer
      • AUTORETOPO
        • Autopo guide
      • Polygroepen
    • Beeldhouwen
      • Sculpt Layer
      • Boom beeldhouwen
      • Beeldhouwen Brush opties
      • Top Bar
      • Brush
      • Submenu Geometrie
      • Beeldhouwen "Rechtsklik" -menu
      • Schaduwen
      • Voxel modus
        • Pure Voxel -beeldhouwkunst
        • Dichtheid en resolutie
        • Clay-motor
        • Voxel tools
        • Oppervlaktetools op Voxels
        • Voxel aanpassingstools
        • Volumetrisch Painting
        • Hulpmiddelen voor Voxel objecten
      • Oppervlakte-modus
        • Oppervlak gereedschap
        • Oppervlak aangepaste tools
        • Hulpmiddelen voor het aanpassen van oppervlakken
        • Oppervlakte Painting
        • Hulpmiddelen voor oppervlakteobjecten
        • Resolutie op meerdere niveaus
          • Multires tools
          • Multires adjust
          • Multires commands
      • Bochten beeldhouwen
        • Spline-curven
        • Splines model creation
      • Vectorverplaatsing
      • Hulpmiddelen voor oppervlaktetransformatie
        • Hulpmiddelen voor Voxel transformatie
        • Instancer
        • Move
        • Pose
        • Fit
        • Reproject
        • Surface Array
      • Voxel primitieven en Import
      • Levende booleans
      • Opdrachten voor beeldhouwkamer
      • Import naar beeldhouwkamer
      • Exporteren vanuit de beeldhouwkamer
    • Veroorzaken
      • Comparison of different roughness values
      • Paneelfuncties renderen
      • Draaitafel
      • Fakebake de verlichting -niet PBR
    • Factures
      • Werkstroom
    • eenvoudigste
    • Modellering
      • Mesh Menu
      • Linker gereedschapspaneel in de modelleerkamer
        • Geometrie toevoegen
          • Geselecteerd
        • Aanpassing
        • Smart Hybrid
        • UV
          • Commando's
        • Geheel gaas
      • Voorbeeld loftoppervlak van Fluffy
      • Blokkade door Poeboi
      • Import Zbrush Polygroups for UV mapping
    • Kitbash - Snelle creatie van 3D-modellen
      • Create kitbash
      • Left tool panel Kitbash
    • 3DPrint
    • Photogrammetry
      • How to install Reality Capture
      • Reality Capture doesn’t show up ?
    • Mesh naar NURBS-kamer
    • Nodes
      • Sculpt shaders Nodes-bibliotheek
  • Scripting en Core API
    • Scripting
    • Core API
    • Python-API
  • Gratis 3DCoatPrint

Autopo guide

603 views 0

Written by Carlos
January 11, 2025

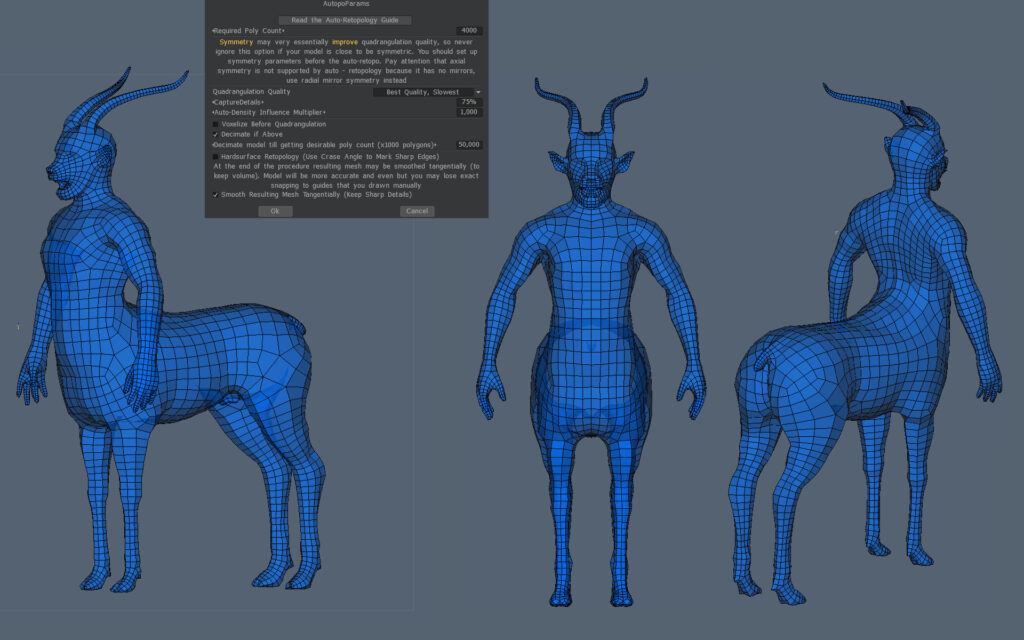
3DCoat Autopo test session By Christoph Werner


Hello friends.

I took some hours to prepare a big autopo test for 3DCoats last Autopo routine update. It was a lot of work to make all the tests and get a good settings result. But it was worth the time.

I have made more than 20 calculations! In the gallery you will find the very best settings I worked out in my tests.
So you may save a lot of time for your own work and just take the setting you think you need. Of course there are more ways to test, but I think my results are good for the most situations.

All tests were done without guide lines or density areas.

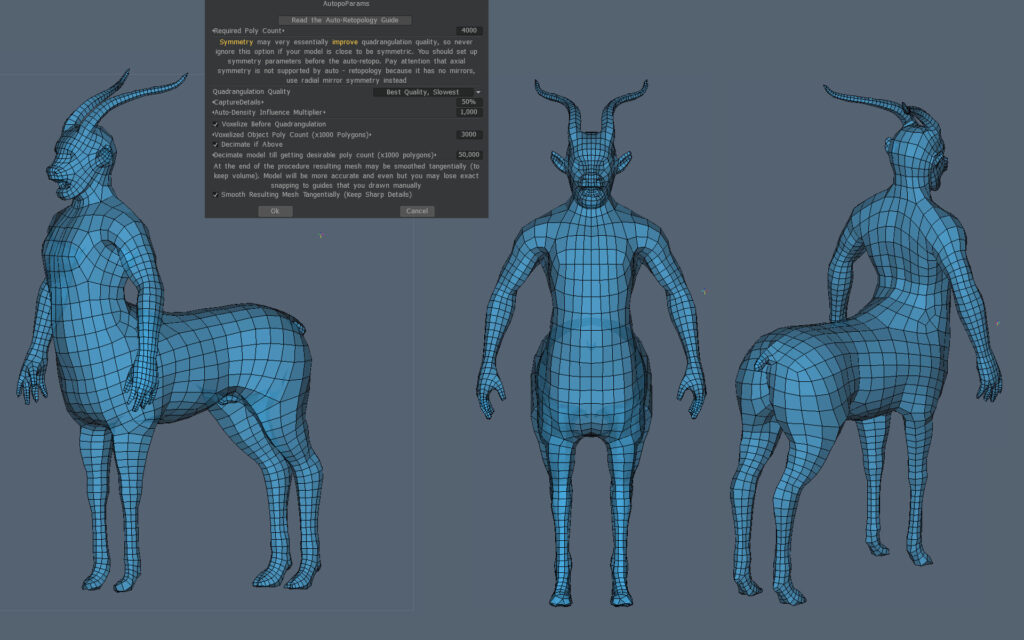
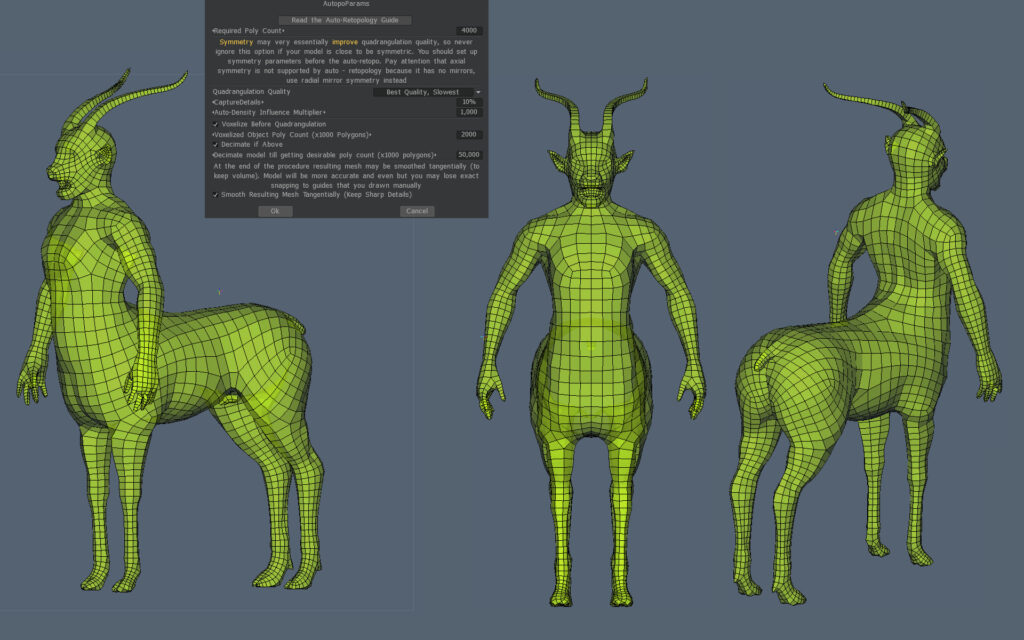
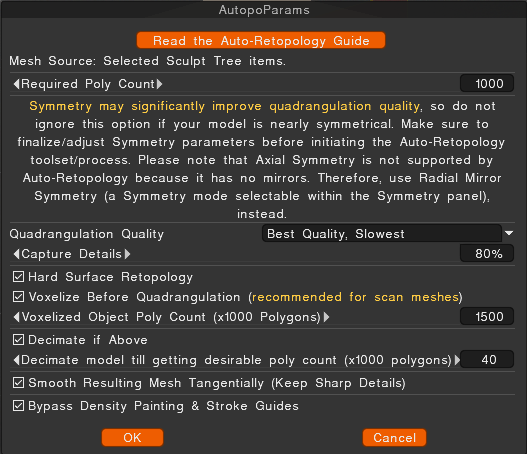
The basic rules for using Autopo in 3DCoat


  • If your model is symmetrical then switch scene symmetry ON. It increases the Autopo quality result a lot.
  • Start with small values for Capture Details and Decimate if Above. The most scenes don’t need more than a value of 50 in both options.
  • The higher the Capture Details value, the more poly stars can appear in the Autopo mesh.
  • The higher the Decimate if Above value, the more render time is used.
  • Switching Voxelise Before Quadrangulation to OFF leads often to better quality. If you have snapping problems in the autopo mesh, then switch it ON.
  • Try not to use Voxelise Before Quadrangulation value higher than 50% of your whole template model poly amount.
    Example: A sculpt model with 2.000.000 polys needs a value of “1.000”. (1000 x 1000=1.000.000=50% of 2 M.)
  • To disable the Decimate if Above option can lead to very long render times.
    (3D Coat is not crashed. You just need a lot of patience… It could result in an hour and more.)
  • Hardsurface retopology Crease Angle: I have not tested it in detail. But my test experience  resulted in ignoring this value. If you have hints where this option is good to have, drop me a line here please.
  • Smooth Resulting Mesh Tangentially can be set ON.

Density


When using density just mark the areas that have to be created with more polygons. The value describes the target amount of polygins in this areas. A value of 2 will lead to a double amount of the actually created polygons.

Don’t forget: Density will always “move” polygons from one area to increase another. So you will have less polygons at some model parts.
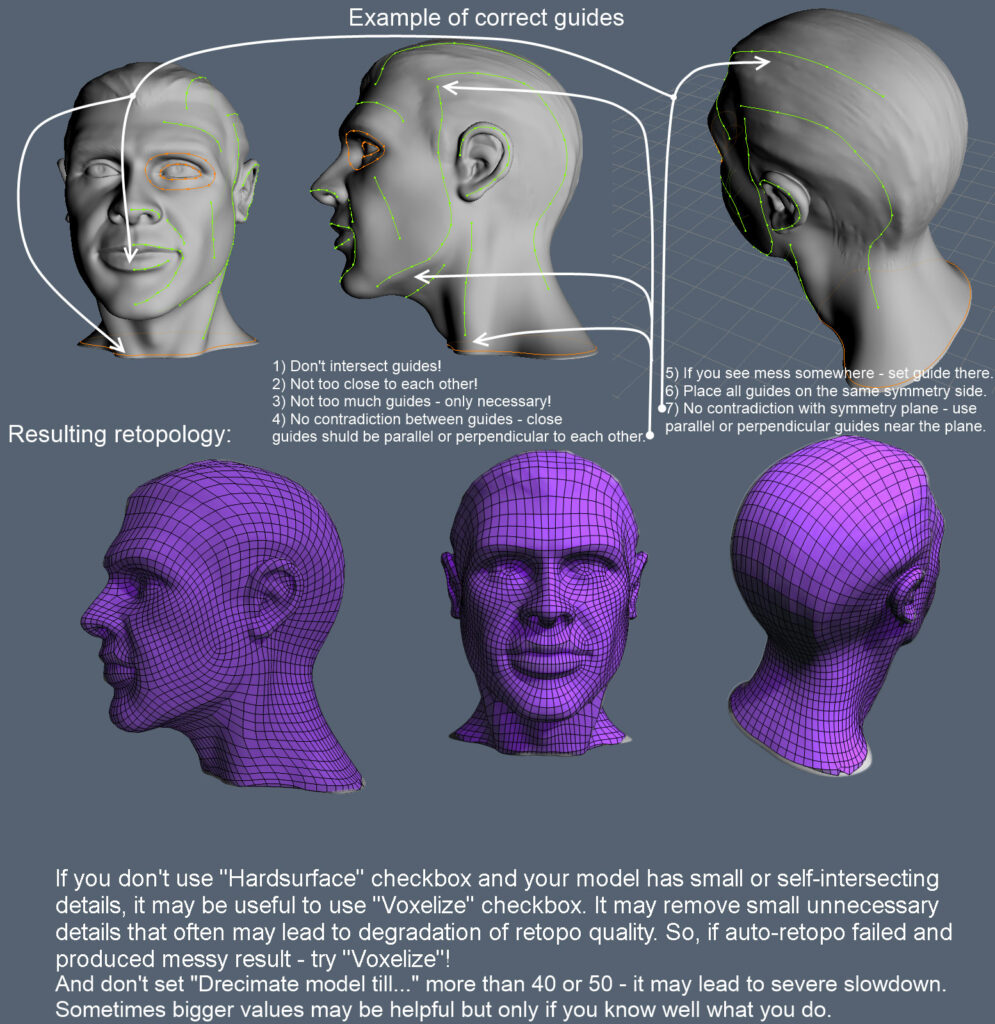
Guide lines


Hand painted guide lines help the Autopo routine to distribute the right polyflow. 3DCoat will try to follow your settings but this is only a approximation. There are some rules before using guide lines. Wrong usage can results in mesh problems.

  • Set less guide lines.
  • Don’t set lines too tight. Keep enough room inbetween.
  • Try to use rings at areas like eyes or similar.
  • Don’t cross lines.

The following official documentation image describes it well:

Test results with ratings for my settings


The more stars I gave the better the autopo result was. The result depends on the type of model used for retopology, for which there is no fixed guide.
Everything translates to trial and error for each circumstance.

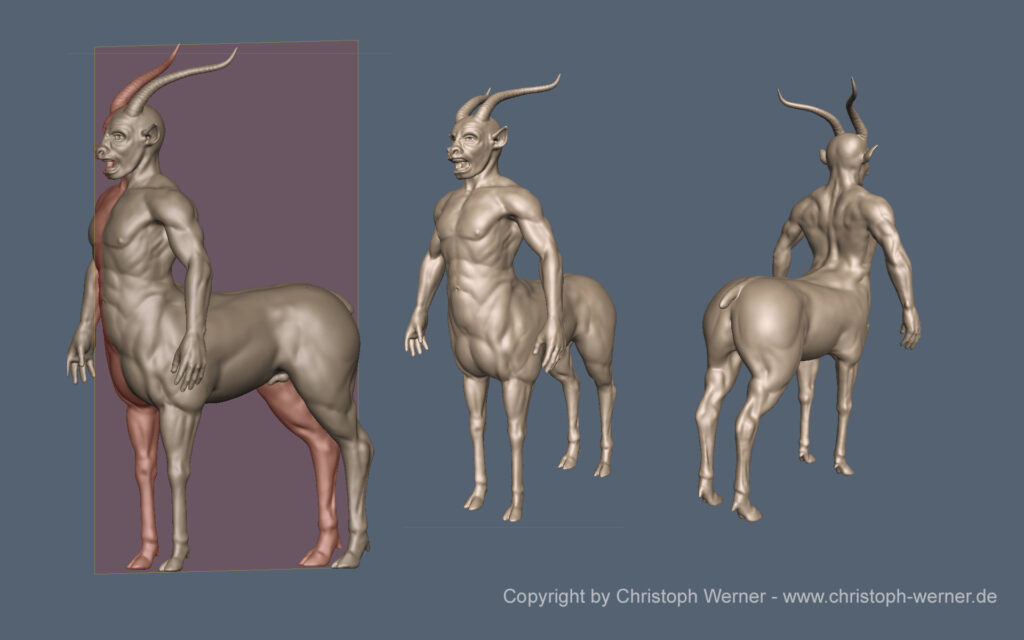
Testing settings for Hard Surface models


Autopo, or automatic retopology, for hard surface models is the process of automatically converting a high-polygon, inorganic model into a clean, low-polygon mesh with all-quad topology. While traditionally difficult for automated algorithms, modern software offers specialized features to produce a clean, usable mesh that respects the model’s sharp edges and flat planes. 

This workflow is crucial for optimizing models for video games and other real-time applications, where performance is critical. It allows artists to create complex, high-detail concepts without worrying about topology, then automatically generate a simplified, animation-ready version later. 

How hard surface auto-retopology works


Standard automatic retopology tools prioritize an even distribution of polygons, which works well for smooth, organic surfaces. Hard surface models, with their distinct angles and precise shapes, require a more advanced approach. Modern auto-retopology algorithms address this by: 

  • Edge detection: The software analyzes the mesh’s curvature to identify sharp edges, rather than relying on a simple crease angle. This allows it to preserve the hard edges of the model.
    User guidance: Many tools allow artists to add “stroke guides” or “density painting” to direct the algorithm. This gives manual control over areas where specific edge loops are critical for function or detail.
    Parameter adjustment: Specific settings can be tweaked to favor hard surface models. In Maya, for instance, high “Topology Regularity” and “Face Uniformity” values can be used to convert a mesh into quads while preserving hard edges. 

Limitations and workflow tips


Hard surface autopo is a hard task whose result depends on the complexity of the model.

  • Not perfect: While automated tools have become extremely powerful, they rarely produce a perfect mesh for complex models, especially for animation. Some manual cleanup is almost always required.
  • Clean source mesh: Ensure your high-poly sculpt is free of errors, such as non-manifold edges or overlapping vertices, as these can cause problems for the auto-retopology algorithm.
  • Separate parts: For very complex models with distinct, connected parts, better results can be achieved by separating the objects into individual components before running the auto-retopology routine.
  • Baking details: Following retopology, high-frequency details from the original model are “baked” into a normal map. This allows the low-poly mesh to retain the appearance of the original’s surface complexity

Was this helpful?

Yes  No
Related Articles
  • Surface Array
  • Top Bar
  • Curves Properties RMB
  • Left tool panel Kitbash
  • Create kitbash
  • Color management
Previously
AUTORETOPO
Up Next
Polygroepen
AI:
Hi! How can I help you?
Attention: This is a beta version of AI chat. Some answers may be wrong. See full version of AI chat