 Magyar
  English
 Українська
 Español
 Deutsch
 Français
 日本語
日本語 Русский
 한국어
한국어 Polski
 中文 (中国)
 Português
 Italiano
 Suomi
Suomi Svenska
 中文 (台灣)
 Dansk
Dansk Slovenčina
 Türkçe
 Nederlands
 ไทย
ไทย हिन्दी
 Ελληνικά
 Tiếng Việt
 Lietuviškai
 Latviešu valoda
 Eesti
Eesti Čeština
 Română
 Norsk Bokmål
Az összes eszköz további leírása itt található.
Módok
Klaszterek hozzáadása: Kattintson az LMB-re, ha egy fürt (UV szigetek) középpontját közvetlenül egy sokszöglapra kívánja hozzáadni. Ha ismét rákattint ugyanarra az arcra, az eltávolítja azt. Ezzel az eszközzel „megjelölhet” egy varrást anélkül, hogy egyként jelölné meg, így egy teljes UV szigetet szétoszthat részekre anélkül, hogy ténylegesen feldarabolná azokat.
Varratok megjelölése: Ha készen áll a háló kibontására, hogy UV térképet készítsen, ki kell választania a varratokat. Itt jön be ez az eszköz. Az éleket az LMB-vel, az élhurkokat a SHIFT+LMB-vel, a kijelölést pedig a CTRL+LMB-vel választhatja ki.
Élhurkok: Ez az eszköz nem különbözik attól, hogy a SHIFT+LMB billentyűt lenyomva tartjuk a „Varratok megjelölése” eszközzel. A különbség az, hogy nem szükséges lenyomva tartani a SHIFT billentyűt a kívánt élhurkok kiválasztásához. Használja az LMB-t az élhurkok, például a textúra varratok megjelölésére, vagy szüntesse meg a jelölésüket a CTRL+LMB billentyűkombinációval.
UV útvonal: Lehetővé teszi a 3DCoat által értelmezett csúcsok kiválasztását, hogy biztosítsa az útvonalat a szétbontó varratként megjelölt élek összekapcsolt sorozatához. Tegyen egy utat a legrövidebb úton (bizonyos feltételek mellett) több pont között. Kattintson rá pontok hozzáadásához vagy osztott vonalak hozzáadásához, használja az RMB-t, vagy kattintson duplán a pontok eltávolításához. A varratok kijelöléséhez nyomja meg az ENTER billentyűt, a varratok törléséhez pedig a CTRL ENTER billentyűt. Használjon különböző kritériumokat az útvonal áramlásának beállításához.
Csatlakozás fürtökhöz: Vigye a varrást a fürtök közé, és kattintson a teljes varrat eltávolításához és a fürtök összekapcsolásához.
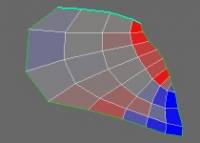
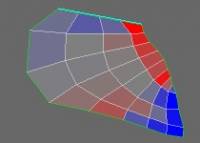
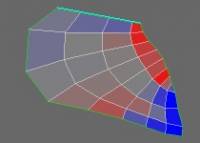
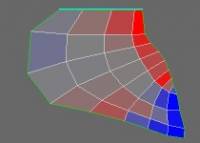
Ha a kiemelt varratok pirosak, az eredményül kapott összefoglaló szigeteken önmetszéspontok vannak, vagy túl nagy négyzet alakú szemetes. Ha zöld, akkor az összesítő szigetnek nincs önmetszéspontja, és a négyzetes szemetes nem több, mint 1/2.
Kiválasztott
A felső panelen kiválaszthatja a kiválasztási típusokat:
Csúcsok, élek, lapok, szigetek, Brush és csípés.

Válassza ki a csúcsokat, éleket vagy lapokat (a választott típustól függően) az LMB segítségével. Ha lenyomva tartja az LMB-t és húzza az egeret, több csúcsot/élt/felületet is kiválaszthat. A SHIFT billentyűvel hozzáadhat egy elemet a kijelöléshez, a CTRL billentyűvel pedig kivonhat egy elemet a kijelölésből.
A kijelölés típusától függően a Kiválasztott blokkban végrehajtott műveletek változhatnak.
Szigetek
Clear: Törli a kijelölést.
Invert: megfordítja a kijelölést.
Rotate CW: Ezzel elforgatja a kiválasztott szigetet az óramutató járásával megegyező irányba.
Rotate CCW: Ez elforgatja a kiválasztott szigetet az óramutató járásával ellentétes irányba.
Flip U: Ezzel megfordítja az UV térkép U betűjét.
Flip V: Ezzel megfordítja az UV térkép V-jét.
Relax: Könnyű simítást alkalmaz a kiválasztott fürtön (vagy szigeten), hogy enyhítse a nyújtást vagy becsípődést.
Ruha Relax: Lazítsa meg az UV szigeteket, hogy a varratokon a szemközti élek közel azonos hosszúságúak legyenek, és ugyanaz a kapcsolat legyen a térbeli élhossz és az UV térben lévő élhossz között. Ez hasznos lehet valódi dolgok – ruhák és puha játékok – készítéséhez.
ABF-nek: Az Unwrapping újabb, fejlettebb formája, amely a legalkalmasabb szerves hálókhoz.
Globálisan egységes (UV) kibontáshoz: A kiválasztott szigeteket a 3DCoat szabadalmaztatott Globally Uniform UV kibontási módszerével bontsa ki.
Az LSCM-hez: Az Unwrapping régebbi, hagyományosabb formája, amely jobban kompatibilis lehet a külső 3D-s alkalmazásokkal.
Síkba: Síkvetítést használ a kiválasztott UV szigetek kibontásához.
Felcsíkozás: Ezzel a módszerrel a sokszögekből álló csíkot egyenes vonallá bontják ki.
Elrejtés: A kiválasztott arcok elrejtése.
Inv. Rejtett:
Elrejtés feloldása: A rejtett arcok megfordítása.
Összes elrejtése: Az összes rejtett arc felfedése.
HD kiterjesztése: a rejtett terület kibontása.
HD szerződés: Szerződés rejtett terület.
UV másolása: Sziget másolása a vágólapra (használja a CTRL+C billentyűkombinációt). Kiválaszthat egy másik szigetet, és oda beillesztheti. Ily módon az egyik szigetet pontosan a másik fölé helyezi.
UV beillesztés : Illessze be a korábban másolt UV szigetet. Ki kell választania egy szigetet, nyomja meg a CTRL+C billentyűkombinációt, majd válasszon ki egy másik, ugyanolyan topológiájú szigetet, és nyomja meg a CTRL+V billentyűkombinációt. Így pontosan az első szigetet helyezi a második fölé.
Élek
Az Edges kiválasztási módban van néhány eszköz.
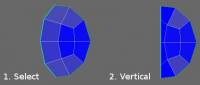
Ezek a következők: vonalhoz, egyenlő távolságra, vízszintes és függőleges.
Megjegyzés: kiválaszthat egy élhurkot az élre duplán kattintva, vagy egyszerűen használhat egy Edgeloop parancsot a Kijelölt blokkban. Az Edgering paranccsal élgyűrűket választhatunk ki.
A To line parancs az összes kijelölt élt a vonal mentén helyezi el.
Az equidistant parancs az összes kijelölt élt a vonal mentén helyezi el, és egyenlő távolságot állít be a pontok között.
A vízszintes parancs az összes kijelölt élt vízszintesen helyezi el.
A függőleges parancs az összes kijelölt élt függőlegesen helyezi el.
Clear: Törli a kijelölést.
Invert: megfordítja a kijelölést.
Rotate CW: Ezzel elforgatja a kiválasztott szigetet az óramutató járásával megegyező irányba.
Rotate CCW: Ez elforgatja a kiválasztott szigetet az óramutató járásával ellentétes irányba.
Flip U: Ezzel megfordítja az UV térkép U betűjét.
Flip V: Ezzel megfordítja az UV térkép V-jét.
Vonalhoz: Helyezze a kiválasztott éleket a vonal mentén.
Egyenlő távolság: Helyezze el a kiválasztott éleket a vonal mentén, és állítson be egyenlő távolságot a pontok között.
Vízszintes: húzza az éleket a vízszintes vonalak mentén.
Függőleges: helyezze el az éleket a függőleges vonal mentén.
Élhurok: Válassza ki az élhurkot ( UV előnézeti ablakban).
Élgyűrű: Válassza ki az élgyűrűt ( UV előnézeti ablakban).
Varratok beállítása: A kijelölt éleket varratként jelöli meg.
Varratok törlése: A kijelölt élek feletti varratok törlése ( UV előnézeti ablakban).
Arcok
Az arcok kijelölési módja további parancsokban tér el a csúcsok kijelölési módtól:
Ezekkel a parancsokkal csak a kiválasztott arcokat jelenítheti meg a nézetablakban.
Clear: Törli a kijelölést.
Invert: megfordítja a kijelölést.
Rotate CW: Ezzel elforgatja a kiválasztott szigetet az óramutató járásával megegyező irányba.
Rotate CCW: Ez elforgatja a kiválasztott szigetet az óramutató járásával ellentétes irányba.
Flip U: Ezzel megfordítja az UV térkép U betűjét.
Flip V: Ezzel megfordítja az UV térkép V-jét.
Relax: Könnyű simítást alkalmaz a kiválasztott fürtön (vagy szigeten), hogy enyhítse a nyújtást vagy becsípődést.
Ruha Relax: Lazítsa meg az UV szigeteket, hogy a varratokon a szemközti élek közel azonos hosszúságúak legyenek, és ugyanaz a kapcsolat legyen a térbeli élhossz és az UV térben lévő élhossz között. Ez hasznos lehet valódi dolgok – ruhák és puha játékok – készítéséhez.
Elrejtés: A kiválasztott arcok elrejtése.
Inv. Rejtett: A rejtett arcok megfordítása.
Elrejtés feloldása: A rejtett arcok megfordítása.
Összes elrejtése: Az összes rejtett arc felfedése.
HD kiterjesztése: a rejtett terület kibontása.
HD szerződés: Szerződés rejtett terület.
Csúcsok
Az összes többi parancs ugyanúgy működik, mint a Vertices esetében.
Szigetek
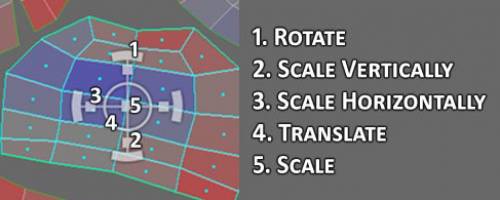
Szigetválasztó mód lehetővé teszi, hogy külön UV szigetekkel működjön. Egy Manipulátor segítségével lefordíthat, elforgathat és méretezhet (függőlegesen, vízszintesen és arányosan) egy szigetet.

Vegye figyelembe, hogy aktiválnia kell a manipulátort a felső sávon. Jelölje be a Kijelölés és a Manipulálás jelölőnégyzeteket.
Tanács: Mindig hagyja bejelölve a Kijelölés jelölőnégyzetet, hacsak nem szeretne semmit sem kijelölni.
Clear: Törli a kijelölést.
Invert: megfordítja a kijelölést.
Rotate CW: Ezzel elforgatja a kiválasztott szigetet az óramutató járásával megegyező irányba.
Rotate CCW: Ez elforgatja a kiválasztott szigetet az óramutató járásával ellentétes irányba.
Flip U: Ezzel megfordítja az UV térkép U betűjét.
Flip V: Ezzel megfordítja az UV térkép V-jét.
Relax: Könnyű simítást alkalmaz a kiválasztott fürtön (vagy szigeten), hogy enyhítse a nyújtást vagy becsípődést.
Ruha Relax: Lazítsa meg az UV szigeteket, hogy a varratokon a szemközti élek közel azonos hosszúságúak legyenek, és ugyanaz a kapcsolat legyen a térbeli élhossz és az UV térben lévő élhossz között. Ez hasznos lehet valódi dolgok – ruhák és puha játékok – készítéséhez.
ABF-hez: (Szög alapú lapítás). Az ABF egy újabb kicsomagolási algoritmus, amely a legalkalmasabb szerves hálókhoz.
GU-nak: A kiválasztott szigeteket a 3DCoat szabadalmaztatott Globally Uniform UV kicsomagolási módszerével oldja ki.
Az LSCM-hez: (Least Squares Conformal Maps) Az Unwrapping régebbi, hagyományosabb formája, amely jobban kompatibilis lehet a külső 3D-s alkalmazásokkal.
Síkba: Síkvetítést használ a kiválasztott UV szigetek tetszőleges tengely mentén történő kibontásához.
Felcsíkozás: Ezzel a módszerrel a sokszögekből álló csíkot egyenes vonallá bontják ki.
Elrejtés: A kiválasztott arcok elrejtése.
Inv. Rejtett: A rejtett arcok megfordítása.
Elrejtés feloldása: A rejtett arcok megfordítása.
Összes elrejtése: Az összes rejtett arc felfedése.
HD kiterjesztése: a rejtett terület kibontása.
HD szerződés: Szerződés rejtett terület.
UV másolása: Sziget másolása a vágólapra (használja a CTRL+C billentyűkombinációt). Kiválaszthat egy másik szigetet, és oda beillesztheti. Ily módon az egyik szigetet pontosan a másik fölé helyezi.
UV beillesztés : Illessze be a korábban másolt UV szigetet. Ki kell választania egy szigetet, nyomja meg a CTRL+C billentyűkombinációt, majd válasszon ki egy másik, ugyanolyan topológiájú szigetet, és nyomja meg a CTRL+V billentyűkombinációt. Így pontosan az első szigetet helyezi a második fölé.
Kefék mód
Ebben a módban az ecsettel működik, amelynek mérete és mérete az RMB nyomva tartásával és az egér félremozdításával változtatható.
Az LMB kattintással és húzással kezelheti az ecset alatti hálót. Használja a SHIFT+LMB billentyűket a háló simításához. A CTRL+LMB billentyűkombinációval csípje össze az ecset alatti területet. A SHIFT+CTRL+LMB billentyűkombinációval bővítheti az ecset alatti területet.
Csípés
Az utolsó mód a Tweak. Ez lehetővé teszi a csúcsok, élek vagy lapok nagyon egyszerű húzását. Egyszerűen mozgassa a kurzort egy csúcs/él/felület fölé, amíg ki nem lesz emelve, majd húzza az LMB segítségével.
A háló háromféleképpen jeleníthető meg: ellenőrző nélkül, egyszerű ellenőrzővel és összetett ellenőrzővel.
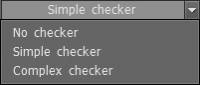
Nagyon hasznos, mivel megmutatja a textúra torzulásait a háló különböző területein.
Egy másik legördülő lista a felső sáv bal oldalán a Válasszon egy UV-készlet listát. Ha a hálónak több UVs van, akkor a legördülő listában váltogathatja őket.

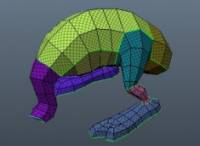
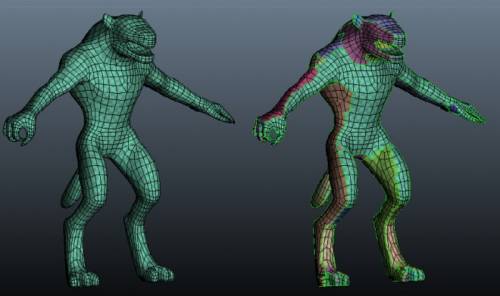
Átfedő UVs . A 3DCoat belül átfedő UVs lehetnek problémamentesen. Ahogy a képen látható.
Manipulátor használata
(A manipulátor ugyanúgy működik csúcsoknál, éleknél és lapoknál)
Nyomja meg az Upd gombot. Islands parancs az UV előnézeti ablak frissítéséhez az UV szigetekkel végzett műveletek után.
Parancsok
UV beállítások : Állítsa be a sziget csomagolási területét és a szigetek közötti minimális távolságot.
Tiszta fürtök: Megtisztítja az összes UV fürtöt (más néven UV szigetet) és varratokat.
Tiszta varratok: Csak az aktuális háló varratait tisztítja meg.
Automatikus varratok: Ha erre a lehetőségre kattint, az összes szükséges varrat automatikusan létrejön, az objektum alakja alapján legjobban kitalált megközelítést alkalmazva. Az újonnan létrehozott varratok továbbra is kiválaszthatók vagy eltávolíthatók a „Varratok megjelölése” munkamóddal. Lényegében automatikusan létrehozza a varratokat, a „legjobb tipp” alapján, hogy melyik éleket válasszuk ki varrásként.
Éles varratok: A varratokat az oldalak közötti szög függvényében állítsa be. Hasznos a kemény felület UV mapping.
UV egyesítése: Az összes oldal áthelyezése az aktuális UV készletre. Ha szükséges, törölje a fennmaradó üres UV készleteket a „Használatlan UV-készletek törlése” funkcióval.
Kicsomagolás: Minden klasztert beilleszt az UV térbe.
AutoMap: Ez ugyanaz a kibontási módszer, amelyet az import párbeszédpanelen használnak az automatikus leképezéshez. Ez egy síkbeli mapping a klaszterek önmetszésének tesztjével. Ez a módszer a legstabilabb, és bármilyen (még nem sokrétű) geometriát is felvesz, de túl sok szigetet hoz létre.
UV csomagolás: Ez az összes kicsomagolt UV klasztert az UV térképre helyezi az Ön által meghatározott útmutató „téglalap” szerint. A művelet befejeztével szerkesztheti a szigeteket az UV térképen. Ezen a ponton számos alapvető funkciót végrehajthat, amelyekhez UV térkép szükséges.
Shuffle/Pack: Az UV szigetek aktuális készletének becsomagolása az UV készletbe; az egymást átfedő szigetek megkeverednek. Nem történik kicsomagolás; csak a csomagolás történik.
PackUV2: csomagolja be az UV szigeteket elforgatás és átfordítás nélkül. A jobb csomagolás érdekében csak méretezik és mozgatják őket. A véletlenszerű lejátszáshoz nyomja meg a CTRL billentyűt.
Auto Scale: Automatikusan skálázza az összes szigetet, hogy egyenlő arányban legyen a térben lévő négyzet és az UV-beállított négyzet között.
Szigetek frissítése: Ha van egy meglévő szigete, és tovább jelöl egy varratot azon a szigeten, így az kettő lesz, akkor végre kell hajtania az „Update Islands” parancsot, hogy átvigye ezeket az információkat az UV előnézeti panelre, hogy ezután ez a két UV sziget választható az UV előnézeti panelen.
Frissítse a szigetkapcsolatot. Ha több varratot jelölt vagy törölt a hálón, az UV-Map nem lesz azonnal szigetekre bontva. Frissítenie kell a szigeteket a meglévő szigetek felosztásához vagy összekapcsolásához.
UV visszaállítása: Helyezze vissza az UVs a hálóból a festékszobában. Ez szinkronizálja mindkét helyiséget.
UV-készlet alkalmazása: Alkalmazza az aktuális kicsomagolási sémát az aktuális Retopo hálóra.
Mentés: UV információ mentése fájlba. Ez az opció elmenti a megjelölt vagy jelöletlen varrat- és fürtinformációkat az aktuális jelenetben, hogy később szerkeszthető legyen. Nem export a végső UV-térképet. Használja a Fájl menü “Textúrák Import/ Export ” párbeszédpanelt.
Betöltés: A korábban mentett UV információk betöltése egy fájlból.
Kontúr mentése: Ez a parancs lehetővé teszi a kontúr valós léptékű mentését EPS vagy DXF formátumban a további lézervágáshoz. A vonalak hossza megfelel a geometriai hossznak. Hasznos, ha formákat szeretne vágni a lézervágóval és az alkatrészeket összeragasztani.