• Svenska
  • 3DCoat dokumentation
  • Chapters
    • Introduktion till 3DCoat
    • Komma igång
    • Gränssnitt & navigering
    • Brush
    • Arbetsytor Rum
    • Scripting & Core API
    • Frågor
    • licensing
    • Utbildningshandledningar
  • Pilgway
  • Products
    • 3DCoat
    • 3DCoatTextura
    • 3DCoatPrint
    • PBRLibrary
  • Blog Posts
  • Store
  • Svenska Svenska
    • English English
    • Українська Українська
    • Español Español
    • Deutsch Deutsch
    • Français Français
    • 日本語 日本語
    • Русский Русский
    • 한국어 한국어
    • Polski Polski
    • 中文 (中国) 中文 (中国)
    • Português Português
    • Italiano Italiano
    • Suomi Suomi
    • 中文 (台灣) 中文 (台灣)
    • Dansk Dansk
    • Slovenčina Slovenčina
    • Türkçe Türkçe
    • Nederlands Nederlands
    • Magyar Magyar
    • ไทย ไทย
    • हिन्दी हिन्दी
    • Ελληνικά Ελληνικά
    • Tiếng Việt Tiếng Việt
    • Lietuviškai Lietuviškai
    • Latviešu valoda Latviešu valoda
    • Eesti Eesti
    • Čeština Čeština
    • Română Română
    • Norsk Bokmål Norsk Bokmål
  • Creating 3D Character Using 3DCoat
Expand All Collapse All
  • Introduktion till 3DCoat
  • Komma igång
    • System requirements
    • Why 3DCoat is Unique?
    • Aktiverar 3DCoat
    • Startfel
      • Startup error Mac
    • Color management
    • Upgrading permanent license
    • Linux Setup
      • Linux initial setup per-user installation
      • Linux initial setup for system
      • Tablet setup
      • To GTK3 from GTK2
    • Mappstruktur
      • Custom documents folder
    • Olika former av "upplösning"
    • Tablet on Window
    • Import & Export
    • Applinks i 3DCoat
      • Blender applänk
        • Blender with the Applink in Linux
      • Blender 4.2/3/4/5 applink
      • Max Applink
      • Houdini applink
      • Lightwave uplink
  • Navigation
    • Öppningsdialogruta (snabbstartsmeny)
    • Navigationspanel
    • Kamera och navigering
      • Customize Navigation as Blender
    • Viewport Navigation Gizmo
    • Left tool panel
    •  Activity Bar
    • Navigering med 3DConnexion-enheter
      • How to compile Spacenavd on non Ubuntu distro
    • Stylus doesn’t work in sculpting
    • Snabbtangenter
  • Gränssnitt & navigering
    • Arkiv-menyn
    • Redigera meny
      • Calculate Curvature
      • Calculate Occlusion
      • Light Baking Tool
      • Inställningar
    • Visa menyn
    • Symmetri
    • Textures
    • Calculate
    • Menyn Lager
    • Frys meny
    • Hide
    • Bake
    • Kurvor 2022
      • Kurvor Meny
      • Curves Properties RMB
      • Fyll med nätskikt
      • Scale of imported curves
    • Windows-menyn
      • Windows popup-paneler med flikar
      • Reglage
    • Scripts
    • Addons
    • Capture
    • Hjälpmeny
    • Anpassning
    • Ändra eller skapa nytt rum
  • Brush
    • Brush Top Bar
    • Borstar allmänt bruk
      • Skapa penslar och dekaler
      • Att göra alfa från nuvarande sculpt
      • Skapa en Brush från ett 3D-objekt
      • Create brushes based on Curves
      • Load photoshop .abr brushes
    • Strokes
      • Kurvor popupmeny
    • Brush
    • Villkorsbegränsare
    • Strips Panel
    • Schabloner panel
    • Smarta material
      • Lägg till nya bilder eller material
      • Fäst ett Smart material på ett lager
      • Import Quixel Material
    • Hur man skapar förinställningar för Brush
  • Arbetsytor Rum
    • Painting
      • Painting och lägen
        • Per-Pixel Painting
        • Painting (Micro-Vertex)
        • Ptex Painting
        • Painting (polymålning)
      • Importera till Painting
        • Initial CC subdivision
        • UV Set smoothing
        • Sharp (hard) edge
        • Lås Normals
        • Ladda ny UV layout efter modellbyten
        • DAZ Genesis models into 3DCoat
        • ID map
      • Menyer för Painting
        • Edit menu
        • Texturer meny
          • Verktyg för Baking
        • Dölj
        • Meny för Bake Paint
        • Färgväljaren
      • Top Bar för Painting
      • Panelen Lager
        • Blandningspanelen
        • Layer and Clipping Masks
      • Painting
      • Opacitet - Transparens
      • Tweak arbetsyta
        • Tweak Toolset
        • Exporterar från Tweak Room
      • Förhandsgranskningspanel för mask/material
      • Exporterar från Painting
    • UV arbetsyta
      • UV Top Bar
      • UV Vänster verktygspanel
      • UV förhandsgranskningspanel
      • Exempel på UV arbetsflöde
      • Importera till UV -rummet
      • Exporterar från UV -rummet
    • Retopologi
      • Importerar till Retopo -rummet
      • Retopo Mesh Menu och Bake Menu
        • Virtuellt spegelläge
      • Bake menu
        • Treat Poly Groups as Paint Objects
        • Baking guide
      • Top Bar
        • Välj geometri
      • Vänster verktygspanel i Retopologirummet
        • Övergripande syfte och funktion
        • Lägg till geometri
          • Strokes verktyg i Retopologi
        • Retopo Tweak Tools
        • UV verktyg
        • Kommandon för Retopologirummet
      • AUTORETOPO
        • Autopo guide
      • Polygrupper
    • Skulptera
      • Sculpt Layer
      • Skulptera träd
      • Sculpt Brush alternativ
      • Top Bar
      • Brush motor
      • Geometri Undermeny
      • Skulptera "Högerklicka"-menyn
      • Shaders
      • Voxel
        • Ren Voxel Sculpting
        • Densitet och upplösning
        • Lera motor
        • Voxel verktyg
        • Ytverktyg på Voxels
        • Voxel
        • Volumetrisk Painting
        • Voxel Objects Tools
      • Ytläge
        • Ytverktyg
        • Ytan anpassade verktyg
        • Ytjusteringsverktyg
        • Painting
        • Verktyg för ytobjekt
        • Flernivåupplösning
          • Multires tools
          • Multires adjust
          • Multires commands
      • Skulptera kurvor
        • Splinekurvor
        • Splines model creation
      • Vektorförskjutning
      • Yttransformeringsverktyg
        • Voxel Transform Tools
        • Instancer
        • Move
        • Pose
        • Fit
        • Reproject
        • Surface Array
      • Voxel Primitives & Import Tools
      • Levande booleaner
      • Kommandon för Sculpt room
      • Import till Sculpt Room
      • Exporterar från Sculpt Room
    • Framställa
      • Comparison of different roughness values
      • Rendera panelfunktioner
      • Skivspelare
      • Fakebake the lighting -icke PBR-
    • Factures
      • Arbetsflöde
    • Enklast
    • Modellering
      • Mesh Menu
      • Vänster verktygspanel i modelleringsrummet
        • Lägg till geometri
          • Vald
        • Modifiera
        • Smart Hybrid
        • UV
          • Kommandon
        • Hela Mesh
      • Loftyteexempel av Fluffy
      • Blockout av Poeboi
      • Import Zbrush Polygroups for UV mapping
    • Kitbash - Snabbt skapande av 3D-modeller
      • Create kitbash
      • Left tool panel Kitbash
    • 3DPrint
    • Photogrammetry
      • How to install Reality Capture
      • Reality Capture doesn’t show up ?
    • Nät till NURBS-rummet
    • Nodes
      • Sculpt shaders Nodes Library
  • Scripting & Core API
    • Scripting
    • Core API
    • Python API
  • Gratis 3DCoatPrint

Light Baking Tool

768 views 1

Written by Carlos
January 4, 2025

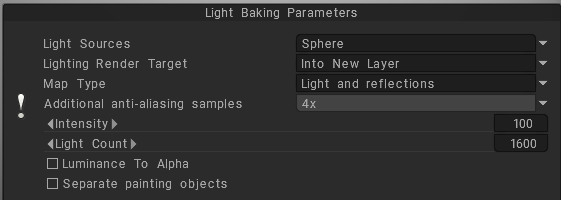
Sometimes you need to bake all lighting into the diffuse color of the texture.
Open shader ball for example, fill layer with any reflective Smart Material, bake your reflection and it creates reflection layer  in texture.
It picks up any light you have set up in render room, including environment light (To change baked illumination change the environment map).

If bake is too dark try modifying setting intensity. 

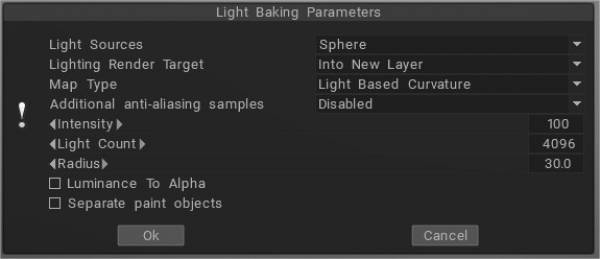
If you wish to bake light without environment “light from render room” is not necessary anymore, because you can achieve the same result by using “light and reflections” in flat shading mode.

Map Type


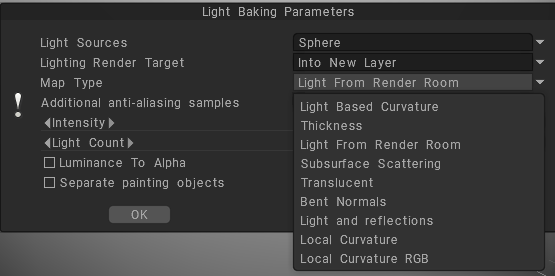
Light Based Curvature: more correctly calculates the result on UV Overlap; black areas no longer appear on different objects which have the same UV coordinates.
Thickness: Similar to AO, it casts rays from the surface of the mesh to the inside (modifying radius value). It can be used in SSS shading.
Light From Render Room: If you wish to bake light without an environment, use “light from render room” instead of “Light and Reflections.
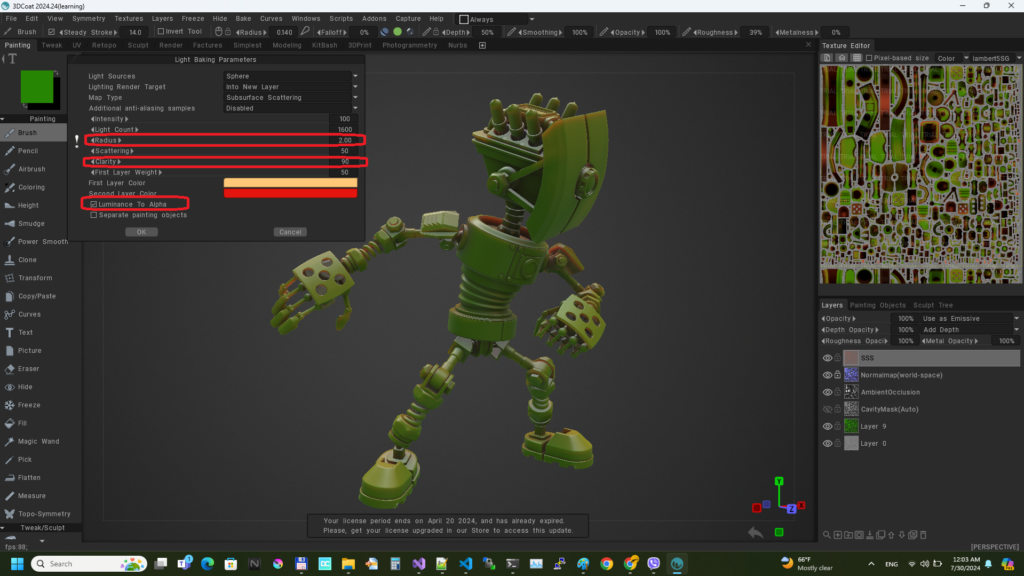
Subsurface Scattering: Use this settings to get rid of the dirty shadow lines on the subsurface scattering.

Translucent: A translucency color map can be used to vary the translucent color of a surface. Use it to recreate glassy materials.
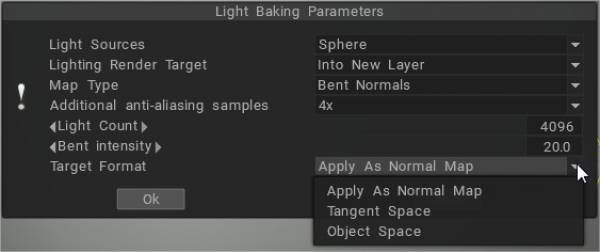
Bent Normals: Benefits of Using Bent Normals. They combine the ao and normal map together to get better occlusion for indirect light and reflection.

Light and Reflections: fill the layer with any reflective Smart Material, bake your reflection, and it creates a reflection layer in the texture layer.

It picks up any light you have set up in the render room, including the environment light.
Local Curvature: calculates curvature on objects with a normal map and analyzes the model’s curvature in many projections pixel by pixel, which allows you to get a more accurate and beautiful result. The radius and intensity can be adjusted.
Local Curvature RGB: Bakes curvature with radius 1, 20, and 100 to RGB channels, respectively. (Use RGB cavity as the default cavity calculation method can be set on Preferences).

RGB Cavity map


The new RGB cavity was introduced as a possible default calculation method. In this case, the multi-range cavity will be calculated on the GPU, and additional control in UI of conditions/smart materials will appear, the “Cavity width.” It allows for variation in the cavity width/smoothing in real time, which is very important for realistic PBR texturing.

Cavity width (using the RGB cavity) may be used for smart materials for each layer separately. Each material layer has its own cavity width settings. It allows for much better effects for “aging” materials, like several differently “aged” layers of paint.

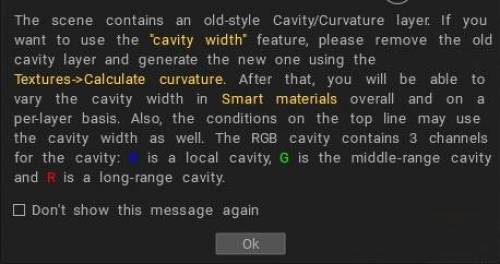
RGB cavity is a multi-range cavity texture, each channel corresponds to a different cavity scale. B is the local cavity, G is a middle-range cavity, and R is the far-range cavity.

If you already have the old cavity layer in the scene, you need to delete it to use this feature. This is a very significant feature for the PBR painting over the texture/mesh.
If the RGB cavity is enabled by default and you are loading the scene that has the old-style cavity layer, the Coat will warn you that it is better to re-calculate the cavity to get better control.

Global (light based) curvature and local curvature are related to the geometry of a surface.


Global (light based) curvature refers to the overall shape of a surface and is a measure of how much the surface deviates from being flat.
For example, a sphere has positive global curvature, while a plane has zero global curvature.

Local curvature, on the other hand, refers to the curvature of a surface at a particular point or over a small region.
This curvature can be different from the global curvature and can vary from point to point on a surface.
For example, a sphere has positive local curvature everywhere, while a parabolic cylinder has positive local curvature in some regions and negative local curvature in others.

Tutorials


Light Baking Tool: This video covers the Light Baking tool in 3DCoat.

Baking Lighting & Reflections in Unlit Shader: This video briefly shows how to bake a PBR material along with reflections and lighting into a texture for an unlit shader.

Tags:Light Baking Tool

Was this helpful?

1 Yes  No
Related Articles
  • Factures
  • ID map
  • Surface Array
  • Top Bar
  • Curves Properties RMB
  • Left tool panel Kitbash
Previously
Calculate Occlusion
Up Next
Inställningar
AI:
Hi! How can I help you?
Attention: This is a beta version of AI chat. Some answers may be wrong. See full version of AI chat