• Svenska
  • 3DCoat dokumentation
  • Chapters
    • Introduktion till 3DCoat
    • Komma igång
    • Gränssnitt & navigering
    • Brush
    • Node System
    • GPU Texturing
    • Arbetsytor Rum
    • Scripting & Core API
    • Frågor
    • Licensing
  • Learn
    • Getting Started
    • Painting
    • Sculpt
    • Modeling
    • Retopology
    • UV
    • Smart Materials
    • Nodes
    • Photogrammetry
    • Render
    • Print
    • Learning
    • Utbildningshandledningar
  • Blog
    • Texturing with nodes
    • Shader Nodes VS. a Material Nodes
    • Multiple UV Tiles/UDIMs to one single UV set ?
    • I want to create geometry only with displacement to be manufactured with a CNC machine
    • Creating 3D Character Using 3DCoat
    • DAZ Genesis models into 3DCoat
    • Cavity and Curvature maps
    • Types of normal maps
    • Texture painting pipeline
    • Load new UV layout After Model Changes
    • Import Zbrush Polygroups for UV mapping
  • Products
    • 3DCoat
    • 3DCoatTextura
    • 3DCoatPrint
    • PBRLibrary
  • Store
  • Pilgway
  • Svenska Svenska
    • English English
    • Українська Українська
    • Español Español
    • Deutsch Deutsch
    • Français Français
    • 日本語 日本語
    • Русский Русский
    • 한국어 한국어
    • Polski Polski
    • 中文 (中国) 中文 (中国)
    • Português Português
    • Italiano Italiano
    • Suomi Suomi
    • 中文 (台灣) 中文 (台灣)
    • Dansk Dansk
    • Slovenčina Slovenčina
    • Türkçe Türkçe
    • Nederlands Nederlands
    • Magyar Magyar
    • ไทย ไทย
    • हिन्दी हिन्दी
    • Ελληνικά Ελληνικά
    • Tiếng Việt Tiếng Việt
    • Lietuviškai Lietuviškai
    • Latviešu valoda Latviešu valoda
    • Eesti Eesti
    • Čeština Čeština
    • Română Română
    • Norsk Bokmål Norsk Bokmål
  • 3DCoat dokumentation
  • Chapters
    • Introduktion till 3DCoat
    • Komma igång
    • Gränssnitt & navigering
    • Brush
    • Node System
    • GPU Texturing
    • Arbetsytor Rum
    • Scripting & Core API
    • Frågor
    • Licensing
  • Learn
    • Getting Started
    • Painting
    • Sculpt
    • Modeling
    • Retopology
    • UV
    • Smart Materials
    • Nodes
    • Photogrammetry
    • Render
    • Print
    • Learning
    • Utbildningshandledningar
  • Blog
    • Texturing with nodes
    • Shader Nodes VS. a Material Nodes
    • Multiple UV Tiles/UDIMs to one single UV set ?
    • I want to create geometry only with displacement to be manufactured with a CNC machine
    • Creating 3D Character Using 3DCoat
    • DAZ Genesis models into 3DCoat
    • Cavity and Curvature maps
    • Types of normal maps
    • Texture painting pipeline
    • Load new UV layout After Model Changes
    • Import Zbrush Polygroups for UV mapping
  • Products
    • 3DCoat
    • 3DCoatTextura
    • 3DCoatPrint
    • PBRLibrary
  • Store
  • Pilgway
  • Svenska Svenska
    • English English
    • Українська Українська
    • Español Español
    • Deutsch Deutsch
    • Français Français
    • 日本語 日本語
    • Русский Русский
    • 한국어 한국어
    • Polski Polski
    • 中文 (中国) 中文 (中国)
    • Português Português
    • Italiano Italiano
    • Suomi Suomi
    • 中文 (台灣) 中文 (台灣)
    • Dansk Dansk
    • Slovenčina Slovenčina
    • Türkçe Türkçe
    • Nederlands Nederlands
    • Magyar Magyar
    • ไทย ไทย
    • हिन्दी हिन्दी
    • Ελληνικά Ελληνικά
    • Tiếng Việt Tiếng Việt
    • Lietuviškai Lietuviškai
    • Latviešu valoda Latviešu valoda
    • Eesti Eesti
    • Čeština Čeština
    • Română Română
    • Norsk Bokmål Norsk Bokmål
Expand All Collapse All
  • Introduktion till 3DCoat
  • Komma igång
    • System requirements
    • Why 3DCoat is Unique?
    • Aktiverar 3DCoat
    • Startfel
      • Startup error Mac
    • Color management
    • Upgrading permanent license
    • Linux Setup
      • Linux initial setup per-user installation
      • Linux initial setup for system
      • Tablet setup
      • To GTK3 from GTK2
      • Error libicuuc.so.70
    • Mappstruktur
      • Custom documents folder
    • Olika former av "upplösning"
    • Tablet on Window
    • Import & Export
    • Applinks i 3DCoat
      • Blender applänk
        • Blender with the Applink in Linux
      • Blender 4.2/3/4/5 applink
      • Max Applink
      • Houdini applink
      • Lightwave uplink
  • Navigation
    • Öppningsdialogruta (snabbstartsmeny)
    • Navigationspanel
    • Kamera och navigering
      • Customize Navigation as Blender
    • Viewport Navigation Gizmo
    • Left tool panel
    •  Activity Bar
    • Navigering med 3DConnexion-enheter
      • How to compile Spacenavd on non Ubuntu distro
    • Space Bar Menu
    • Stylus doesn’t work in sculpting
    • Snabbtangenter
  • Gränssnitt & navigering
    • Arkiv-menyn
    • Redigera meny
      • Calculate Curvature
      • Calculate Occlusion
      • Light Baking Tool
      • Inställningar
    • Visa menyn
    • Symmetri
    • Textures
    • Calculate
    • Menyn Lager
    • Frys meny
    • Hide
    • Bake
    • Kurvor 2022
      • Kurvor Meny
      • Curves Properties RMB
      • Fyll med nätskikt
      • Scale of imported curves
    • Windows-menyn
      • Windows popup-paneler med flikar
      • Reglage
    • Scripts
    • Addons
    • Capture
    • Hjälpmeny
    • Anpassning
    • Ändra eller skapa nytt rum
  • Brush
    • Brush Top Bar
    • Borstar allmänt bruk
      • Skapa penslar och dekaler
      • Att göra alfa från nuvarande sculpt
      • Skapa en Brush från ett 3D-objekt
      • Create brushes based on Curves
      • Load photoshop .abr brushes
    • Strokes
      • Kurvor popupmeny
    • Brush
    • Villkorsbegränsare
    • Strips Panel
    • Schabloner panel
    • Smarta material
      • Lägg till nya bilder eller material
      • Fäst ett Smart material på ett lager
      • Import Quixel Megascans
    • Hur man skapar förinställningar för Brush
  • Node System
    • Node Editor
    • Node & Object Inspectors
    • Node Graph
    • NodeGraph Language (NGL)
    • GPU Nodes
      • Color
      • GeometryIn
      • In
      • Layer
      • Material
      • Out
      • Pattern
      • Pattern3D
      • ShaderToy
      • Shape
      • Texture
      • Tilable
      • UV
      • Vector
    • Filters
    • Masks
    • Materials
    • Modifiers
    • Volumes
  • Gratis 3DCoatPrint
  • GPU Texturing
    • PBM Channels
    • Per-Pixel Painting
  • Arbetsytor Rum
    • Painting
      • Painting och lägen
        • Per-Pixel Painting
        • Painting (Micro-Vertex)
        • Ptex Painting
        • Painting (polymålning)
      • Importera till Painting
        • Initial CC subdivision
        • UV Set smoothing
        • Sharp (hard) edge
        • Lås Normals
        • Ladda ny UV layout efter modellbyten
        • DAZ Genesis models into 3DCoat
        • ID map
      • Menyer för Painting
        • Edit menu
        • Texturer meny
          • Verktyg för Baking
        • Dölj
        • Meny för Bake Paint
        • Färgväljaren
      • Surface Materials
      • Top Bar för Painting
      • Panelen Lager
        • Blandningspanelen
        • Layer and Clipping Masks
      • Painting
      • Opacitet - Transparens
      • Tweak arbetsyta
        • Tweak Toolset
        • Exporterar från Tweak Room
      • Förhandsgranskningspanel för mask/material
      • Exporterar från Painting
    • UV arbetsyta
      • UV Top Bar
      • UV Vänster verktygspanel
      • UV förhandsgranskningspanel
      • Exempel på UV arbetsflöde
      • Importera till UV -rummet
      • Exporterar från UV -rummet
    • Retopologi
      • Importerar till Retopo -rummet
      • Retopo Mesh Menu och Bake Menu
        • Virtuellt spegelläge
      • Bake menu
        • Treat Poly Groups as Paint Objects
        • Baking guide
      • Strokes verktyg i Retopologi
      • Top Bar
        • Välj geometri
      • Vänster verktygspanel i Retopologirummet
        • Övergripande syfte och funktion
        • Lägg till geometri
        • Retopo Tweak Tools
        • UV verktyg
        • Kommandon för Retopologirummet
      • AUTORETOPO
        • Autopo guide
      • Polygrupper
    • Skulptera
      • Sculpt Layer
      • Skulptera träd
      • Sculpt Brush alternativ
      • Top Bar
      • Brush motor
      • Geometri Undermeny
      • Skulptera "Högerklicka"-menyn
      • Shaders
      • Voxel
        • Ren Voxel Sculpting
        • Densitet och upplösning
        • Lera motor
        • Voxel verktyg
        • Ytverktyg på Voxels
        • Voxel
        • Volumetrisk Painting
        • Voxel Objects Tools
      • Ytläge
        • Ytverktyg
        • Ytan anpassade verktyg
        • Surface Layer
        • Ytjusteringsverktyg
        • Painting
        • Flernivåupplösning
          • Multires tools
          • Multires adjust
          • Multires commands
      • Skulptera kurvor
        • Splinekurvor
        • Splines model creation
      • Vektorförskjutning
      • Yttransformeringsverktyg
        • Voxel Transform Tools
        • Instancer
        • Move
        • Pose
        • Fit
        • Reproject
        • Surface Array
      • Voxel Primitives & Import Tools
        • Hollow Box
      • Levande booleaner
      • Kommandon för Sculpt room
      • Import till Sculpt Room
      • Exporterar från Sculpt Room
    • Framställa
      • Comparison of different roughness values
      • Rendera panelfunktioner
      • Skivspelare
      • Fakebake the lighting -icke PBR-
    • Factures
      • Arbetsflöde
    • Enklast
    • Modellering
      • Mesh Menu
      • Vänster verktygspanel i modelleringsrummet
        • Lägg till geometri
          • Vald
        • Modifiera
        • Smart Hybrid
        • UV
          • Kommandon
        • Hela Mesh
      • Loftyteexempel av Fluffy
      • Blockout av Poeboi
      • Import Zbrush Polygroups for UV mapping
    • Kitbash - Snabbt skapande av 3D-modeller
      • Create kitbash
      • Left tool panel Kitbash
    • 3DPrint
    • Photogrammetry
      • How to install Reality Capture
      • Reality Capture doesn’t show up ?
    • Nät till NURBS-rummet
    • Nodes
      • Texturing with nodes
      • Sculpt shaders Nodes Library
      • Open PBR
  • Scripting & Core API
    • Core API
    • Python API
    • Extensions and Addons

Tablet on Window

1162 views 0

Written by Carlos
June 7, 2025

Because of the drastic increase to the of Wacom stylus pressure levels in recent versions of Wacom tablets, an important adjustment needs to be made in the PREFERENCES panel of 3D Coat, regarding the pressure sensitivity.

Go to Preferences >Tablet Library

This option let you select input used by “3DCoat”. Switch between two tablet libraries: “WinTab” and “Tablet PC”.
Currently “3DCoat” uses “WinTab” which will work only if you will install Wacom “WinTab” driver.
When using “Tablet PC” library which should work without additional Wacom “WinTab” driver. 
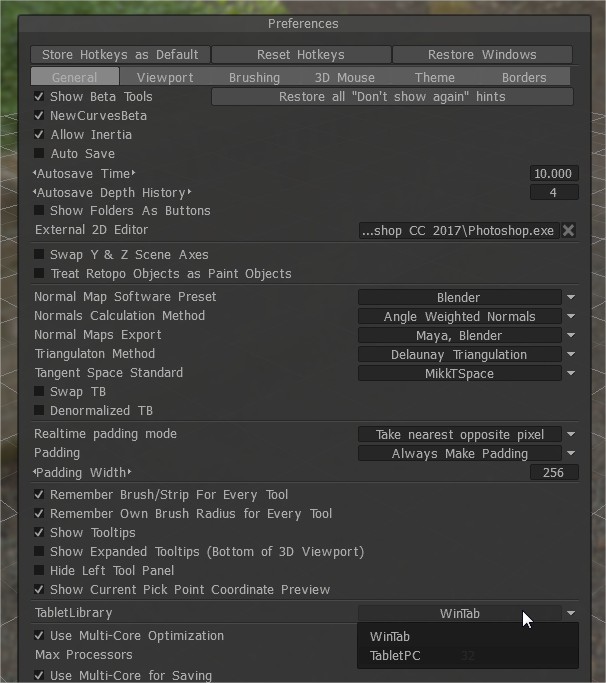
TabletLibrary.jpg

Also remember switching this icon to pen (pressing LMB over the icon) 
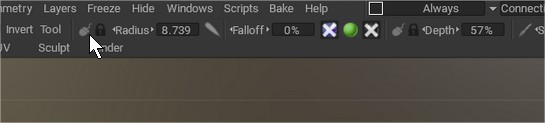
Pen.jpg


Pressure Sensitivity

To adjust your tablet’s pressure sensitivity in 3DCoat, you can fine-tune the app’s global preferences and also toggle the pen mode directly from the workspace for optimal stroke control.

1. Adjust Global Sensitivity in Preferences

If your strokes don’t feel responsive—especially with modern tablets that have 8,192 pressure levels—you can adjust the global sensitivity curve.

  • Open 3DCoat and navigate to Edit > Preferences.
  • Go to the Brushing tab and locate the Brush Sensitivity setting.
  • Change the value (e.g., lowering it to 0.1 will make the brush respond more noticeably to light pressure compared to the default 1 setting).

If your stylus is not responding at all, try switching the tablet library located in Edit > Preferences > Brushing > Tablet Interface (or Tablet Library). You can toggle between WinTab and Tablet PC (Windows Ink) to see which one works best for your specific tablet driver.

2. Configure Your Tablet Driver

If adjusting 3DCoat’s preferences isn’t enough, you may need to calibrate the physical pressure curve in your tablet’s native control panel:

  • Wacom: Open the Wacom Center or Wacom Tablet Properties, select your device, and go to the Pen tab to adjust the Tip Feel slider (Soft to Firm) or customize the pressure curve graph.
  • Huion: Open the Huion app, go to Digital Pen, and click Pressure Sensitivity Adjustment to adjust the curve or apply a soft/hard preset.

3. Toggle Pressure Modes in the Top Bar

You can quickly change how individual brushes react to your stylus using the icons next to the Radius/Depth sliders in the top toolbar:

  • Pen Icon: Turns pen pressure ON (your brush will dynamically change based on how hard you press).
  • Mouse Icon: Turns pen pressure OFF and applies constant pressure throughout the entire stroke.

For a visual walkthrough of these adjustments, including how to set up brush libraries for newer drawing tablets:


Tutorial

This old video show how to setup Tablet sensitivity on Preferences

Was this helpful?

Yes  No
Related Articles
  • Texturing with nodes
  • Hollow Box
  • GPU Texturing
  • Vector
  • Volumes
  • Modifiers
Previously
Olika former av "upplösning"
Up Next
Import & Export
AI:
Hi! How can I help you?
Attention: This is a beta version of AI chat. Some answers may be wrong. See full version of AI chat