• Español
  • Documentación 3DCoat
  • Chapters
    • Introducción a 3DCoat
    • Empezando
    • Interfaz y Navegación
    • Componentes del Brush
    • Espacios de trabajo Habitaciones
    • Scripting y Core API
    • Preguntas y respuestas
    • licensing
    • Tutoriales de formación
  • Pilgway
  • Products
    • 3DCoat
    • 3DCoatTextura
    • 3DCoatPrint
    • PBRLibrary
  • Blog Posts
  • Store
  • Español Español
    • English English
    • Українська Українська
    • Deutsch Deutsch
    • Français Français
    • 日本語 日本語
    • Русский Русский
    • 한국어 한국어
    • Polski Polski
    • 中文 (中国) 中文 (中国)
    • Português Português
    • Italiano Italiano
    • Suomi Suomi
    • Svenska Svenska
    • 中文 (台灣) 中文 (台灣)
    • Dansk Dansk
    • Slovenčina Slovenčina
    • Türkçe Türkçe
    • Nederlands Nederlands
    • Magyar Magyar
    • ไทย ไทย
    • हिन्दी हिन्दी
    • Ελληνικά Ελληνικά
    • Tiếng Việt Tiếng Việt
    • Lietuviškai Lietuviškai
    • Latviešu valoda Latviešu valoda
    • Eesti Eesti
    • Čeština Čeština
    • Română Română
    • Norsk Bokmål Norsk Bokmål
  • Creating 3D Character Using 3DCoat
Expand All Collapse All
  • Introducción a 3DCoat
  • Empezando
    • System requirements
    • Why 3DCoat is Unique?
    • Activando 3DCoat
    • error de inicio
      • Startup error Mac
    • Color management
    • Upgrading permanent license
    • Linux Setup
      • Linux initial setup per-user installation
      • Linux initial setup for system
      • Tablet setup
      • To GTK3 from GTK2
    • Estructura de carpetas
      • Custom documents folder
    • Diferentes formas de “resolución”
    • Tablet on Window
    • Import y Export
    • Applinks en 3DCoat
      • Enlace de aplicación Blender
        • Blender with the Applink in Linux
      • Blender 4.2/3/4/5 applink
      • Max Applink
      • Houdini applink
      • Lightwave uplink
  • Navigation
    • Diálogo de apertura (menú de inicio rápido)
    • Panel de navegación
    • Cámara y Navegación
      • Customize Navigation as Blender
    • Viewport Navigation Gizmo
    • Left tool panel
    •  Activity Bar
    • Navegación con dispositivos 3DConnexion
      • How to compile Spacenavd on non Ubuntu distro
    • Stylus doesn’t work in sculpting
    • Teclas de acceso directo
  • Interfaz y Navegación
    • Menú Archivo
    • Menú de edición
      • Calculate Curvature
      • Calculate Occlusion
      • Light Baking Tool
      • preferencias
    • Ver menú
    • Simetría
    • Textures
    • Calculate
    • Menú de capas
    • Menú de congelación
    • Hide
    • Bake
    • Curvas 2022
      • Menú Curvas
      • Curves Properties RMB
      • Rellenar con capa de malla
      • Scale of imported curves
    • Menú de ventanas
      • Paneles emergentes de Windows con pestañas
      • Controles deslizantes
    • Scripts
    • Addons
    • Capture
    • Menú de ayuda
    • personalización
    • Modificar o Crear nueva Sala
  • Componentes del Brush
    • Barra superior de Brush
    • Cepillos uso general
      • Crear pinceles y calcomanías
      • Hacer alfa a partir de la escultura actual
      • Crear un Brush a partir de un objeto 3D
      • Create brushes based on Curves
      • Load photoshop .abr brushes
    • trazos
      • Menú emergente de curvas
    • Opciones de Brush
    • Limitador de condiciones
    • Panel de tiras
    • Panel de plantillas
    • Materiales inteligentes
      • Agregar nuevas imágenes o materiales
      • Adjuntar un material inteligente a una capa
      • Import Quixel Material
    • Cómo crear ajustes preestablecidos para Brush
  • Espacios de trabajo Habitaciones
    • Painting
      • Painting de texturas y modos
        • Painting Per-Pixel
        • Painting de desplazamiento (Micro-Vertex)
        • Painting Ptex
        • Painting de Superficies (Polipintura)
      • Importación a la sala de Painting
        • Initial CC subdivision
        • UV Set smoothing
        • Sharp (hard) edge
        • Bloquear normales
        • Cargar nuevo diseño UV después de cambios de modelo
        • DAZ Genesis models into 3DCoat
      • Menús del espacio de trabajo de Painting
        • Edit menu
        • Menú Texturas
          • Herramientas Baking texturas
        • Esconder
        • Menú para la Bake Paint
        • El selector de color
      • Barra superior para la Painting
      • El panel de capas
        • El panel de fusión
        • Layer and Clipping Masks
      • Herramientas de la sala de Painting
      • Opacidad - Transparencia
      • Ajustar el espacio de trabajo
        • Conjunto de herramientas de ajuste
        • Exportación desde Tweak Room
      • Panel de vista previa de máscara/material
      • Exportación desde la sala de Painting
    • Espacio de trabajo UV
      • Barra superior UV
      • Panel de herramientas izquierdo UV
      • Panel de vista previa UV
      • Ejemplo de flujo de trabajo UV
      • Importación a la sala UV
      • Exportando desde la Sala UV
    • Retopología
      • Importando a la Sala Retopo
      • Menú Malla Retopo y Menú Hornear
        • Modo espejo virtual
      • Bake menu
        • Treat Poly Groups as Paint Objects
        • Baking guide
      • Barra superior
        • Seleccionar geometría
      • Panel de herramientas izquierdo en la sala de Retopología
        • Propósito general y función
        • Agregar Geometría
          • Herramienta Trazos en Retopología
        • Herramientas de ajuste Retopo
        • Herramientas UV
        • Comandos para sala de Retopología
      • AUTORETOPO
        • Autopo guide
      • Grupos polivinílicos
    • Esculpir
      • Sculpt Layer
      • Esculpir árbol
      • Opciones de Brush para esculpir
      • Top Bar
      • motor de Brush
      • Submenú Geometría
      • Esculpir menú de "clic derecho"
      • sombreadores
      • modo Voxel
        • Escultura pura de Voxel
        • Densidad y Resolución
        • Motor de arcilla
        • Herramientas de Voxel
        • Herramientas de superficie en Voxels
        • Herramientas de ajuste de Voxel
        • Painting volumétrica
        • Herramientas de objetos de Voxel
      • modo de superficie
        • Herramientas de superficie
        • Herramientas personalizadas de superficie
        • Herramientas de ajuste de superficie
        • Painting de superficies
        • Herramientas de objetos de superficie
        • Resolución multinivel
          • Multires tools
          • Multires adjust
          • Multires commands
      • Esculpir curvas
        • Curvas Spline
        • Splines model creation
      • Desplazamiento vectorial
      • Herramientas de transformación de superficies
        • Herramientas de transformación de Voxel
        • Instancer
        • Move
        • Pose
        • Fit
        • Reproject
        • Surface Array
      • Primitivas de Voxel y herramientas de Import
      • Booleanos en vivo
      • Comandos para la sala Sculpt
      • Import a Sculpt Room
      • Exportación desde Sculpt Room
    • Prestar
      • Comparison of different roughness values
      • Funciones del panel de procesamiento
      • Placa giratoria
      • Fakebake la iluminación -sin PBR-
    • Factures
      • flujo de trabajo
    • más simple
    • Modelado
      • Mesh Menu
      • Panel de herramientas izquierdo en la sala de modelado
        • Agregar geometría
          • Seleccionado
        • Retocar
        • Smart Hybrid
        • UV
          • Comandos
        • Malla entera
      • Ejemplo de superficie loft de Fluffy
      • Bloqueo por Poeboi
      • Import Zbrush Polygroups for UV mapping
    • Kitbash - Creación rápida de modelos 3D
      • Create kitbash
      • Left tool panel Kitbash
    • 3DPrint
    • Photogrammetry
      • How to install Reality Capture
      • Reality Capture doesn’t show up ?
    • Malla a habitación NURBS
    • Nodes
      • Sculpt shaders Biblioteca de nodos
  • Scripting y Core API
    • Scripting
    • Core API
    • API de Python
  • 3DCoatPrint gratis

Initial CC subdivision

784 views 0

Written by Carlos
May 27, 2024

Initial subdivision


When you import “model for pixel painting” with 3DCoat, you can select initial subdivision.
(text below by lunarbor).

Software used

    • 3DCoat
    • Blender

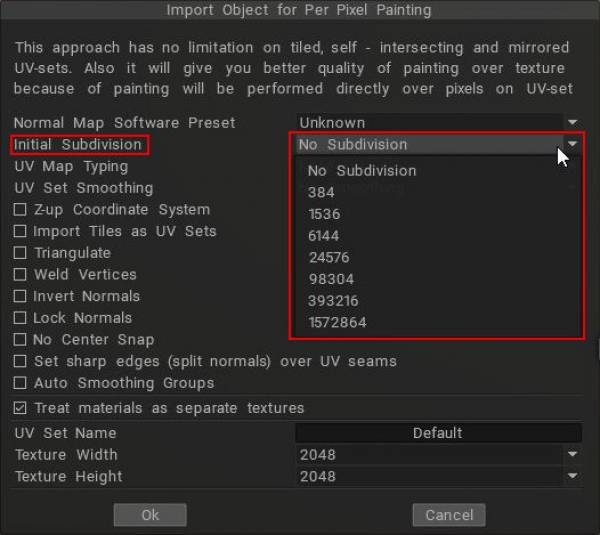
In 3DCoat, when you “import a model for pixel painting”, you can select “Initial subdivision (number of polygons)” in the import settings screen, which seems to correspond to the subdivision ratio when using Catmull-Clark subdivision (CC).

In other software, the division level is specified as the number of polygons, so it is hard to tell which one to choose at a glance.

Verification


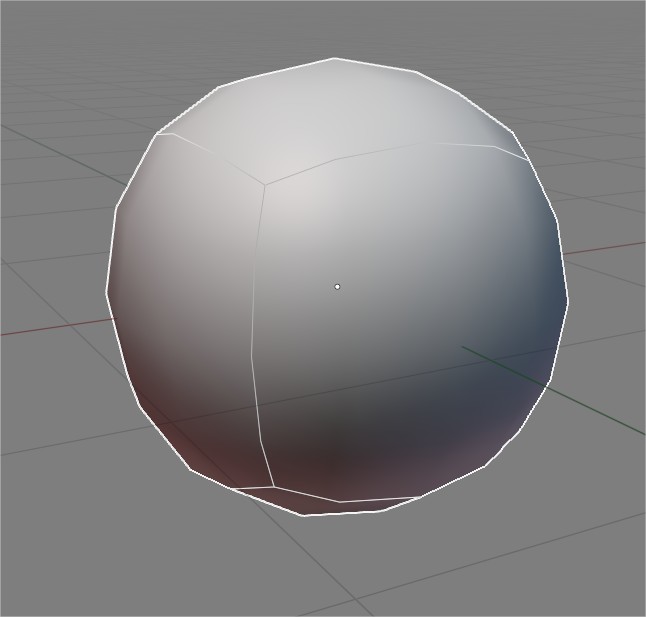
Create a primitive cube in Blender. The number of polygons is “6,” of course.
The cube is subdivided by applying CC, but the number of polygons that can be counted is still “6”. (red frame)


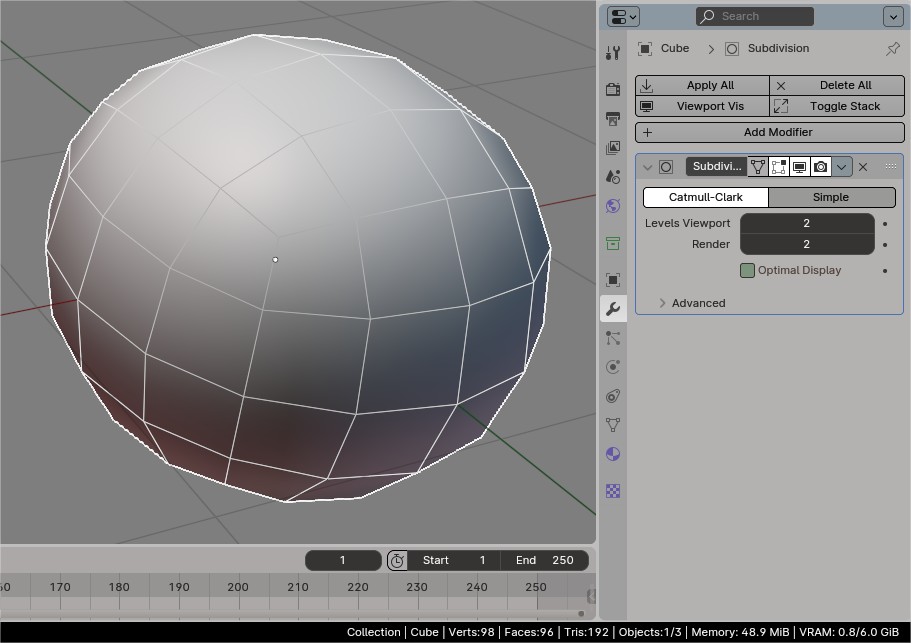
Then, press the “Modifiers > Apply” button to finalize the subdivision.

Then the division is fixed with CC applied, and the polygon count of this object is counted. In this case, we used CC division level 2. The polygon count is “96”.

Do this for each CC division level and check the polygon count according to the level.

And I made an animated gif to make the results easier to understand.

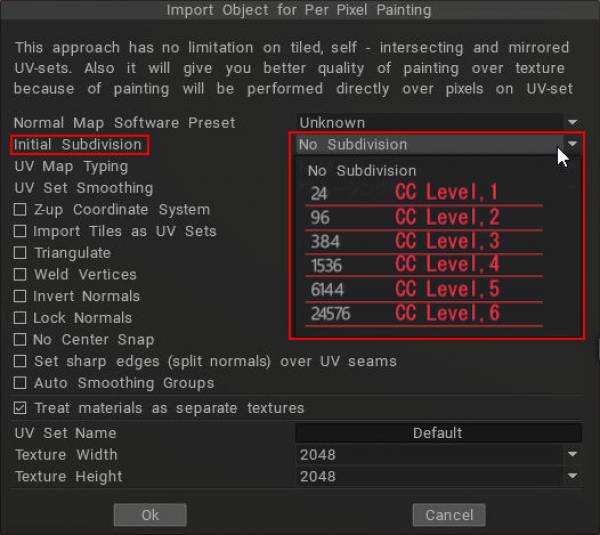
The polygon count matches the number in the 3DCoat panel pasted at the beginning of this article. Therefore, that number seems correct for the number of polygons subdivided by each division level of CC. Simply remember it is level 1, 2, 3~ from the top.
That clears things up.

This panel is displayed when the same cube model used in the verification is imported into 3DCoat as a “model for pixel painting”.

This value varies depending on the object to be imported, so if you do not understand this, you will not know which one to choose.

3DCoat has setting items here and there with only numerical values like this.

Tags:Initial subdivision

Was this helpful?

Yes  No
Related Articles
  • Surface Array
  • Top Bar
  • Curves Properties RMB
  • Left tool panel Kitbash
  • Create kitbash
  • Color management
Previously
Importación a la sala de Painting
Up Next
UV Set smoothing
AI:
Hi! How can I help you?
Attention: This is a beta version of AI chat. Some answers may be wrong. See full version of AI chat