 Eesti
Eesti  English
 Українська
 Español
 Deutsch
 Français
 日本語
日本語 Русский
 한국어
한국어 Polski
 中文 (中国)
 Português
 Italiano
 Suomi
Suomi Svenska
 中文 (台灣)
 Dansk
Dansk Slovenčina
 Türkçe
 Nederlands
 Magyar
 ไทย
ไทย हिन्दी
 Ελληνικά
 Tiếng Việt
 Lietuviškai
 Latviešu valoda
 Čeština
 Română
 Norsk Bokmål
DICOMi osade Import : DICOM on esmane failivorming meditsiiniliste kujutiste salvestamiseks ja edastamiseks haigla andmebaasis. Piltide salvestamiseks on ka teisi failivorminguid. Lisaks DICOM-ile võite näha ka meditsiinilisi pilte, mis on salvestatud NIFTI-vormingus (faili järelliide “.nii”), PNG-, JPEG-vormingus või isegi Pythoni failiobjektides, nagu NumPy massiivid.
Miks siis kasutada DICOM-i? Muud failivormingud võivad olla mugavamad, kuid kõik kasutab kliinilises praktikas DICOM-vormingut.
DICOM-i mõistmine : kuidas lugeda, kirjutada ja korraldada meditsiinilisi pilte.
Soovime rõhutada, et 3DCoat ei ole meditsiinilisi litsentse ja 3DCoat ei ole mõeldud meditsiiniliseks otstarbeks.
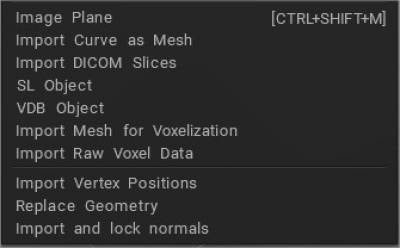
Võrgusilma Import vokseliseerimiseks: Import hulknurkne võrk, et seda ruumis Sculpt vokseleerida. See tööriist võimaldab import hulknurkseid võrke, et teisendada need voksliteks. Võrk peaks olema suletud.
Kui see pole suletud, peaksite selle import koos paksusega või muutma selle suletuks. Tutvume kõigepealt selle tööriista mõne põhifunktsiooniga:
- Select mesh: valib teie kõvakettale salvestatud võrgu.
- Vali retopo: kui teil on Retopo ruumis midagi ümber topologiseeritud, saate voksliteks liitmiseks kasutada võrku.
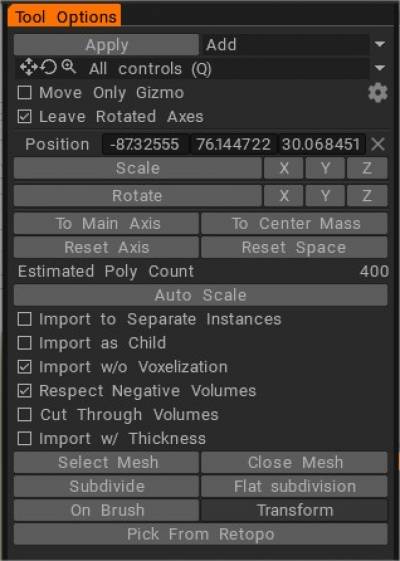
- Pliiatsil: muudab kõik ühendatud võrgud tööriistaks “Ühenda lennult”, mis võimaldab ühendada mis tahes objekti kursori asukohas (respekteerides põhiobjekti normaalväärtusi ja põhiobjekti sissetungimist või selle kohalt väljapressimist). Reguleerige liidetud objekti suurust paremklõpsuga lohistades vasakule või paremale ja reguleerige selle sissetungi või väljapressimist paremklõpsuga üles või alla lohistades.
- Alamjaotamine: jagab teie ühendamata võrgu osadeks, andes sellele enne ühendamist suurema esialgse eraldusvõime.
- Teisendus: võimaldab teil positsioneerida mis tahes ühendatud objekti “Transform vidinaga”.
- Nihutamine (X, Y ja Z): nihutab ühendamata võrgusilma piki valitud telge kohalikus ruumis asuvas piirdekastis.
- Eelseaded: sellel tööriistal on mitu eelseadet; teid julgustatakse neid uurima.
- Eraldi köite ühendamine: liidab iga alamobjekti oma kordumatu köitega.
- Austage negatiivseid mahtusid: kui ühendamata objekti nimes on “_negative” – (mis näitab faili sees lahutavat alamobjekti), lahutab see funktsioon selle mahu, kui ühendab selle teiste alamobjektidega. Kui kasutate seda funktsiooni “negatiivse” või lahutava tõeväärtusobjektina, peaksite sellest ette teadma. See funktsioon sobib suurepäraselt greeblite ja lastehoidjate loomiseks.
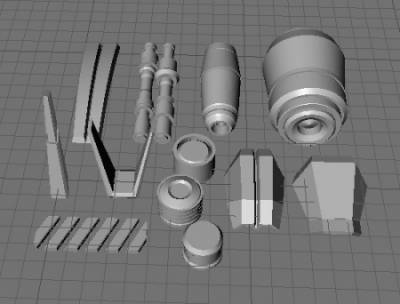
Voxel režiimi importimine
Põhimõte on see, et kui import välise mudeli Voxel, muudate selle olemust sisuliselt 3DCoat mahupõhiseks „skulptuuriks” – 3DCoat keskkonnale ainulaadseks.
Enamik imporditud 3D-objekte on hulknurgapõhised ja seetõttu tuleb need tõlkida antud “eraldusvõimega” Voxel . See eraldusvõime sõltub skaalast, mille selle objekti jaoks import määrate.
Välised objektid sisenevad Voxel kas dialoogide avamise, menüü Fail/ Import või ühendamise kaudu.
Kõigil kolmel juhul tuuakse teie objekt Voxel , mida ümbritseb “Transform Widget/Gizmo”. Saate anda oma imporditud mudelile vajaliku eraldusvõime, suurendades seda vaateaknas visuaalselt või sisestades numbrid. Kui õige skaala/eraldusvõime on saavutatud, vajutage selle kehtivaks ja püsivaks muutmiseks sisestusklahvi.
Kui “Import vokseliseerimiseks” või “Import” välise objekti, on olemas huvitav ja kasulik funktsioon nimega “Piiats”, mis võimaldab teil interaktiivselt paigutada imporditud võrgu eksemplare mis tahes mõõtkava, orientatsiooni ja läbitungimissügavusega. (kui Voxel on juba mõni muu objekt) – kõik “lennult” – ja kasutades hiirt.
Paremnupuga alla lohistamine:
paremalt vasakule – muudab liidetud objekti suurust üles või alla – muudab ühendatud objekti läbitungimissügavuse mis tahes objektiks, mis võib Voxel juba olemas olla.
Oletame, et teil on objekt, mis eksisteerib paneelil “Models” ja soovite selle lisada Voxel . Sel juhul saate seda teha, klõpsates lihtsalt selle ikoonil paneelil ja teile kuvatakse standardne “Import” dialoog, mis võimaldab teil seda teha nagu mis tahes välist mudelit.
Surface Mode jaoks importimine
Avamise dialoogi kaudu saate import ka otse pinnarežiimi.
Pinnarežiim on Voxel Roomi alamhulk, kuid töötab täielikult pindadel (ilma helitugevuseta). Pinnarežiim pakub teie imporditud mudeli reguleeritava kolmnurkse võrgusilma kujutist, mis käitub sarnaselt vokslitega.
Kui teie imporditud mudel on Surface Mode tööruumis, saate kasutada LiveClayt, meie dünaamilise alajaotuse (lokaliseeritud alajaotuse) rakendust. See vormimismeetod lisab eraldusvõimet ainult seal, kus seda vajatakse (lokaalselt), säästes tarkvara- ja riistvararessursse.
Õpetused
Madala polüestersusega võrgusilma importimine ruumi Sculpti : see video näitab mõningaid probleeme, mis võivad ilmneda madala polüestersusega võrkude importimisel 3DCoati Sculptingi tööruumi, eriti Surface režiimis… ja kuidas neid õigesti käsitleda.
Import lameda alamjaotusega : see video demonstreerib hiljutist Import suvandit 3DCoat tööruumis Sculpt, et kasutada Catmull Clarki alajaotuse asemel Flat Subdivisioni. See jaguneb aladeks ilma objekti silumata. See aitab kõrvaldada vajaduse kulutada lisaaega mudeli tavapäraseks jaotamiseks ettevalmistamiseks enne selle importimist 3DCoati kõrgpolü/ Voxel skulptuurikeskkonda.
Kiirnõuanne: madala hulknurkse võrgusilma impordi parandamine .