Käyttöliittymän perusteet: Anton Tenitsky.

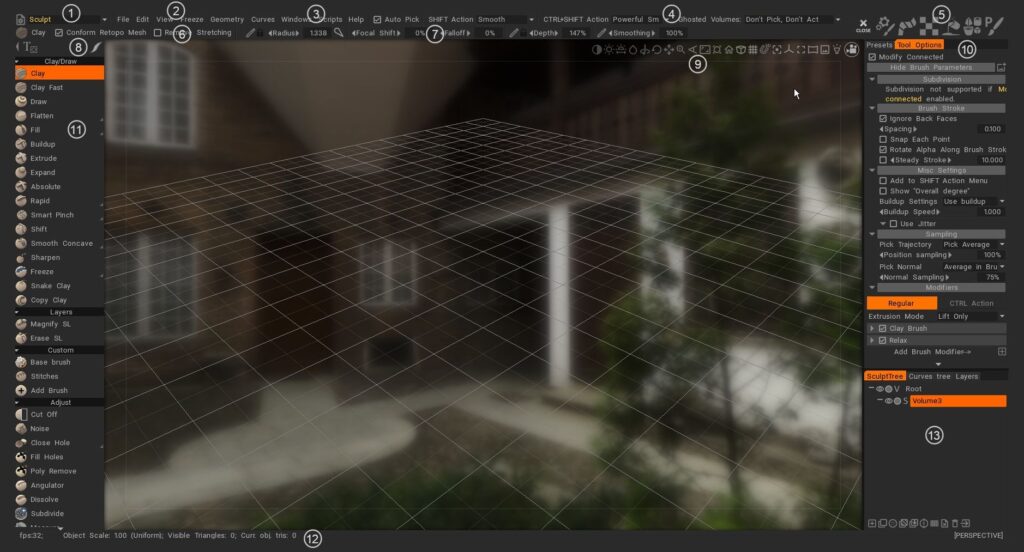
Huonesarjat: Pormestarin työkalut ja toiminnot on jaettu huoneisiin. Jokainen huone on suunniteltu tarjoamaan sinulle joukko työkaluja, jotka kaikki liittyvät johonkin luovan prosessin osaan. Kun valitset huoneen hiirellä tai näppäimistöllä, vain nykyiseen tehtävään liittyvä työkalu näkyy vasemmassa työkalupaneelissa.
- Päävalikko: Ensimmäiset valikot ovat aina käytettävissä.
- Yksittäiset valikot: Muut valikot vaihtelevat valitsemasi huonesarjan mukaan. Tämä auttaa keskittymään työsi vastaaviin työkaluihin.
- Tilarivi: Valitse ja nappaa -valintamenetelmä. Työkaluvaihtoehdot. Muuta sen mukaan, minkä huonesarjan valitset.
- Toimintopalkki : tämä video esittelee lyhyesti oikeassa yläkulmassa olevan toimintopalkin käyttöä. Kun viet hiiren osoittimen sen päälle, se laajentaa nopeasti kyseisen kuvakkeen eri lavat tai paneelit häiritsemättä käyttöliittymän yleistä asettelua.
- Työkalun tyyppi: näyttää valitun työkalun.
- Työkaluasetukset-paneeli: kuten muissakin huoneissa, yläpalkki sisältää tavalliset siveltimen asetukset, se sisältää työkalukohtaiset parametrit ja painikkeet. Joillakin harjoilla ja työkaluilla on parametreja, toisilla ei.
- Stroke : määrittää tavan, jolla vetosi käyttäytyy hiiren napsautuksesta hiiren vapauttamiseen. Stroke on useita Stroke , jotka auttavat hallitsemaan Brush vetoa, sekä laaja valikoima spline- ja polygonpohjaisia piirustustiloja.
- Kamera ja navigointi: Yhteisiä kaikille huoneille ovat vakiomenetelmät näkymän ja yksittäisten mallien näyttämiseksi 3D-näkymässä.
- Työkalurivin asetukset: sisältää joitain yleisiä parametreja, jotka perustuvat käyttämääsi työkaluun. Se muuttuu kontekstuaalisesti.
- Vasen työkalupaneeli: kaikki nykyiseen huoneeseen liittyvät työkalujen valinnat.
- Tilastorivi: siellä on tilastot kohtauksen kärkien, pintojen ja kolmioiden kokonaismäärästä nykyisen kohdevalinnan lisäksi.
- Kerrokset: 3DCoat on 3 tyyppistä kerrosta. Muokkaa kerroksia, maalikerroksia (maali- ja veistoskerroksille) ja Curves-kerroksia.
3DCoat on erittäin intuitiivinen ja kattava valikoima säätimiä ja pikanäppäimiä , jotka auttavat sinua käsittelemään työtilaasi ja 3D-kohtauksia. Olemme yrittäneet integroida yleisimmät yleisimmissä 3D-sovelluksissa käytetyt navigointikäytännöt ja luoneet tapoja mukauttaa niitä melkein mihin tahansa.
3DCoat Quick Start -käyttöliittymä 1 Splash Screen, UI & Navigation Pt 1. Selkeä video, joka määrittää, että sinulla on useita kohteita, joista jokainen on erityinen jokaiselle huoneelle.
3DCoat 2021 -käyttöliittymän yleiskatsaus 1
3DCoat 2021 Quick Start -käyttöliittymä 2 Splash Screen, UI & Navigation Pt 2.
Tämä video päättää yleiskatsauksen 3DCoat 2021 -käyttöliittymästä, jossa tarkastellaan joitain uusimpia muutoksia, mutta myös kuinka optimoida, mukauttaa ja minimoida näkyvien paneelien määrä mieltymystesi mukaan.
3DCoat Version 4 – UI Overview Serie Tämä version 4 videosarja kattaa
- Navigointipalkin elementit
- Kameran pikavalinnat ja navigoinnin esiasetukset (esim. kuten Maya, ZBrush tai tavallinen 3DCoat)
- Pikanäppäinnavigointi
- Brush koko ja intensiteetti
- Yleiset käyttöliittymäelementit koko sovelluksessa
- Käyttöliittymän mukauttaminen
- Pikanäppäinten luominen, tallentaminen ja lataaminen
- Brush asetukset -paneeli
- Nauhat
- 2D-tekstuurieditori
- Brush, materiaalit, naamarit (pääasiassa stensiilit) -paneelit; käyttää niitä 2D-tekstuurieditorin lisäesittelyssä.
- Lisäasetukset Tasot-paneelissa.
- E-paneeli.
- Työkalupalkki
- Valikkopalkki
- Asetukset-paneeli
Tervetuloa Alien Minefieldin 3DCoat sarjaan: Osa 1 (Interface) : Tässä opetusohjelmasarjassa hän käy läpi 3DCoat perusteet. Keskustelemme kuvanveistotyökalujen, vokseli- ja pintapohjaisten työnkulkujen, retopologian, teksturoinnin ja muiden perusteiden perusteista!
Tämä opetusohjelmasarja on tarkoitettu 3DCoat ehdottomille uusille tulokkaille. En käy läpi jokaista työkalua, vaan kiistän edistyneitä ominaisuuksia.
Se on suunnattu version 4 käyttäjille, mutta se on ajankohtainen navigointikonseptissa ja huonekäytössä. Joitakin uutta harjamoottoria vastaavista parannuksista ei käsitellä.
Kynätabletin käyttäminen
3DCoat on suunniteltu toimimaan hyvin joko hiiren tai grafiikkatabletin kanssa. Yleinen katsaus kunkin syöttölaitteen kanssa työskentelyyn paljastaa, että hiirellä työskentely mahdollistaa enemmän tarkkuutta, erityisesti sellaisilla alueilla kuin kovan pinnan mallinnus.
Todellisen taiteellisen vapauden ja “oikean” median kanssa työskentelyn tunteen vuoksi on kuitenkin vaikea päihittää grafiikkatabletin ja kynän kanssa työskentelyn tulosta ja kokemusta.
Veistoshuoneessa ja Paint Roomissa voit todella kokea lisättyä hienovaraisuutta ja todellisen maailman “siveltimen” tunnetta vedoihisi.
Saadaksesi kaikki irti Tablet-kokemuksestasi, tutustu käyttöliittymän pääosiin, jotka optimoivat yleisen käyttökokemuksen ja tuloksen:
Yläpalkin Brush parametripaneeli sisältää valitsimia toimintoihin, kuten “syvyys, tasoitus, läpinäkyvyys ja kiilto” maalaushuoneessa vaihdettavan kuvakkeen muodossa (joka vaihtaa hiiren vasteen ja tabletin vasteen välillä).
Veistoshuoneeseen on lisätty “Radius”-kytkin, jonka avulla kynän paine voi sanella Brush koon sekä sen syvyyden.
Kummallakin asetuksella saadut tulokset ovat kummassakin tapauksessa melko dramaattisia. Kokeilemalla opit tuntemaan kunkin “tuntevia” eroja.
Vasemman reunan Stroke 5 kuvaketta antavat myös mahdollisuuden saada syvällisiä eroja kynän ja hiiren käyttäytymisessä. Kokeile jokaista nähdäksesi ja kokeaksesi eron.
Navigointi 3D-näkymässä on myös todella intuitiivista ja kätevää kynää käytettäessä:
– Napauta ja vedä mallin ulkopuolelle (tyhjään tilaan) kiertääksesi kameranäkymää.
– Napauta ja vedä oikealle tai vasemmalle pitämällä hiiren oikeaa painiketta painettuna (tyhjässä tilassa) panoroidaksesi näkymää.
– Vie hiiri tyhjän tilan päälle pitämällä hiiren oikeaa painiketta painettuna ja zoomaa näkymää vetämällä.
Brush säädöt ovat yhtä intuitiivisia:
– Siirrä osoitin mallin päälle ja vedä oikealle tai vasemmalle pitämällä “Hiiren oikea painike” -painiketta painettuna muuttaaksesi Brush kokoa.
– Siirrä hiiren osoitin mallin päälle ja säädä Brush syvyyttä vetämällä ylös tai alas painamalla hiiren oikeaa painiketta.
Miten
Wacom-tabletin paineen säätö : Wacom-tablettien viimeisimpien versioiden Wacom-kynän paineen jyrkän nousun vuoksi 3DCoat ASETUKSET-paneelissa on tehtävä tärkeä säätö paineherkkyyden suhteen.
Pikanäppäimet 3DCoat
Oppaat
Pikavinkki_ Kahden näytön käyttäminen : Tämä video on lyhyt osoitus kyvystä laajentaa 3DCoatin käyttöliittymää kahdelle näytölle samanlaisena vaihtoehtona selkeälle kahden näytön tuelle, joka ei ole tällä hetkellä saatavilla.
Numeerinen syöttö Gizmosille, automaattinen valintatila ja vapaa/normaali pursotus : Tämä video kattaa muutamia uusia ominaisuuksia 3DCoat:
- Numeerinen syöttö Transform Gizmosille (Retopo ja Voxel Rooms), joka mahdollistaa tarkemmat muunnostoiminnot tarvittaessa
- Auto-Select-tila ( Retopo -huoneessa), jonka avulla käyttäjä voi viedä hiiren halutun mesh-alielementin (Vertex, Edge, Poly) päälle, ja 3DCoat siirtyy tähän tilaan automaattisesti, kun sitä napsautetaan Retopo -huoneessa.
- Ilmaiset ekstrudointi- ja normaalipursottavat työkalut saatavilla Retopo -huoneessa. Toimii samalla tavalla kuin Mayan Extrude-työkalu tai 3ds Maxin Inset and Bevel Tools.
Uudet käyttöliittymän lisäykset/parannukset : Tämä video esittelee monia uusia käyttöliittymän lisäyksiä ja parannuksia 3DCoat. Se sisältää nyt kuvakkeet, tekstin ja kuvakkeet yhdessä sekä uusia lisäyksiä esiasetuspaneeliin.
Tehokas paneelin käyttö ja siirrettävä leima : Tämä video sisältää muutamia nopeita vihjeitä useimmin käytettyjen paneelien tehokkaampaan käyttöön ja liikkuvan leiman piirtotilan käyttämiseen.
Sticky Keys : Tämä video esittelee uuden Sticky Keys -toiminnon käyttöä 3DCoat sekä kuinka pikanäppäimiä ja pinoa näppäimiä määritetään.
 Suomi
Suomi  English
 Українська
 Español
 Deutsch
 Français
 日本語
日本語 Русский
 한국어
한국어 Polski
 中文 (中国)
 Português
 Italiano
 Svenska
 中文 (台灣)
 Dansk
Dansk Slovenčina
 Türkçe
 Nederlands
 Magyar
 ไทย
ไทย हिन्दी
 Ελληνικά
 Tiếng Việt
 Lietuviškai
 Latviešu valoda
 Eesti
Eesti Čeština
 Română
 Norsk Bokmål