• Español
  • Documentación 3DCoat
  • Chapters
    • Introduction to 3DCoat
    • Getting started
    • Interface
    • Brush Components
    • Workspaces Rooms
    • Scripting & Core API
    • Preguntas y respuestas
    • licensing
    • Tutoriales de formación
  • Pilgway
  • Products
    • 3DCoat
    • 3DCoatTextura
    • 3DCoatPrint
    • PBRLibrary
  • Blog Posts
  • Store
  • Español Español
    • English English
    • Українська Українська
    • Deutsch Deutsch
    • Français Français
    • 日本語 日本語
    • Русский Русский
    • 한국어 한국어
    • Polski Polski
    • 中文 (中国) 中文 (中国)
    • Português Português
    • Italiano Italiano
    • Suomi Suomi
    • Svenska Svenska
    • 中文 (台灣) 中文 (台灣)
    • Dansk Dansk
    • Slovenčina Slovenčina
    • Türkçe Türkçe
    • Nederlands Nederlands
    • Magyar Magyar
    • ไทย ไทย
    • हिन्दी हिन्दी
    • Ελληνικά Ελληνικά
    • Tiếng Việt Tiếng Việt
    • Lietuviškai Lietuviškai
    • Latviešu valoda Latviešu valoda
    • Eesti Eesti
    • Čeština Čeština
    • Română Română
    • Norsk Bokmål Norsk Bokmål
  • Creating 3D Character Using 3DCoat
  • Introduction to 3DCoat
  • Getting started
    • System requirements
    • Activating 3DCoat
    • Startup error
      • Startup error Mac
    • Upgrading permanent license
    • Linux Setup
      • Linux initial setup per-user installation
      • Linux initial setup for system
      • Tablet setup
      • To GTK3 from GTK2
    • Folders Structure
      • Custom documents folder
    • Different Forms of “Resolution”
    • Import and Export
    • Applinks in 3DCoat
      • Blender 4.1 applink
        • Blender with the Applink in Linux
      • Blender 4.2/3 applink
      • Max Applink
      • Houdini applink
      • Lightwave uplink
  • Navigation
    • Opening Dialog (Quick Start Menu)
    • Navigation Panel
    • Camera and Navigation
      • Customize Navigation as Blender
    • Viewport Navigation Gizmo
    • Left tool panel
    •  Activity Bar
    • Navigation using 3DConnexion devices
      • How to compile Spacenavd on non Ubuntu distro
    • Stylus doesn’t work in sculpting
    • Hotkeys
  • Interface
    • File
    • Edit
      • Calculate Curvature
      • Calculate Occlusion
      • Light Baking Tool
      • Preferences
    • View
    • Symmetry
    • Textures
    • Calculate
    • Layers
    • Freeze
    • Hide
    • Bake
    • Curves
      • Curves editor
      • Fill with mesh layer
      • Scale of imported curves
    • Windows
      • Tabbed and Popup Panels
      • Controls
    • Scripts
    • Addons
    • Capture
    • Help
    • Room Customization
    • Modify or Create new Room
  • Brush Components
    • Brushes general use
      • Create alpha brushes and decals
      • Making alpha from current sculpt
      • Create a Brush from a 3D Object
      • Create brushes based on Curves
      • Load photoshop .abr brushes
    • Strokes
      • Curves Popup Menu
    • Brush Options panel
    • Brush Top Bar
    • Conditions Limiter
    • Strips Panel
    • Stencils Panel
    • Smart Materials
      • Add new images or materials
      • Attach a Smart material to a layer
      • Import Quixel Material
    • Presets for Brush alphas
  • Workspaces Rooms
    • Paint
      • Texture Painting & Modes
        • Per Pixel Painting
        • Displacement Painting (Micro-Vertex)
        • Ptex Painting
        • Surface Painting (Vertex painting)
      • Importing Into the Painting Room
        • Initial CC subdivision
        • UV Set smoothing
        • Sharp (hard) edge
        • Lock Normals
        • Load new UV layout After Model Changes
        • DAZ Genesis models into 3DCoat
      • Paint Menus
        • Edit menu
        • Textures Menu
          • Texture Baking Tools
        • Hide
        • Bake Paint menu
        • The Color Picker
      • Top Bar for the Painting
      • The Layers Panel
        • The Blending Panel
        • Layer and Clipping Masks
      • Left Tool Panel
      • Opacity & Transparency
      • Tweak tools
        • Tweak Toolset
        • Exporting from the Tweak Room
      • Stencil & Material preview panel
      • Exporting from the Painting Room
    • UV
      • UV Top Bar
      • UV Left tool panel
      • UV Preview Panel
      • UV workflow example
      • Importing Into the UV Room
      • Exporting from the UV Room
    • Retopology
      • Importing into Retopo Room
      • Retopo Mesh Menu
        • Virtual Mirror Mode
      • Bake menu
        • Autopo Baking guide
        • Baking guide
      • Top Bar
        • Select geometry
      • Left tool panel
        • Overall Purpose & Function
        • Add Geometry in the retopology room
          • Strokes tool in Retopology
        • Tweak Tools
        • UV Tools
        • Commands for Retopology room
      • AUTORETOPO
        • Autoretopology Guide
      • Poly Groups
    • Sculpt
      • Sculpt Tree
      • Sculpt Layer
      • Brush engine
      • Sculpt Brush options
      • Right mouse button menu
      • Geometry menu
      • Right-Click Menu
      • Shader
      • Commands for Sculpt room
      • Voxel mode
        • Pure Voxel Sculpting
        • Density and Resolution
        • Clay Engine
        • Voxel Tools
        • Surface tools on Voxels
        • Voxel Adjustment Tools
        • Volumetric Painting
        • Transform Tools
        • Voxel Objects Tools
          • Voxel Primitives & Import Tools
      • Surface mode
        • Surface tools
        • Surface custom tools
        • Surface adjust tools
        • Surface transform tools
        • Surface Painting
        • Surface Objects Tools
          • Sculpt Primitives & Import Tools
        • Multi Level Resolution
          • Multires tools
          • Multires adjust
          • Multires commands
      • Sculpt curves
        • Spline Curves
        • Splines model creation
      • Vector Displacement
      • Live Booleans
      • Import to Sculpt Room
      • Exporting from the Sculpt Room
    • Render
      • Comparison of different roughness values
      • Render Panel Functions
      • Turntable
      • Fakebake the lighting -non PBR-
    • Factures
      • Workflow
    • Simplest
    • Modeling
      • Mesh Menu
      • Left tool panel
        • Add Geometry
        • Tweak
        • UV panel
        • Commands panel
        • Selected
        • Entire Mesh
      • Loft surface example by Fluffy
      • Blockout by Poeboi
      • Import Zbrush Polygroups for UV mapping
    • Kitbash
    • 3DPrint
    • Photogrammetry
      • How to install Reality Capture
      • Reality Capture doesn’t show up ?
    • Nurbs
    • Nodes
      • Sculpt shader Nodes Library
  • Scripting & Core API
    • Scripting
    • Core API
    • Python API
  • Free 3DCoatPrint
Expand All Collapse All
  • Introduction to 3DCoat
  • Getting started
    • System requirements
    • Activating 3DCoat
    • Startup error
      • Startup error Mac
    • Upgrading permanent license
    • Linux Setup
      • Linux initial setup per-user installation
      • Linux initial setup for system
      • Tablet setup
      • To GTK3 from GTK2
    • Folders Structure
      • Custom documents folder
    • Different Forms of “Resolution”
    • Import and Export
    • Applinks in 3DCoat
      • Blender 4.1 applink
        • Blender with the Applink in Linux
      • Blender 4.2/3 applink
      • Max Applink
      • Houdini applink
      • Lightwave uplink
  • Navigation
    • Opening Dialog (Quick Start Menu)
    • Navigation Panel
    • Camera and Navigation
      • Customize Navigation as Blender
    • Viewport Navigation Gizmo
    • Left tool panel
    •  Activity Bar
    • Navigation using 3DConnexion devices
      • How to compile Spacenavd on non Ubuntu distro
    • Stylus doesn’t work in sculpting
    • Hotkeys
  • Interface
    • File
    • Edit
      • Calculate Curvature
      • Calculate Occlusion
      • Light Baking Tool
      • Preferences
    • View
    • Symmetry
    • Textures
    • Calculate
    • Layers
    • Freeze
    • Hide
    • Bake
    • Curves
      • Curves editor
      • Fill with mesh layer
      • Scale of imported curves
    • Windows
      • Tabbed and Popup Panels
      • Controls
    • Scripts
    • Addons
    • Capture
    • Help
    • Room Customization
    • Modify or Create new Room
  • Brush Components
    • Brushes general use
      • Create alpha brushes and decals
      • Making alpha from current sculpt
      • Create a Brush from a 3D Object
      • Create brushes based on Curves
      • Load photoshop .abr brushes
    • Strokes
      • Curves Popup Menu
    • Brush Options panel
    • Brush Top Bar
    • Conditions Limiter
    • Strips Panel
    • Stencils Panel
    • Smart Materials
      • Add new images or materials
      • Attach a Smart material to a layer
      • Import Quixel Material
    • Presets for Brush alphas
  • Workspaces Rooms
    • Paint
      • Texture Painting & Modes
        • Per Pixel Painting
        • Displacement Painting (Micro-Vertex)
        • Ptex Painting
        • Surface Painting (Vertex painting)
      • Importing Into the Painting Room
        • Initial CC subdivision
        • UV Set smoothing
        • Sharp (hard) edge
        • Lock Normals
        • Load new UV layout After Model Changes
        • DAZ Genesis models into 3DCoat
      • Paint Menus
        • Edit menu
        • Textures Menu
          • Texture Baking Tools
        • Hide
        • Bake Paint menu
        • The Color Picker
      • Top Bar for the Painting
      • The Layers Panel
        • The Blending Panel
        • Layer and Clipping Masks
      • Left Tool Panel
      • Opacity & Transparency
      • Tweak tools
        • Tweak Toolset
        • Exporting from the Tweak Room
      • Stencil & Material preview panel
      • Exporting from the Painting Room
    • UV
      • UV Top Bar
      • UV Left tool panel
      • UV Preview Panel
      • UV workflow example
      • Importing Into the UV Room
      • Exporting from the UV Room
    • Retopology
      • Importing into Retopo Room
      • Retopo Mesh Menu
        • Virtual Mirror Mode
      • Bake menu
        • Autopo Baking guide
        • Baking guide
      • Top Bar
        • Select geometry
      • Left tool panel
        • Overall Purpose & Function
        • Add Geometry in the retopology room
          • Strokes tool in Retopology
        • Tweak Tools
        • UV Tools
        • Commands for Retopology room
      • AUTORETOPO
        • Autoretopology Guide
      • Poly Groups
    • Sculpt
      • Sculpt Tree
      • Sculpt Layer
      • Brush engine
      • Sculpt Brush options
      • Right mouse button menu
      • Geometry menu
      • Right-Click Menu
      • Shader
      • Commands for Sculpt room
      • Voxel mode
        • Pure Voxel Sculpting
        • Density and Resolution
        • Clay Engine
        • Voxel Tools
        • Surface tools on Voxels
        • Voxel Adjustment Tools
        • Volumetric Painting
        • Transform Tools
        • Voxel Objects Tools
          • Voxel Primitives & Import Tools
      • Surface mode
        • Surface tools
        • Surface custom tools
        • Surface adjust tools
        • Surface transform tools
        • Surface Painting
        • Surface Objects Tools
          • Sculpt Primitives & Import Tools
        • Multi Level Resolution
          • Multires tools
          • Multires adjust
          • Multires commands
      • Sculpt curves
        • Spline Curves
        • Splines model creation
      • Vector Displacement
      • Live Booleans
      • Import to Sculpt Room
      • Exporting from the Sculpt Room
    • Render
      • Comparison of different roughness values
      • Render Panel Functions
      • Turntable
      • Fakebake the lighting -non PBR-
    • Factures
      • Workflow
    • Simplest
    • Modeling
      • Mesh Menu
      • Left tool panel
        • Add Geometry
        • Tweak
        • UV panel
        • Commands panel
        • Selected
        • Entire Mesh
      • Loft surface example by Fluffy
      • Blockout by Poeboi
      • Import Zbrush Polygroups for UV mapping
    • Kitbash
    • 3DPrint
    • Photogrammetry
      • How to install Reality Capture
      • Reality Capture doesn’t show up ?
    • Nurbs
    • Nodes
      • Sculpt shader Nodes Library
  • Scripting & Core API
    • Scripting
    • Core API
    • Python API
  • Free 3DCoatPrint

Splines model creation

423 views 0

Written by Carlos
March 5, 2024

The model to be used seamlessly over the spline should consist of 3 objects, named as Top, Bottom, and Middle.
The Middle object is the one that will be constantly tiled along the curve.

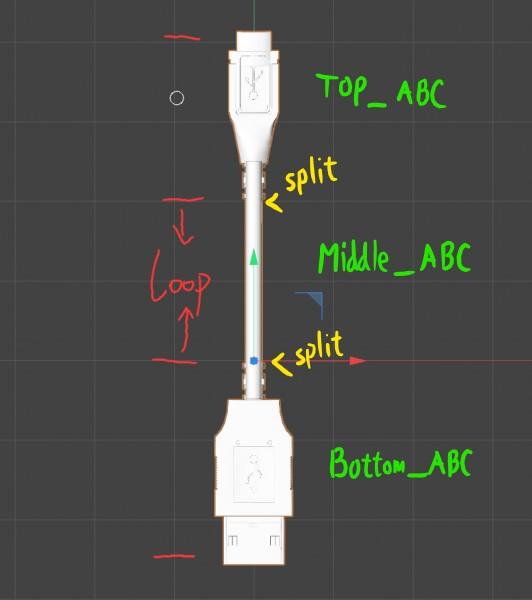
It has vertices approximately in the range [0..1] along Y-axis.

Look at the loop part. To create a spline model with three parts LOOP must begin at 0,0,0 Global Space coordinates.


Top and bottom of the Middle object should be open and opposite vertices positions should differ exactly by 1 along Y.

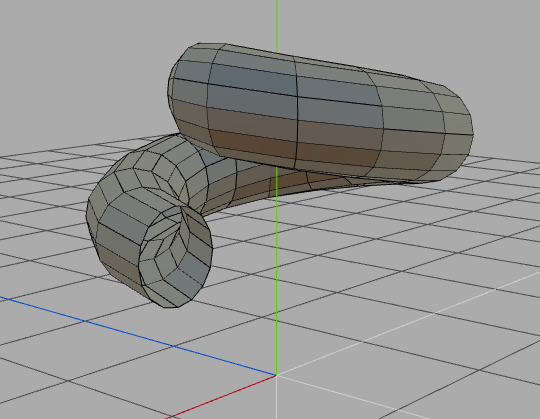
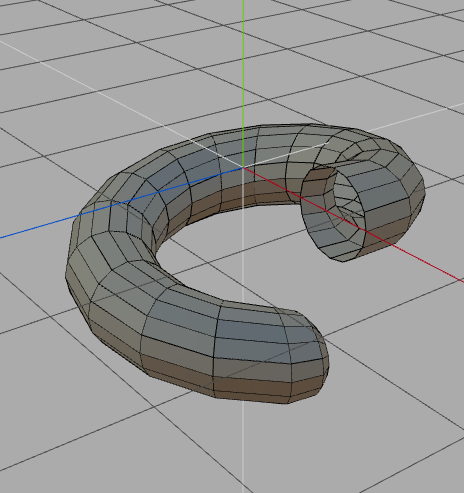
Here’s an example of the Middle object:

There may be several objects named “Middle_anything”. They should get identical open edges, but in the middle the geometry may be different. 3DCoat will use random middle objects to place them along the curve. 

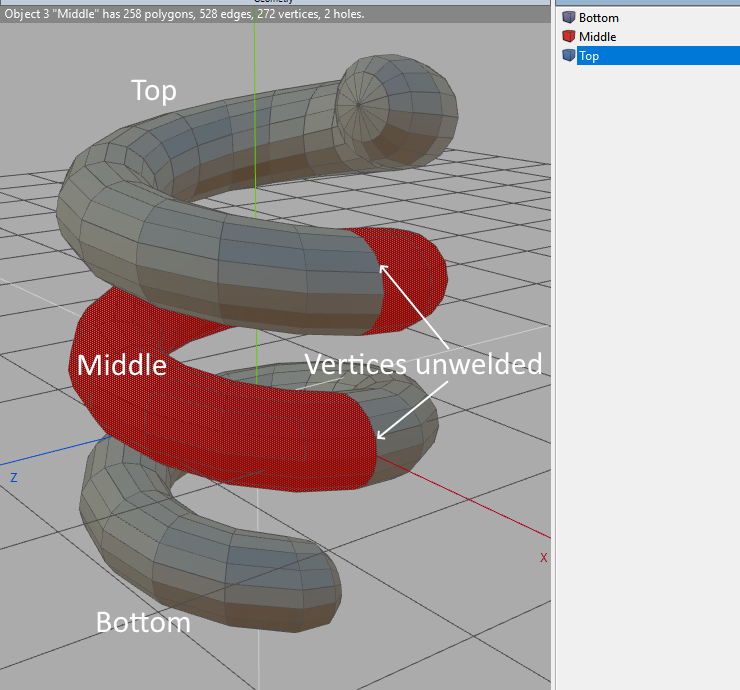
The Top object is placed exactly over the Middle object and has an approximate [1..2] range of Y-coordinate. This object is open at the bottom, the vertices should get exactly the same values as on the Middle top vertices.

An example of the Top object, marked red: 

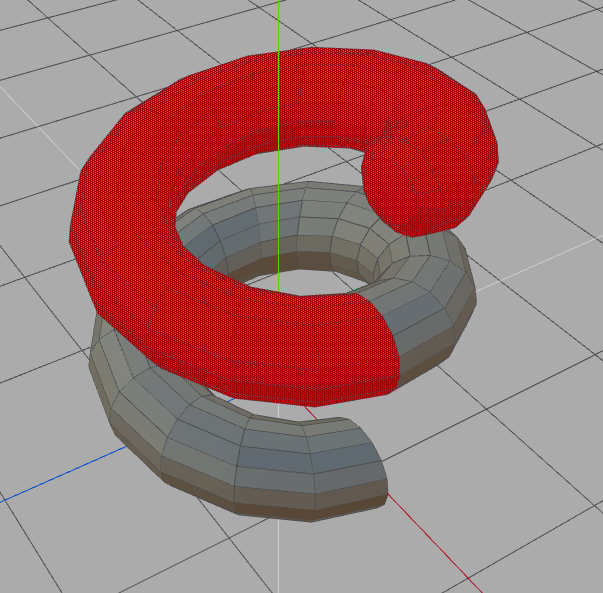
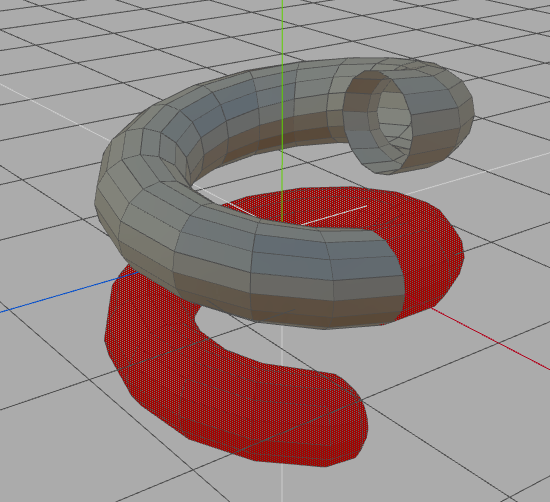
The Bottom object is placed exactly under the Middle object and has an approximate [-1..0] range of Y-coordinate. This object is open at the top, the vertices should get exactly the same values as on the Middle bottom vertices.

Here’s an example of the Bottom object, marked red: 

The whole curve will be tiled with Middle sections, the first section is Bottom, the last one is Top.

If the curve is closed, only the Middle sections will be used.

Open edges will be welded with nearby sections, so if you made everything correctly, the whole object will be closed.

So, the final model looks like this:

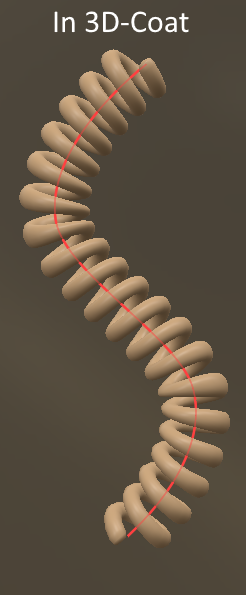
And this is how it looks in 3DCoat

If the middle part of the model does not repeat, check the following

1. Is the object named as follows?
– Top_@@@
– Middle_@@@
– Bottom_@@@

2. Is the connection part of the object ‘Open edge’?
– Spline guidelines say that the top-middle-bottom part should be an open edge

3. This is just in case, but have you actually registered and tested it instead of a preview in the creation stage?
– It does not seem to be repeated in the preview, but if you follow steps 1 and 2 properly, the result will be repeated middle-parts normally.

Tags:splines model

Was this helpful?

Yes  No
Related Articles
  • 3DPrint
  • Nodes
  • Create brushes based on Curves
  • Baking guide
  • Autopo Baking guide
  • Light Baking Tool
Previously
Spline Curves
Up Next
Vector Displacement
AI:
Hi! How can I help you?
Attention: This is a beta version of AI chat. Some answers may be wrong. See full version of AI chat