 Lietuviškai
  English
 Українська
 Español
 Deutsch
 Français
 日本語
日本語 Русский
 한국어
한국어 Polski
 中文 (中国)
 Português
 Italiano
 Suomi
Suomi Svenska
 中文 (台灣)
 Dansk
Dansk Slovenčina
 Türkçe
 Nederlands
 Magyar
 ไทย
ไทย हिन्दी
 Ελληνικά
 Tiếng Việt
 Latviešu valoda
 Eesti
Eesti Čeština
 Română
 Norsk Bokmål
Voxel Painting : šiame vaizdo įraše išnagrinėsime vokselių tapybą.
Tai pristato tikrąjį tūrinės tekstūros dažymą, kuris yra ne tik nauja paradigma pačioje programoje, bet ir visai pramonei.
Kad padėtų iliustruoti, kodėl tai tokia unikali dažymo platforma, kubeliai vaizduoja vokselius, taigi vartotojas turi tikrą tūrinį gylį.
Kadangi vienpusis paviršius sukuria tik gylio iliuziją, net kai naudojama daug dažymo sluoksnių, vokselių tapyba leidžia menininkui 3D aplinkoje dirbti taip, kad jis būtų daug arčiau realaus pasaulio, nes realaus pasaulio elementai. visada turi tam tikrą storio ar tūrio laipsnį.
Naudojant Volumetrinį dažymą galima vizualizuoti medicininius tūrinius anatominius modelius. Leiskite pridėti detalių prie anatominio modelio kelių mastelių forma, kurios geometrijos vėliau gali būti nupieštos 3D, kad būtų galima pridėti detalių.
Tai nereiškia, kad viršūnių dažymas nudažo formos paviršių (net jei nereikia UV žemėlapio), bet kai piešiate tūrį, kad sukurtumėte 3D tekstūrą, pridedant spalvų vokseliams.
Be to, suteikite galimybę lipdyti ir dažyti vienu metu.
Eksperimentai su tūriniu dažymu 3DCoat 2022, kurį sukūrė Silas Merlinas:
3D nuskaitymus valyti naudoju tūrinį dažymą. Šiuo atveju tūriniai dažai nenaudojami norint bake spalvą iki galutinio žemos polinkio, jie naudojami tik padėti valymo procesui. Galų gale retopo siunčiamas atgal į fotogrametrijos programinę įrangą, kad būtų galima pakeisti tekstūrą.
Lygiai taip pat manau, ką galėtumėte padaryti savo atveju, jei naudotumėte tas išmaniąsias medžiagas kaip peržiūrą.
Štai ką darytumėte:
Kiekvienai naudojamai išmaniajai medžiagai sukurkite naują dažų sluoksnį, užpildykite jį ir pritvirtinkite išmaniąją medžiagą prie sluoksnio. (dešiniuoju pelės mygtuku spustelėkite išmaniąją medžiagą > prijunkite prie sluoksnio).
Suformavę skulptūrą, kaip tai darote aukščiau esančiame vaizdo įraše, retopo ir bake, tada paslėpkite skulptūrą ir eikite į dažymo kambarį.
Dažymo patalpoje spustelėkite vieną iš sluoksnių su pridėta išmaniąja medžiaga ir užpildykite užpildymo įrankį dar kartą (dešiniuoju pelės mygtuku spustelėkite > užpildyti parinktis ant sluoksnio neveiks). Dabar lowpoly bus nudažytas tekstūros raiška. Be to, dabar galite dažyti su gyliu.
Tą patį padarykite su kitais sluoksniais su pritvirtintomis išmaniosiomis medžiagomis. (Vienintelė problema, kurią numatau, yra tai, kad bus pridėtas kiekvieno sluoksnio gylis, todėl jūs turite rasti būdą, kaip tai apeiti. Atrodo, kad klipų kaukės netinka gyliui).
Kelio planas:
– teisingas pereinamasis paviršius←→vokseliai, išlaikantys spalvas. Tai labai svarbu, ypač taisant nuskaitymo klaidas, vokseliai yra pranašesni šiam tikslui, todėl tai yra „būtina turėti“ rutina.
– Dabar veikia tik dažymas / aerozolis / pieštukas / trintukas + rašiklis / laso ant paviršiaus ar gabalo. Tačiau palaipsniui viskas klonuosis, išsiteps, kreivės, tekstas, transformuos, paveikslėlis.
– taip pat turėtų būti palaikomas res+, resample ir tarpinis serveris.
– Tūrinė spalva visiškai palaikoma visur, kur veikia paviršiaus dažymas, palaikomas net lengvas kepimas ir sąlygos. Kai kurie paviršiaus / tūrio dažymo įrankiai buvo pataisyti, o dabar kreivės / tekstas tinkamai veikia su PBR.
– export tūriniu formatu.
– Painting/ užpildymo įrankis tinkamai veikia vokselius.
– Tūrinė spalva visiškai palaikoma visur, kur veikia paviršiaus dažymas, palaikomas net lengvas kepimas ir sąlygos. Kai kurie paviršiaus / tūrio dažymo įrankiai buvo pataisyti, o dabar kreivės / tekstas tinkamai veikia su PBR.
– Visiškai palaikomas tūrinis dažymas: teisingi pereinamieji vokseliai ↔ paviršius, kuris išlaiko spalvą/blizgesį/metalą, atpalaiduoja spalvą, tinkamas paviršiaus šepečių veikimas vokselių režimu su tūrine spalva.
– Jei pakeisite vokselio tūrį naudodami paviršiaus įrankius ir tada pasuksite į paviršių, sluoksnio struktūra išliks.
– Būlio vertės tarp tūrių išlaiko tūrinę spalvą.
– Vokselio tapybos metu galite nustatyti spalvos įsiskverbimo gylį. Norėdami giliai suprasti, perskaitykite užuominą. Be to, spalva prasiskverbia su neskaidrumo gradientu, todėl tolesnis lipdymas tiksliau išblukina spalvą.
– Core API palaiko ir spalvotus vokselius. – Vokselio spalva taikoma įvairiems įrankiams – dėmelei, smaigaliui, gyvatei, raumenims, primityvams ir kt. – Dabar galite lipdyti ir dažyti vienu metu su visais Voxel Brush Engine šepečiais.
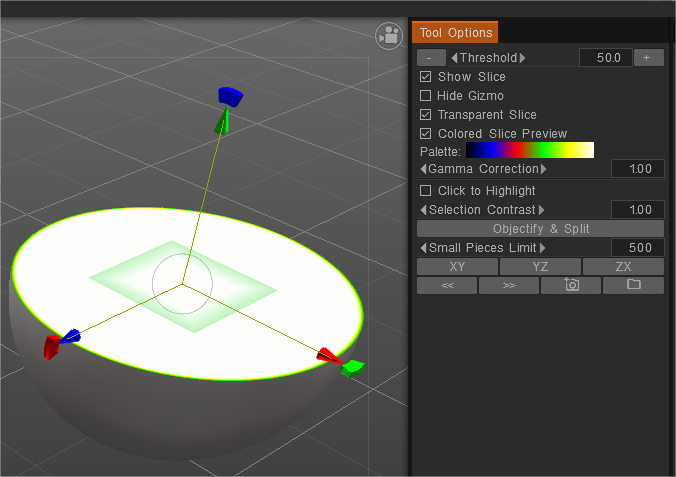
Tai yra pjaustymo parinktis:
Suteikia jums pjūvį per geometriją. Tai būdas patikrinti MRT ir kitus skenavimo duomenis.
Tai įdomus būdas užtikrinti, kad nuskaitymo duomenyse ar kituose importuotuose tinkle nebūtų skylių, ir leidžia greitai užtikrinti gerą import.
Naudojant tūrinį dažymą su skirtingu gyliu, sumaišant dvi išmaniąsias medžiagas 3d-Coat 2022
Silo Merlino tapybos vokseliu naudojimo atvejai:
1. Kad padėtumėte suformuoti iš vienos nuotraukos nuorodos : projektoriaus įrankiu projektuokite atskaitos vaizdą ant vokselių bloko, tada grubiai nupieškite formą iš tos pusės. “dažyti sluoksnį su projekcija” pažymėjus “nedažyti iš kitos pusės”. Dabar galite lipdyti iš visų pusių, netrukdydami projekcijos, einančios į galą. (Jūs nebūtinai naudojate projektuojamas spalvas galutiniame objekte (bet galite), šiuo atveju tūriniai dažai yra pagalba skulptūrai).
2. Norėdami nuo pat pradžių apibrėžti skirtingas medžiagas viename vandeniui nepralaidžiame objekte: pradėkite pritvirtindami išmaniąją medžiagą prie dažų sluoksnio, pagaminkite tiek, kiek jums reikia. Skulptūruodami atidžiai pasirinkite, kurį dažų sluoksnį norite suaktyvinti. Po retopo ir kepimo užpildykite kiekvieną dažų sluoksnį pridėta išmaniąja medžiaga, kad dažytumėte optimalią skiriamąją gebą ir į mišinį patektumėte išmaniosios medžiagos aukščio žemėlapį. (pirmiausia padarykite bandymus, nes užpildant medžiagą gali būti užpildytas visas sluoksnis, nepamenu… todėl gali tekti naudoti žemiau pateiktą alternatyvą, su klipų kaukėmis, su sąlyga, kad problema su klipų kaukėmis, kurios neužmaskuoja normal map fiksuota) – Alternatyva būtų pirmiausia nupiešti vientisomis spalvomis ant skirtingų dažų sluoksnių ir vėliau jas naudoti kaip klipų kaukes.
3. Lėtai žingsnis po žingsnio išspauskite formą, kiekvieną kartą nudažydami ekstruzijos gylį vis kita spalva. Jūs gaunate formą, kuri yra nudažyta viena spalva, bet tada pradedate kasti viduje, kuri atskleidžia paslėptus spalvų sluoksnius.
Tūrinis dažymas neatsižvelgia į išmaniųjų medžiagų gylio kanalą.
Laikykite tai kaip peržiūrą: įsitikinkite, kad išmaniąją medžiagą pritvirtinote prie dažų sluoksnio. Tokiu būdu, iš retopo, išvynioję ir bake skulptūrą, galėsite iš naujo užpildyti sluoksnį išmaniąja medžiaga ant galutinio dažymo objekto su gyliu ir viskuo.
Pamokos
„Voxel Painting 2“ Šiame vaizdo įraše tęsiama „Voxel Painting“ 3DCoat apžvalga, aprašant išmaniųjų medžiagų, primityvių ir tūrinių sluoksnių Painting naudojimą.
Medienos susidėvėjimo didinimas naudojant tūrinį Painting Šiame pavyzdyje sumodeliavau paprastą lentą ir prie jos pridėjome kelis medienos medžiagos sluoksnius ir kiekvienam sluoksniui priskyrėme vokselio gylį, kaip tikėjausi realiame pasaulyje, tada pradėjau grandyti vokselius, padidindami jo susidėvėjimą ir nerimą. Leidžia sluoksniams atsiskleisti natūraliau.