 Türkçe
  English
 Українська
 Español
 Deutsch
 Français
 日本語
日本語 Русский
 한국어
한국어 Polski
 中文 (中国)
 Português
 Italiano
 Suomi
Suomi Svenska
 中文 (台灣)
 Dansk
Dansk Slovenčina
 Nederlands
 Magyar
 ไทย
ไทย हिन्दी
 Ελληνικά
 Tiếng Việt
 Lietuviškai
 Latviešu valoda
 Eesti
Eesti Čeština
 Română
 Norsk Bokmål
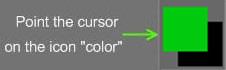
Şimdi rengi doğru kullanmayı öğrenmemiz gerekiyor. Bu nokta için imleci sol araçlar panelindeki “Renk” simgesi üzerine getirin ve “Renk” yazısının altındaki bir kareye tıklayın. Bunu yaparak, bir renk seçmenize izin veren bir panel göreceksiniz. Bu panelde, diğer renk seçiciler için ek seçenekler bulunur. Beş farklı renk seçiciniz var; sonuncusu, yüklediğiniz herhangi bir görüntüden bir renk seçmenize olanak tanır.
Bu renk işaret ettiğiniz kareyi boyayacaktır. Mevcut rengi gösterir. İkinci rengi de seçebilirsiniz: “Renk” kutusundaki ilk renk simgesinin hemen yanındaki simgeye tıklayın (bu resimde, ilk renk yeşil, ikincisi siyah).
Standart bir renk seçenekleri setinin yanı sıra, “Renk seç” penceresi çeşitli renk seçim modları içerir: HSL ve IMG (görüntüden seçim). İkincisi için ek düğmeler mevcuttur.
Aralarından seçim yapabileceğiniz beş Renk Seçici vardır. Bunlar, ana Paint Tool Panel’in sol üst kısmındaki renk örneklerine sol tıklanarak kullanılabilir. Bunlar:

- Üçgensel
- Çubuk
- Yuvarlak
- dörtlü
- resim
Bunlar, ana Paint Tool Panel’in sol üst kısmındaki renk örneklerine sol tıklanarak kullanılabilir. Toplayıcılar, diğer ana akım boyama uygulamalarındaki muadilleri gibi çalışır.
Görüntü Renk Seçici
İlk dördü yaygın olsa da, Görüntü Renk Seçici’yi biraz daha ayrıntılı olarak ele alalım.
Bir görüntüden bir renk seçmenize olanak tanır ve ayrıca heykel veya boyama işlemleri sırasında her zaman bir referans görüntüyü açık tutmak için kullanışlıdır. Bu paneldeki üç gizmo denetimiyle, bu görüntünün hangi bölümünün görünür olduğunu ve penceredeki konumunu değiştirebilirsiniz.
Seç düğmesiyle istediğiniz görüntüyü seçin veya Panonuzdan görüntüyü yapıştırın. Kullanıldıktan sonra, görüntü adının sağındaki açılır ok aracılığıyla bir görüntü kullanılabilir hale gelir.
Görüntü Renk Paneli
Bunun istisnası, istediğiniz bir görüntüyü atamanıza izin veren Renkli Görüntü Panelidir ve görüntüde bulunan herhangi bir tonu boyamak için seçebilirsiniz.
Bu, heykel veya boyama işlemleri sırasında her zaman bir referans görüntüyü açık tutmak için de oldukça kullanışlıdır.
Bu görüntünün hangi bölümünün görünür olduğunu ve penceredeki konumunu, hemen altındaki ve görüntü penceresinin solundaki üç kontrolle değiştirebilirsiniz.
“Seç” düğmesiyle istediğiniz görüntüyü seçin veya görüntüyü Panonuzdan “Yapıştır” ile seçin. Kullanıldıktan sonra, görüntü adının sağındaki “açılır ok” aracılığıyla bir görüntü kullanılabilir hale gelir.
Öğretici
Görüntü Seçici : Bu video, 3DCoat kullanıcının bir görüntüden renk bilgilerini örneklemesine ve ayrıca takılabilir bir referans görüntü olarak hizmet etmesine olanak tanıyan Görüntü Seçici’yi gösterir.
Referans Resimlerin Kullanılması : Bu video, referans resimlerin kullanımını gösterir. Görüntü alanında Görüntü Düzlemleri olarak veya Kullanıcı Arabirimi içinde Görüntü Seçici’nin statik bir referans görüntü olarak kullanımı.
Şimdi rengi doğru kullanmayı öğrenmemiz gerekiyor. Bu nokta için imleci sol araçlar panelindeki “Renk” simgesi üzerine getirin ve “Renk” yazısının altındaki bir kareye tıklayın. Bunu yaparak, bir renk seçmenize izin veren bir panel göreceksiniz. Bu panelde, diğer renk seçiciler için ek seçenekler bulunur. Beş farklı renk seçiciniz var; sonuncusu, yüklediğiniz herhangi bir görüntüden bir renk seçmenize olanak tanır.
Bu renk işaret ettiğiniz kareyi boyayacaktır. Mevcut rengi gösterir. İkinci rengi de seçebilirsiniz: “Renk” kutusundaki ilk renk simgesinin hemen yanındaki simgeye tıklayın (bu resimde ilk renk yeşil, ikincisi siyah). İkinci renk, siz açılır listeyle çalışırken dağıtma kanalında kullanılır.
Standart bir renk seçenekleri setinin yanı sıra, “Renk seç” penceresi çeşitli renk seçim modları içerir: HSL ve IMG (görüntüden seçim). İkincisi için ek düğmeler mevcuttur.
Görüntü rengi seçici paneli için başka seçenekler de vardır:
- Manipülatör Simgeleri. Görüntü rengi seçicinin sol üst kısmındaki simgelerle görüntünün konumunu kaydırabilir/yakınlaştırabilir/sıfırlayabilirsiniz.
- Seçme. Dosyadan bir resim seçin.
- Yapıştırmak. Görüntüyü panodan yapıştırın ve özel bir seçici gibi kullanın.
- Görüntü Açılır liste . Birden fazla görseliniz varsa, listeden buraya tıklayarak her birinden çoklu seçim yapabilirsiniz.
Ayrıca, hızlı renk seçimi için “B” tuşunu basılı tutarsınız (bu şekilde çağırdığınızda, Windows→Açılır Pencereler->Renk seçiciden arama yaparken olduğu gibi küçültülmüş “Renk seç” penceresini açarsınız. Renk kullanımını devre dışı bırakmak/etkinleştirmek için RMB’. Beyaz rengi seçmekle eşdeğerdir. Doğrudan bir yüzeyden renk alabilir, imleci karşılık gelen bir yere getirip “V” tuşuna basabilirsiniz.
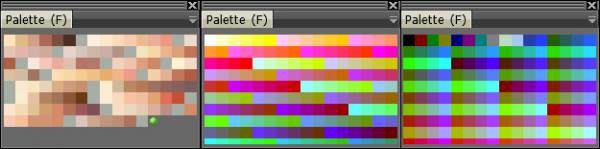
Renk Paleti Paneli
Renk Paleti penceresinden de bir renk seçebilirsiniz; önceden ayarlanmış üç palet vardır:
3 hazır palet vardır:
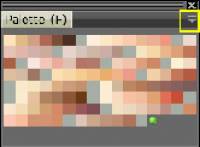
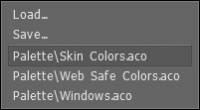
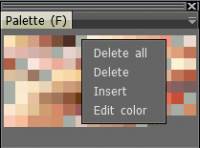
Bir .ACO renk paleti dosyasını hem yükleyebilir hem de kaydedebilirsiniz. Rengin özelliklerini değiştirmek için bir renge sağ tıklayabilirsiniz: