• Dansk
  • 3DCoat dokumentation
  • Chapters
    • Introduktion til 3DCoat
    • Kom godt i gang
    • Interface & Navigation
    • Brush
    • Arbejdsrum Rum
    • Scripting & Core API
    • Spørgsmål/svar
    • licensing
    • Træningsvejledninger
  • Pilgway
  • Products
    • 3DCoat
    • 3DCoatTextura
    • 3DCoatPrint
    • PBRLibrary
  • Blog Posts
  • Store
  • Dansk Dansk
    • English English
    • Українська Українська
    • Español Español
    • Deutsch Deutsch
    • Français Français
    • 日本語 日本語
    • Русский Русский
    • 한국어 한국어
    • Polski Polski
    • 中文 (中国) 中文 (中国)
    • Português Português
    • Italiano Italiano
    • Suomi Suomi
    • Svenska Svenska
    • 中文 (台灣) 中文 (台灣)
    • Slovenčina Slovenčina
    • Türkçe Türkçe
    • Nederlands Nederlands
    • Magyar Magyar
    • ไทย ไทย
    • हिन्दी हिन्दी
    • Ελληνικά Ελληνικά
    • Tiếng Việt Tiếng Việt
    • Lietuviškai Lietuviškai
    • Latviešu valoda Latviešu valoda
    • Eesti Eesti
    • Čeština Čeština
    • Română Română
    • Norsk Bokmål Norsk Bokmål
  • Creating 3D Character Using 3DCoat
Expand All Collapse All
  • Introduktion til 3DCoat
  • Kom godt i gang
    • System requirements
    • Why 3DCoat is Unique?
    • Aktivering af 3DCoat
    • Opstartsfejl
      • Startup error Mac
    • Color management
    • Upgrading permanent license
    • Linux Setup
      • Linux initial setup per-user installation
      • Linux initial setup for system
      • Tablet setup
      • To GTK3 from GTK2
    • Mappestruktur
      • Custom documents folder
    • Forskellige former for "opløsning"
    • Tablet on Window
    • Import & Export
    • Applinks i 3DCoat
      • Blender applink
        • Blender with the Applink in Linux
      • Blender 4.2/3/4/5 applink
      • Max Applink
      • Houdini applink
      • Lightwave uplink
  • Navigation
    • Åbningsdialog (hurtig startmenu)
    • Navigationspanel
    • Kamera og navigation
      • Customize Navigation as Blender
    • Viewport Navigation Gizmo
    • Left tool panel
    •  Activity Bar
    • Navigation ved hjælp af 3DConnexion-enheder
      • How to compile Spacenavd on non Ubuntu distro
    • Stylus doesn’t work in sculpting
    • Genvejstaster
  • Interface & Navigation
    • Fil menu
    • Rediger menu
      • Calculate Curvature
      • Calculate Occlusion
      • Light Baking Tool
      • Præferencer
    • Vis menu
    • Symmetri
    • Textures
    • Calculate
    • Menuen Lag
    • Frys menu
    • Hide
    • Bake
    • Kurver 2022
      • Kurver menu
      • Curves Properties RMB
      • Fyld med mesh lag
      • Scale of imported curves
    • Windows menu
      • Windows Popup-paneler med faner
      • Skydere
    • Scripts
    • Addons
    • Capture
    • Hjælp menu
    • Tilpasning
    • Rediger eller opret nyt rum
  • Brush
    • Brush Top Bar
    • Børster til almindelig brug
      • Lav børster og mærkater
      • Fremstilling af alfa fra den nuværende sculpt
      • Opret en Brush fra et 3D-objekt
      • Create brushes based on Curves
      • Load photoshop .abr brushes
    • Slagtilfælde
      • Kurver popup-menu
    • Brush muligheder
    • Betingelsesbegrænser
    • Strips Panel
    • Stencils panel
    • Smarte materialer
      • Tilføj nye billeder eller materialer
      • Vedhæft et Smart materiale til et lag
      • Import Quixel Material
    • Sådan opretter du forudindstillinger til Brush
  • Arbejdsrum Rum
    • Painting
      • Painting og tilstande
        • Per-Pixel Painting
        • Painting (Micro-Vertex)
        • Ptex Painting
        • Painting (polymaling)
      • Importer ind i Painting
        • Initial CC subdivision
        • UV Set smoothing
        • Sharp (hard) edge
        • Lås Normaler
        • Indlæs nyt UV layout efter modelændringer
        • DAZ Genesis models into 3DCoat
      • Menuer i Painting
        • Edit menu
        • Tekstur menu
          • Tekstur Baking
        • Skjule
        • Menu til Bake Paint
        • Farvevælgeren
      • Topstang til Painting
      • Panelet Lag
        • Blandingspanelet
        • Layer and Clipping Masks
      • Værktøj til Painting
      • Opacitet - Gennemsigtighed
      • Tweak arbejdsområde
        • Tweak værktøjssæt
        • Eksporterer fra Tweak Room
      • Maske/materiale Preview Panel
      • Eksporterer fra Painting
    • UV arbejdsplads
      • UV Top Bar
      • UV venstre værktøjspanel
      • UV Preview Panel
      • Eksempel på UV arbejdsgang
      • Importer ind i UV rummet
      • Eksport fra UV rummet
    • Retopologi
      • Importer til Retopo rummet
      • Retopo Mesh Menu og Bake Menu
        • Virtuel spejltilstand
      • Bake menu
        • Treat Poly Groups as Paint Objects
        • Baking guide
      • Top bar
        • Vælg geometri
      • Venstre værktøjspanel i Retopologirummet
        • Overordnet formål og funktion
        • Tilføj geometri
          • Slagværktøj i Retopologi
        • Retopo Tweak-værktøjer
        • UV værktøj
        • Kommandoer til Retopologirummet
      • AUTORETOPO
        • Autopo guide
      • Poly grupper
    • Skulptere
      • Sculpt Layer
      • Skulptér træ
      • Muligheder for Sculpt Brush
      • Top Bar
      • Brush motor
      • Geometri Undermenu
      • Skulptur "højreklik"-menuen
      • Shaders
      • Voxel -tilstand
        • Ren Voxel Sculpting
        • Tæthed og opløsning
        • Ler motor
        • Voxel værktøjer
        • Overfladeværktøjer på Voxels
        • Voxel justeringsværktøjer
        • Volumetrisk Painting
        • Voxel Objects-værktøjer
      • Overfladetilstand
        • Overfladeværktøj
        • Tilpassede overfladeværktøjer
        • Værktøj til overfladejustering
        • Painting
        • Værktøjer til overfladeobjekter
        • Multi Level Opløsning
          • Multires tools
          • Multires adjust
          • Multires commands
      • Skulptur kurver
        • Spline kurver
        • Splines model creation
      • Vektor forskydning
      • Værktøjer til overfladetransformation
        • Voxel transformationsværktøjer
        • Instancer
        • Move
        • Pose
        • Fit
        • Reproject
        • Surface Array
      • Voxel Primitives og Import
      • Levende booleanere
      • Kommandoer til Sculpt room
      • Import til Sculpt Room
      • Eksporterer fra skulpturrummet
    • Render
      • Comparison of different roughness values
      • Render panelfunktioner
      • Pladespiller
      • Fakebake the lighting -ikke PBR-
    • Factures
      • Workflow
    • Det enkleste
    • Modellering
      • Mesh Menu
      • Venstre værktøjspanel i modelleringsrum
        • Tilføj geometri
          • Valgte
        • Tweak
        • Smart Hybrid
        • UV
          • Kommandoer
        • Hele Mesh
      • Loft overflade eksempel af Fluffy
      • Blockout af Poeboi
      • Import Zbrush Polygroups for UV mapping
    • Kitbash - Hurtig oprettelse af 3D-modeller
      • Create kitbash
      • Left tool panel Kitbash
    • 3DPrint
    • Photogrammetry
      • How to install Reality Capture
      • Reality Capture doesn’t show up ?
    • Mesh til NURBS værelse
    • Nodes
      • Sculpt shaders Nodes Library
  • Scripting & Core API
    • Scripting
    • Core API
    • Python API
  • Gratis 3DCoatPrint

Custom documents folder

872 views 1

Written by Carlos
May 11, 2024
  • On Windows
  • On Linux

On Windows

You should define environment variable “COAT_FILES_PATH” with full path to your custom documents folder. 

By default “3DCoat” stores user files inside folder “This PC > Documents > 3D-CoatV48” under Windows and inside folder “HOME > 3D-CoatV48” under Linux/macOS.

You can define environment variable “COAT_FILES_PATH” with full path to your custom documents folder. Under Windows do the following:
START > Settings > System > About > System info > Advanced system settings > Environment Variables… > System variables or User variables for XXX > New… >
Variable name: COAT_FILES_PATH
Variable value: C:\WORK\My-Data\3D-Coat (place your path here)

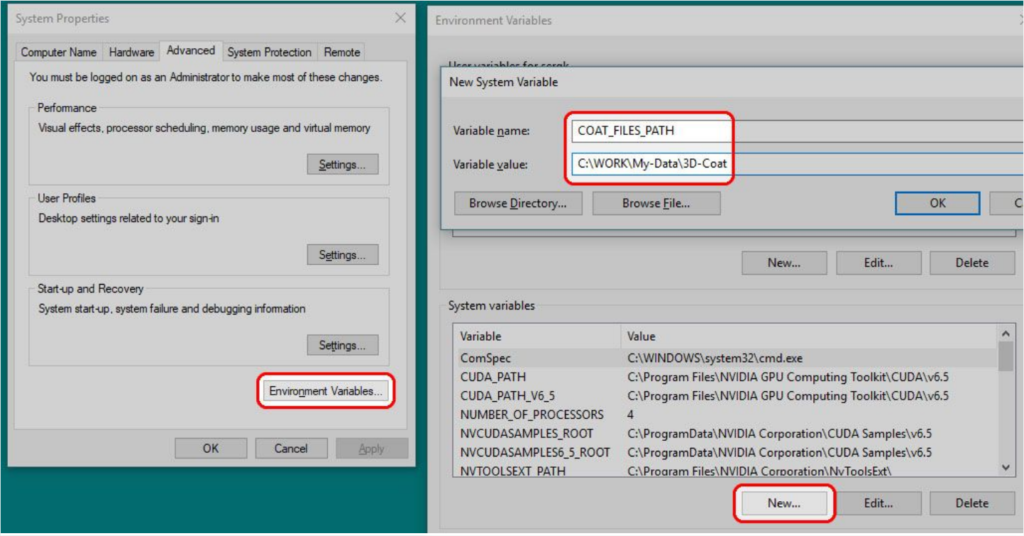
No need to restart your PC. Just run 3DCoat.

On Linux

Under Linux please read section Environment variables under Linux and under macOS read section
Environment variables under macOS inside this document:
http://www.3d-coat.com/~sergyi/LinuxDocs/FServer.pdf

CustomDocumentsFolder-1Download


Also please read section with title “Share the same 3DCoat installation between multiple users” in the
document above

Was this helpful?

1 Yes  No
Related Articles
  • Surface Array
  • Top Bar
  • Curves Properties RMB
  • Left tool panel Kitbash
  • Create kitbash
  • Color management
Previously
Mappestruktur
Up Next
Forskellige former for "opløsning"
AI:
Hi! How can I help you?
Attention: This is a beta version of AI chat. Some answers may be wrong. See full version of AI chat