• Norsk Bokmål
  • 3DCoat dokumentasjon
  • Chapters
    • Introduksjon til 3DCoat
    • Starter
    • Grensesnitt og navigasjon
    • Brush
    • Arbeidsrom Rom
    • Scripting og Core API
    • Spørsmål og svar
    • licensing
    • Opplæringsveiledninger
  • Pilgway
  • Products
    • 3DCoat
    • 3DCoatTextura
    • 3DCoatPrint
    • PBRLibrary
  • Blog Posts
  • Store
  • Norsk Bokmål Norsk Bokmål
    • English English
    • Українська Українська
    • Español Español
    • Deutsch Deutsch
    • Français Français
    • 日本語 日本語
    • Русский Русский
    • 한국어 한국어
    • Polski Polski
    • 中文 (中国) 中文 (中国)
    • Português Português
    • Italiano Italiano
    • Suomi Suomi
    • Svenska Svenska
    • 中文 (台灣) 中文 (台灣)
    • Dansk Dansk
    • Slovenčina Slovenčina
    • Türkçe Türkçe
    • Nederlands Nederlands
    • Magyar Magyar
    • ไทย ไทย
    • हिन्दी हिन्दी
    • Ελληνικά Ελληνικά
    • Tiếng Việt Tiếng Việt
    • Lietuviškai Lietuviškai
    • Latviešu valoda Latviešu valoda
    • Eesti Eesti
    • Čeština Čeština
    • Română Română
  • Creating 3D Character Using 3DCoat
Expand All Collapse All
  • Introduksjon til 3DCoat
  • Starter
    • System requirements
    • Why 3DCoat is Unique?
    • Aktiverer 3DCoat
    • Oppstartsfeil
      • Startup error Mac
    • Color management
    • Upgrading permanent license
    • Linux Setup
      • Linux initial setup per-user installation
      • Linux initial setup for system
      • Tablet setup
      • To GTK3 from GTK2
    • Mappestruktur
      • Custom documents folder
    • Ulike former for "oppløsning"
    • Tablet on Window
    • Import og Export
    • Applinks i 3DCoat
      • Blender applink
        • Blender with the Applink in Linux
      • Blender 4.2/3/4/5 applink
      • Max Applink
      • Houdini applink
      • Lightwave uplink
  • Navigation
    • Åpningsdialog (hurtigstartmeny)
    • Navigasjonspanel
    • Kamera og navigasjon
      • Customize Navigation as Blender
    • Viewport Navigation Gizmo
    • Left tool panel
    •  Activity Bar
    • Navigering ved hjelp av 3DConnexion-enheter
      • How to compile Spacenavd on non Ubuntu distro
    • Stylus doesn’t work in sculpting
    • Hurtigtaster
  • Grensesnitt og navigasjon
    • Filmeny
    • Rediger meny
      • Calculate Curvature
      • Calculate Occlusion
      • Light Baking Tool
      • Preferanser
    • Vis meny
    • Symmetri
    • Textures
    • Calculate
    • Lagmeny
    • Frys meny
    • Hide
    • Bake
    • Kurver 2022
      • Kurvermeny
      • Curves Properties RMB
      • Fyll med mesh-lag
      • Scale of imported curves
    • Windows-menyen
      • Windows Popup-paneler med faner
      • Skyveknapper
    • Scripts
    • Addons
    • Capture
    • Hjelp-menyen
    • Tilpasning
    • Endre eller opprett nytt rom
  • Brush
    • Brush Top Bar
    • Børster til generell bruk
      • Lag børster og dekaler
      • Å lage alfa fra nåværende skulptur
      • Lag en Brush fra et 3D-objekt
      • Create brushes based on Curves
      • Load photoshop .abr brushes
    • Slag
      • Kurver popup-meny
    • Brush
    • Betingelsesbegrenser
    • Strips Panel
    • Sjablonger panel
    • Smarte materialer
      • Legg til nye bilder eller materialer
      • Fest et Smart-materiale til et lag
      • Import Quixel Material
    • Hvordan lage forhåndsinnstillinger for Brush
  • Arbeidsrom Rom
    • Painting
      • Painting og modi
        • Per-Pixel Painting
        • Painting (Micro-Vertex)
        • Ptex Painting
        • Painting (polymaling)
      • Importerer inn i Painting
        • Initial CC subdivision
        • UV Set smoothing
        • Sharp (hard) edge
        • Lås Normaler
        • Last inn ny UV layout etter modellendringer
        • DAZ Genesis models into 3DCoat
      • Menyer for Painting
        • Edit menu
        • Teksturmeny
          • Baking
        • Gjemme seg
        • Meny for Bake Paint
        • Fargevelgeren
      • Toppstang for Painting
      • Lagpanelet
        • Blandingspanelet
        • Layer and Clipping Masks
      • Painting
      • Opasitet - Gjennomsiktighet
      • Juster arbeidsområdet
        • Tweak verktøysett
        • Eksporterer fra Tweak Room
      • Forhåndsvisningspanel for maske/materiale
      • Eksporterer fra Painting
    • UV arbeidsplass
      • UV toppbar
      • UV Venstre verktøypanel
      • UV forhåndsvisningspanel
      • Eksempel på UV arbeidsflyt
      • Importerer inn i UV rommet
      • Eksporterer fra UV rommet
    • Retopologi
      • Importerer til Retopo rommet
      • Retopo Mesh Menu og Bake Menu
        • Virtuelt speilmodus
      • Bake menu
        • Treat Poly Groups as Paint Objects
        • Baking guide
      • Toppbar
        • Velg geometri
      • Venstre verktøypanel i Retopologirom
        • Overordnet formål og funksjon
        • Legg til geometri
          • Strokes-verktøy i Retopologi
        • Retopo Tweak-verktøy
        • UV verktøy
        • Kommandoer for Retopologirom
      • AUTORETOPO
        • Autopo guide
      • Polygrupper
    • Skulptere
      • Sculpt Layer
      • Skulptre
      • Sculpt Brush alternativer
      • Top Bar
      • Brush
      • Geometri Undermeny
      • Skulptér "høyreklikk"-menyen
      • Shaders
      • Voxel modus
        • Ren Voxel skulptur
        • Tetthet og oppløsning
        • Leiremotor
        • Voxel verktøy
        • Overflateverktøy på Voxels
        • Voxel justeringsverktøy
        • Volumetrisk Painting
        • Voxel Objects-verktøy
      • Overflatemodus
        • Overflateverktøy
        • Tilpassede overflateverktøy
        • Overflatejusteringsverktøy
        • Painting
        • Verktøy for overflateobjekter
        • Flernivåoppløsning
          • Multires tools
          • Multires adjust
          • Multires commands
      • Skulptere kurver
        • Splinekurver
        • Splines model creation
      • Vektor forskyvning
      • Verktøy for overflatetransformasjon
        • Voxel Transform Tools
        • Instancer
        • Move
        • Pose
        • Fit
        • Reproject
        • Surface Array
      • Voxel Primitives og Import
      • Levende booleanere
      • Kommandoer for Sculpt-rommet
      • Import til Sculpt Room
      • Eksporterer fra Sculpt Room
    • Gjengi
      • Comparison of different roughness values
      • Gjengi panelfunksjoner
      • Platespiller
      • Fakebake the lighting -ikke PBR-
    • Factures
      • Arbeidsflyt
    • Enkleste
    • Modellering
      • Mesh Menu
      • Venstre verktøypanel i modelleringsrommet
        • Legg til geometri
          • Valgt
        • Tweak
        • Smart Hybrid
        • UV
          • Kommandoer
        • Hele mesh
      • Loft overflate eksempel av Fluffy
      • Blockout av Poeboi
      • Import Zbrush Polygroups for UV mapping
    • Kitbash - Rask oppretting av 3D-modeller
      • Create kitbash
      • Left tool panel Kitbash
    • 3DPrint
    • Photogrammetry
      • How to install Reality Capture
      • Reality Capture doesn’t show up ?
    • Mesh til NURBS-rommet
    • Nodes
      • Sculpt shaders Nodes Library
  • Scripting og Core API
    • Scripting
    • Core API
    • Python API
  • Gratis 3DCoatPrint

Comparison of different roughness values

539 views 0

Written by Carlos
November 14, 2024

A render comparison of different roughness values in 3DCoat and Blender by DMG

I was going between 3DC and Blender a bit trying to hit the sweet spot I wanted for something, and I noticed differences between the two renders, especially caused by varying roughness values.

I decided to get a bit scientific about it, so here’s the results of my tinkering.  I used the studio.exr panorama from Blender in both programs for a fair comparison. The 3DCoat environment settings were left at default, but the light was deactivated. The HDRI was normalized when I imported it. The HDRI strength was left at default value in Blender too.

A simple sphere, identical color value in all renders. 

I’m making no judgement as to which renderer is ‘better’. This is just purely for comparison, to see how roughness values appear in each in order to make texturing a bit more predictable.

I did notice that in the HDRI there is a tiny but bright spotlight high up adjacent to the other light, but for some reason this isn’t picked up in the 3DCoat renders. Perhaps it’s just a tiny pinprick and too small to be picked up. I don’t know. There also appears to be a light down low, right of center, but only on the renders for 25% to 40% roughness in the 3DCoat renders. I don’t know where that’s coming from. It isn’t apparent in any of the others.

The rows are: 3DCoat’s GGX, Handpaint, Render; then Blender’s Eevee, Cycles.

* I think the Handpaint render (compared to the GGX one) has slightly lower intensity in the bright highlights, as well as ever so slightly more diffuse reflections when the roughness reached mid-levels. And compared to the 3DCoat render, the bright highlights in the Handpaint render are a touch more intense, and as with the GGX ones, much more defined.

Looking at the Handpaint renders and the Blender Cycles renders, they’re actually very similar. This is excellent.
I feel that if I use the Handpaint preview, I will be seeing a very close approximation of what I’ll get in Blender. So my chart is now redundant, based on the reason I created it in the first place, but it has nevertheless been very useful.

RenderComparisonChart.jpg

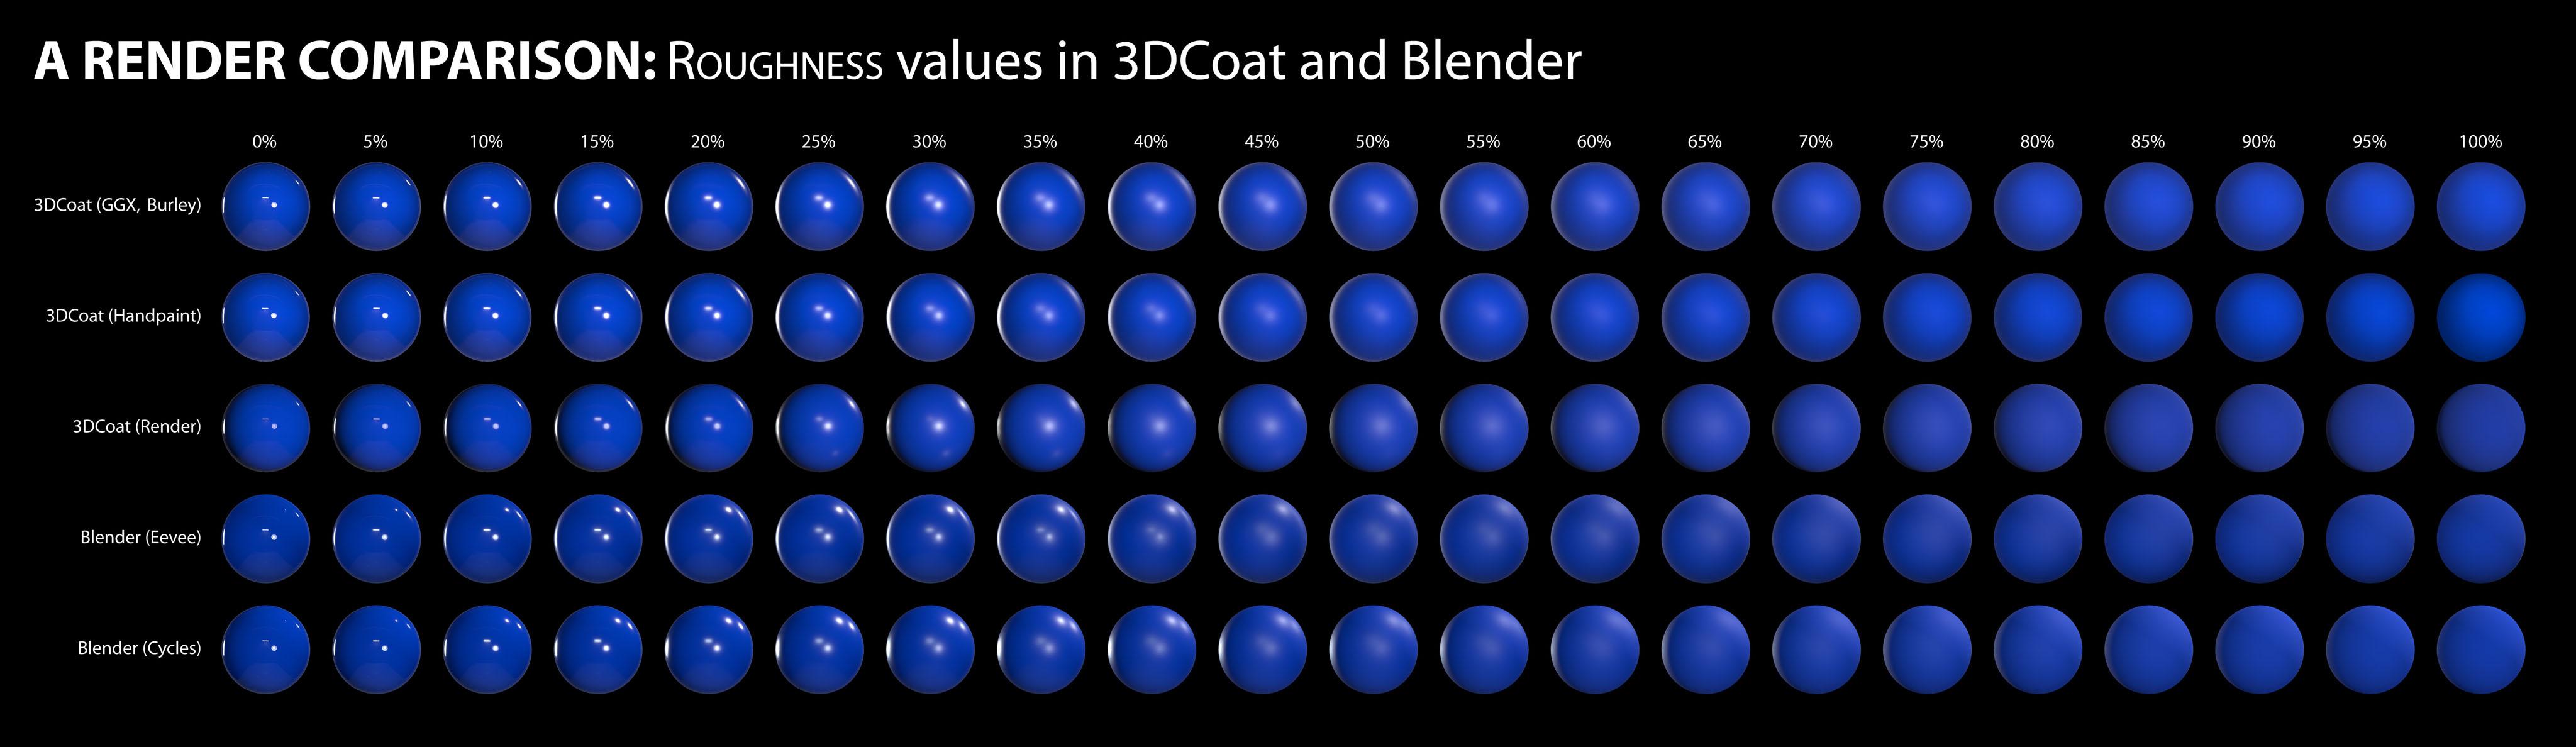
The most noticeable differences is that the reflections in the 3DCoat Paint Room preview are a touch more intense than both of Blender’s renders, but the same reflections are a bit feinter in 3DCoat’s Renderer.

Also, at around 35-40% roughness, the 3DCoat Renderer has greater blur on the main reflections near the center, which has almost become a single bright patch, whereas all the others still have two distinct light sources.

Like I said, this isn’t about picking a ‘winner’ or ‘favorite’.  It’s just to help me predict how my textured objects will appear and render in Blender to save time to-ing and fro-ing making adjustments.

Tags:roughness

Was this helpful?

Yes  No
Related Articles
  • Surface Array
  • Top Bar
  • Curves Properties RMB
  • Left tool panel Kitbash
  • Create kitbash
  • Color management
Previously
Gjengi
Up Next
Gjengi panelfunksjoner
AI:
Hi! How can I help you?
Attention: This is a beta version of AI chat. Some answers may be wrong. See full version of AI chat