• Deutsch
  • 3DCoat Dokumentation
  • Chapters
    • Einführung in 3DCoat
    • Einstieg
    • Schnittstelle & Navigation
    • Brush
    • Arbeitsbereiche Räume
    • Scripting und Core API
    • Fragen & Antworten
    • licensing
    • Schulungs-Tutorials
  • Pilgway
  • Products
    • 3DCoat
    • 3DCoatTextura
    • 3DCoatPrint
    • PBRLibrary
  • Blog Posts
  • Store
  • Deutsch Deutsch
    • English English
    • Українська Українська
    • Español Español
    • Français Français
    • 日本語 日本語
    • Русский Русский
    • 한국어 한국어
    • Polski Polski
    • 中文 (中国) 中文 (中国)
    • Português Português
    • Italiano Italiano
    • Suomi Suomi
    • Svenska Svenska
    • 中文 (台灣) 中文 (台灣)
    • Dansk Dansk
    • Slovenčina Slovenčina
    • Türkçe Türkçe
    • Nederlands Nederlands
    • Magyar Magyar
    • ไทย ไทย
    • हिन्दी हिन्दी
    • Ελληνικά Ελληνικά
    • Tiếng Việt Tiếng Việt
    • Lietuviškai Lietuviškai
    • Latviešu valoda Latviešu valoda
    • Eesti Eesti
    • Čeština Čeština
    • Română Română
    • Norsk Bokmål Norsk Bokmål
  • Creating 3D Character Using 3DCoat
Expand All Collapse All
  • Einführung in 3DCoat
  • Einstieg
    • System requirements
    • Why 3DCoat is Unique?
    • 3DCoat aktivieren
    • Fehler beim starten
      • Startup error Mac
    • Color management
    • Upgrading permanent license
    • Linux Setup
      • Linux initial setup per-user installation
      • Linux initial setup for system
      • Tablet setup
      • To GTK3 from GTK2
    • Ordnerstruktur
      • Custom documents folder
    • Verschiedene Formen der „Auflösung“
    • Tablet on Window
    • Import und Export
    • Applinks in 3DCoat
      • Blender -Applink
        • Blender with the Applink in Linux
      • Blender 4.2/3/4/5 applink
      • Max Applink
      • Houdini applink
      • Lightwave uplink
  • Navigation
    • Dialog öffnen (Schnellstartmenü)
    • Navigationsbereich
    • Kamera und Navigation
      • Customize Navigation as Blender
    • Viewport Navigation Gizmo
    • Left tool panel
    •  Activity Bar
    • Navigation mit 3DConnexion-Geräten
      • How to compile Spacenavd on non Ubuntu distro
    • Stylus doesn’t work in sculpting
    • Hotkeys
  • Schnittstelle & Navigation
    • Dateimenü
    • Menü bearbeiten
      • Calculate Curvature
      • Calculate Occlusion
      • Light Baking Tool
      • Einstellungen
    • Ansicht-Menü
    • Symmetrie
    • Textures
    • Calculate
    • Ebenenmenü
    • Menü einfrieren
    • Hide
    • Bake
    • Kurven 2022
      • Kurvenmenü
      • Curves Properties RMB
      • Mit Maschenschicht füllen
      • Scale of imported curves
    • Windows-Menü
      • Windows-Popup-Bedienfelder mit Registerkarten
      • Schieberegler
    • Scripts
    • Addons
    • Capture
    • Hilfemenü
    • Anpassung
    • Raum ändern oder neu erstellen
  • Brush
    • Brush Top-Leiste
    • Bürsten allgemeine Verwendung
      • Erstellen Sie Pinsel und Abziehbilder
      • Aus der aktuellen Skulptur Alpha machen
      • Erstellen Sie einen Brush aus einem 3D-Objekt
      • Create brushes based on Curves
      • Load photoshop .abr brushes
    • Striche
      • Kurven-Popup-Menü
    • Brush
    • Bedingungen-Limiter
    • Streifen-Panel
    • Schablonen-Panel
    • Intelligente Materialien
      • Fügen Sie neue Bilder oder Materialien hinzu
      • Hängen Sie ein Smart-Material an eine Ebene an
      • Import Quixel Material
    • So erstellen Sie Voreinstellungen für Brush
  • Arbeitsbereiche Räume
    • Painting
      • Painting & Modi
        • Per-Pixel Painting
        • Displacement Painting (Mikro-Vertex)
        • Ptex Painting
        • Painting (Polypainting)
      • Importieren in den Painting
        • Initial CC subdivision
        • UV Set smoothing
        • Sharp (hard) edge
        • Normalen sperren
        • Laden Sie nach Modelländerungen ein neues UV Layout
        • DAZ Genesis models into 3DCoat
      • Menüs des Painting Arbeitsbereichs
        • Edit menu
        • Texturen-Menü
          • Baking für Texturen
        • Verstecken
        • Menü für die Bake Paint
        • Der Farbwähler
      • Obere Leiste für das Painting
      • Das Ebenenbedienfeld
        • Das Blending-Panel
        • Layer and Clipping Masks
      • Painting Werkzeuge
      • Deckkraft – Transparenz
      • Arbeitsbereich optimieren
        • Tweak-Toolset
        • Exportieren aus dem Tweak Room
      • Masken-/Materialvorschaufenster
      • Exportieren aus dem Painting
    • UV Arbeitsbereich
      • UV Leiste oben
      • UV Linkes Werkzeugfeld
      • UV Vorschaufenster
      • Beispiel für einen UV Workflow
      • Importieren in den UV Raum
      • Exportieren aus dem UV Raum
    • Retopologie
      • Importieren in den Retopo Raum
      • Retopo Mesh-Menü und Bake-Menü
        • Virtueller Spiegelmodus
      • Bake menu
        • Treat Poly Groups as Paint Objects
        • Baking guide
      • Obere Leiste
        • Geometrie auswählen
      • Linke Werkzeugtafel im Retopologieraum
        • Gesamtzweck und Funktion
        • Geometrie hinzufügen
          • Striche-Werkzeug in Retopology
        • Retopo Tweak-Tools
        • UV Werkzeuge
        • Befehle für den Retopologieraum
      • AUTORETOPO
        • Autopo guide
      • Poly-Gruppen
    • Bildhauen
      • Sculpt Layer
      • Baum formen
      • Brush Optionen
      • Top Bar
      • Brush
      • Geometrie-Untermenü
      • Gestalten Sie das „Rechtsklick“-Menü
      • Shader
      • Voxel Modus
        • Reines Voxel Sculpting
        • Dichte und Auflösung
        • Ton-Motor
        • Voxel -Tools
        • Oberflächenwerkzeuge auf Voxeln
        • Voxel Anpassungswerkzeuge
        • Volumetrische Painting
        • Voxel Objekte-Tools
      • Oberflächenmodus
        • Oberflächenwerkzeuge
        • Benutzerdefinierte Oberflächenwerkzeuge
        • Werkzeuge zur Oberflächenanpassung
        • Painting
        • Werkzeuge für Oberflächenobjekte
        • Mehrstufige Auflösung
          • Multires tools
          • Multires adjust
          • Multires commands
      • Kurven formen
        • Spline-Kurven
        • Splines model creation
      • Vektorverschiebung
      • Werkzeuge zur Oberflächentransformation
        • Voxel Transformationswerkzeuge
        • Instancer
        • Move
        • Pose
        • Fit
        • Reproject
        • Surface Array
      • Voxel Primitive und Import Tools
      • Live-Boolesche Werte
      • Befehle für den Sculpt-Raum
      • In Sculpt Room Import
      • Exportieren aus dem Sculpt Room
    • Machen
      • Comparison of different roughness values
      • Funktionen des Renderbereichs
      • Drehscheibe
      • Fakebake die Beleuchtung – kein PBR–
    • Factures
      • Arbeitsablauf
    • Am einfachsten
    • Modellieren
      • Mesh Menu
      • Linke Werkzeugtafel im Modellierungsraum
        • Geometrie hinzufügen
          • Ausgewählt
        • Optimieren
        • Smart Hybrid
        • UV
          • Befehle
        • Gesamtes Netz
      • Loft-Oberflächenbeispiel von Fluffy
      • Blockout von Poeboi
      • Import Zbrush Polygroups for UV mapping
    • Kitbash - Schnelle Erstellung von 3D-Modellen
      • Create kitbash
      • Left tool panel Kitbash
    • 3DPrint
    • Photogrammetry
      • How to install Reality Capture
      • Reality Capture doesn’t show up ?
    • Mesh zum NURBS-Raum
    • Nodes
      • Sculpt-Shader Nodes Library
  • Scripting und Core API
    • Scripting
    • Core API
    • Python-API
  • Kostenloser 3DCoatPrint

Move

309 views 0

Written by Carlos
May 12, 2025

Move: Move a surface area. Press and drag LMB to move the surface within the cursor, relative to the screen view. Not only can it “adjust” any shape, large or small, but it also can act as an “Extrusion/Intrusion” tool.

  • Drag with the “LMB” to move the surface within the area of the cursor relative to the screen view.
  • Hold the “Ctrl” key to move the surface along the normal.

The “Move” tool also interacts with Brush Alphas, providing various effects.

Toolbar Option: Conform Retopo Mesh to Sculpt

  • Conform Retopo Mesh to Sculpt: This video demonstrates an update to the “Conform Retopo Mesh” feature in 3DCoat’s Sculpt workspace, which allows the user to see the Retopo Mesh (in the Sculpt Workspace) while making large-scale edits with the Pose, Move, or Transform tool.

It also covers some additional tips for making the Retopo mesh conform after making edits with Sculpting brushes.

Tool options


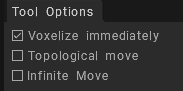
Voxelize immediately: As soon as the move is finished, the surface will be voxelized immediately. Turn this checkbox off if you want to make multiple moves and voxelize as soon as you switch to any voxel tool.
Topological move: Move only connected to the center parts. Use it to close up holes and move what you want to move and not everything under the brush. It is a very helpful brush for sculpting close details, like lips, eyes, and fingers.
Infinite Move: Modify your brush to apply details to anything that is directly in line with the brush icon.

Tutorials


Through All Volumes (Pose & Move Tool Changes): This video covers changes made to the Pose & Move tools on Toolbar options.

Was this helpful?

Yes  No
Related Articles
  • Surface Array
  • Top Bar
  • Curves Properties RMB
  • Left tool panel Kitbash
  • Create kitbash
  • Color management
Previously
Instancer
Up Next
Pose
AI:
Hi! How can I help you?
Attention: This is a beta version of AI chat. Some answers may be wrong. See full version of AI chat