 Lietuviškai
  English
 Українська
 Español
 Deutsch
 Français
 日本語
日本語 Русский
 한국어
한국어 Polski
 中文 (中国)
 Português
 Italiano
 Suomi
Suomi Svenska
 中文 (台灣)
 Dansk
Dansk Slovenčina
 Türkçe
 Nederlands
 Magyar
 ไทย
ไทย हिन्दी
 Ελληνικά
 Tiếng Việt
 Latviešu valoda
 Eesti
Eesti Čeština
 Română
 Norsk Bokmål
Kaip aprašyta anksčiau, šiuo įrankiu galite bake detales į įprastą arba displacement map, net jei paviršiaus topologija nesutampa tarp dviejų norimų bake tinklelių (atskaitos ir mažo poli).
Štai keli išsamūs šio įrankio naudojimo veiksmai:
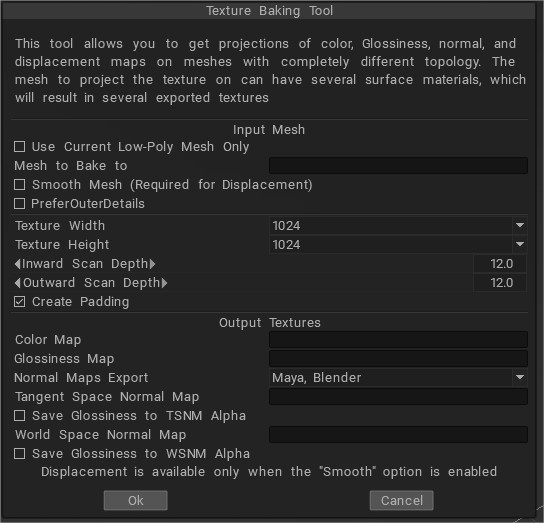
• Poslinkių žemėlapiui
Įjungti.
- Naudokite dabartinį mažo polietileno tinklelį.
- Lygus tinklelis
- Išsaugoti pozicijas
Išjunk:
- Naudokite pradines pozicijas
• Normaliam žemėlapiui.
Įjungti.
- Naudokite dabartinį mažo polietileno tinklelį.
Išjunk.
- Naudokite pradines pozicijas
- Lygus tinklelis
Turėsite įjungti parinktį „Naudoti dabartinį žemą tinklelį“ ir „Smooth mesh“, o „naudoti pradines pozicijas“ – išjungti. Norėdami gauti displacement map, turėtumėte nustatyti parinktį „Smooth mesh“, nes poslinkis skaičiuojamas kaip skirtumas tarp objekto scenoje ir išlygintos įvesties tinklelio. Pažymėkite parinktį „Naudoti dabartinį mažą polietileno tinklelį…“, jei norite projektuoti ant esamo tinklelio. Tokiu atveju geriau pažymėti parinktis „Naudoti pradines pozicijas…“ ir „Smooth mesh“, jei norite gauti poslinkį ir panaikinkite jų žymėjimą, jei norite tik normal map .
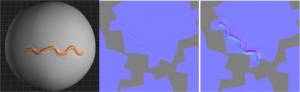
Kadangi iškraipėte geometriją, bet palikote tekstūrą neiškraipytą, tinklelis atrodo netinkamai naudojant mažo polinkio režimą. Tokiu atveju jums gali padėti kepimo įrankis. Naują labai iškreiptą tinklelį turėtumėte projektuoti ant mažo polietileno tinklelio. Taip gaunamos iškreiptos tekstūros. Kaip matote iš įprastų žemėlapių vaizdų, apatinis yra išsamesnis nei kitas. Jis buvo sugeneruotas naudojant Texture Baking įrankį, viršutinis buvo atliktas naudojant paprastą export funkciją.
Taikant mikro viršūnių metodą, kiekvienas veidas (leidžiamas tik keturkampis) buvo vaizduojamas kaip N × M viršūnių lopinėlis (N ir M gali skirtis kiekvienam veidui).
Kiekviena viršūnė turėjo spalvą ir koordinates erdvėje, todėl buvo leidžiamas bet koks poslinkis. Tačiau šis metodas buvo ribotas, nes buvo labai sunku redaguoti tinklelius su ne keturkampiais paviršiais, o projektuojant pleistrą į tekstūrą buvo prarasta kokybė. Buvo sunku import tekstūrą, ją redaguoti ir export , nes tekstūra po eksporto atrodė šiek tiek neryški. Taigi nusprendėme įdiegti Per-Pixel Painting. Štai pagrindiniai šios technologijos punktai:
Painting atliekamas ne virš viršūnių, o per pikselius tiesiai ant tekstūros. Atrodo, kad kiekvienas tekstūros pikselis yra vaizduojamas kaip erdvės taškas. Kiekviename pikselyje yra bet koks spalvų, neskaidrumo, normalaus poslinkio ir ryškumo sluoksnių skaičius.
Kiekvieną sluoksnį galima sumaišyti su ankstesniu, naudojant gerai žinomas spalvos ir poslinkio maišymo operacijas.
Kiekvienas tekstūros taškas erdvėje turi savo kaimynus per-pixel vaizde. Tai svarbu, nes leidžia ne tik nudažyti modelį, bet ir atlikti nevietines operacijas – pavyzdžiui, suliejimą ir galandimą teptuku.
Kai kurios operacijos atliekamos erdvėje, pavyzdžiui, dažymas, užpildymas ir kreivių taikymas, o kai kurios – projekcijoje, pavyzdžiui, dėmė. Visa tai yra skaidru vartotojui.
Daugumą operacijų galima atlikti (pasirinktinai) ne tik matomoje objekto pusėje, bet ir nematomoje, pavyzdžiui, ant paviršiaus uždėti kreives, užpildyti ir dažyti žiedus, stačiakampius ir daugiakampius.
Keitimasis su kitomis programomis tampa greitas ir nepraranda kokybės, todėl galite naudoti 3DCoat bet kuriame dujotiekio etape, kad gautumėte paskutinį prisilietimą arba atliktumėte visą tekstūravimą.
Galite import normal map ir naudoti jį kaip tekstūros dažymo nuorodą. Įprastus žemėlapius taip pat galima keisti, galite šiek tiek išlyginti (ne per siūles) arba išblukinti kai kurias sritis. Tai sukuria vientisą dažymą ir tekstūrų išlyginimą.
Dažymas Per-Pixel turi tik vieną trūkumą, palyginti su Micro-Vertex dažymu: piešimas per-pixel nepalaiko vektorinio poslinkio, tik normalų poslinkį. Kartais šis funkcionalumo skirtumas yra svarbus, todėl abu metodus palikome kaip parinktis.
Pavyzdžiui, naudojant „Micro-Vertex“ metodą dažant ant iškeptų vokselių skulptūrų gaunami geresni rezultatai. Papildomi piešimo per-pixel pranašumai yra šie:
• Galimybė paveikti modelio gale esančius pikselius (užpildymas, suliejimas ir bendrų efektų taikymas).
• Dažymo kokybė nepriklauso nuo atstumo nuo objekto iki fotoaparato.
• Tikslesnė tapyba: ką matai, tą ir gauni. Pagrindinis pranašumas, palyginti su „Micro-Vertex“ dažymu, yra galimybė sulieti po teptuku esančius pikselius. Tai įmanoma, nes kiekvienas pikselis turi kaimyną, kurio atžvilgiu jis gali būti neryškus.
Painting su gyliu
Painting 3DCoat gali vykti iki 3 „kanalų“ vienu metu – gylio, spalvos ir blizgesio. Įjunkite arba išjunkite bet kokius kanalus, kuriuos norite naudoti, tiesiog spustelėdami atitinkamą piktogramą viršutinėje įrankių juostoje.
Užvedus pelės žymeklį ant šių piktogramų, pasirodo papildomas parinkčių meniu.
Priedo dažymo parinktis geriausiai pavaizduota diagramoje dešinėje. Kai neįjungta, teptuko potėpių plynaukštės kirtimas tame pačiame gylio lygyje – kai įjungta, dėl tų pačių potėpių dažai „susikaups“ visur, kur potėpiai susikerta. Be to, jei parinktis išjungta, persidengimo elgsena taikoma tik dabartiniame sluoksnyje nubrėžtiems potėpiams.
Nupiešto potėpio gylį galima valdyti „skraidydamas“, tiesiog laikant nuspaudus dešinįjį pelės mygtuką ir vilkant aukštyn arba žemyn. Gylio intensyvumą vizualiai rodo centro spalvos ir kontūrinė linija dažymo žymeklyje (raudona pagal numatytuosius nustatymus). Šio centro kontūro forma atspindi alfa formą, kurią pasirinkote pirminiame Brush skydelyje.
Gylio intensyvumą taip pat galima valdyti klaviatūra paspaudus „+“ arba „-“ klavišą arba sukant pelės slinkties ratuką pirmyn arba atgal. Naudodami rašiklį naudokite mažiau spaudimo, kad išvengtumėte smūgio „pervargimo“.
Kai dažote Micro-Vertex režimu ir jūsų tinklelis yra mažos skiriamosios gebos, dažymas dideliu gylio intensyvumu gali staigiai iškraipyti tinklelį.
Nupiešto gylio potėpio išlyginimą galima reguliuoti naudojant slankiklį „Smoothing“ viršutinėje Brush įrankių juostoje arba laikant nuspaudus klavišą „Shift“ ir dešinįjį pelės mygtuką ir vilkdami aukštyn arba žemyn. Šios funkcijos spartusis klavišas yra „Shift +“ arba „Shift -“. Centrinio šepečio profilio linija pagal numatytuosius nustatymus tampa žalia, kai veikiate išlyginimo režimu.