 Română
  English
 Українська
 Español
 Deutsch
 Français
 日本語
日本語 Русский
 한국어
한국어 Polski
 中文 (中国)
 Português
 Italiano
 Suomi
Suomi Svenska
 中文 (台灣)
 Dansk
Dansk Slovenčina
 Türkçe
 Nederlands
 Magyar
 ไทย
ไทย हिन्दी
 Ελληνικά
 Tiếng Việt
 Lietuviškai
 Latviešu valoda
 Eesti
Eesti Čeština
 Norsk Bokmål
Primitive
Import
Import în spațiul de lucru Sculpt
Acest instrument vă permite să import ochiuri poligonale.
Generator de arbori
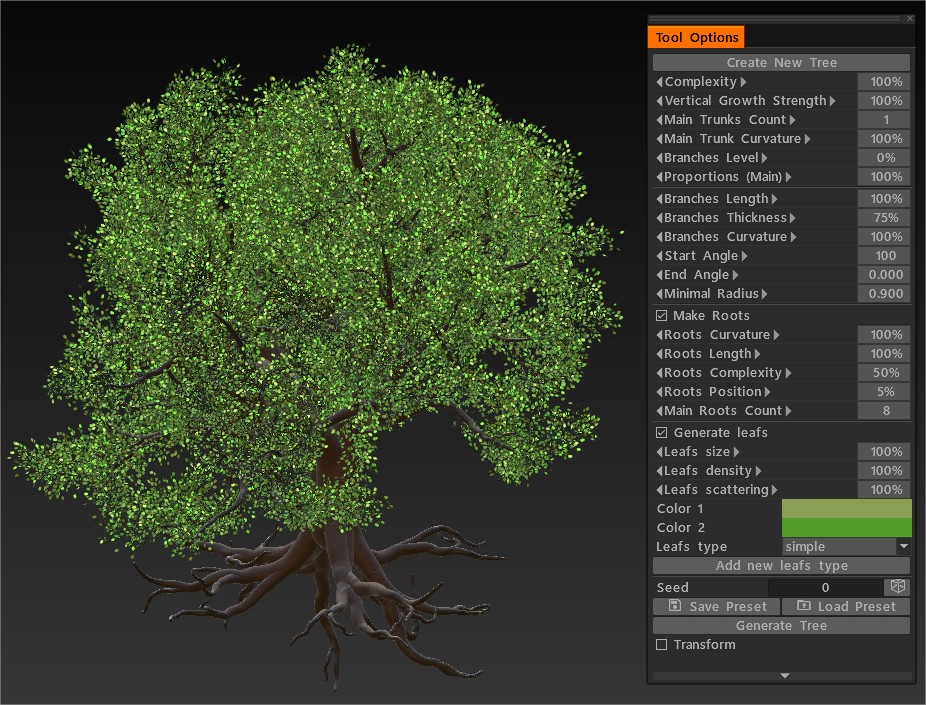
O privire rapidă asupra noului instrument Tree Generator : O primă privire asupra noului instrument Tree Generator din interiorul 3D Coat. Este un instrument procedural, nedistructiv. Chiar mai important decât mecanismul bun creat în 3DCoat pentru a face instrumente procedurale, nedistructive.
Instrumentul Trees Generator a avut posibilitatea de a genera Leafs. Puteți adăuga propriile tipuri de frunze, puteți sculpta forma crone dacă este necesar, export toate acestea ca FBX. În CoreAPI ai posibilitatea de a adăuga obiecte texturate în scena sculptării (vezi exemplul generatorului de copaci).
Siglă
Logo : instrumentul logo vă permite să import orice imagine alb-negru și să o convertiți în voxeli. Puteți converti imaginile care sunt în formatele .BMP, .TGA, .jpeg și .PNG. Faceți clic pe instrumentul Logo și selectați o imagine. Când sunt importate, voxelurile vor fi create pe baza unei imagini în tonuri de gri. Se va folosi implicit instrumentul de îmbinare, astfel încât să puteți utiliza gizmo-ul standard de îmbinare aici.
Constructor
Constructor : simplifică procesul de modelare 3D pentru PixelArt folosind forme geometrice de bază ca cărămizi.
Acest instrument este compus din mai multe forme prestabilite cu diferite componente de montare. Imaginați-vă un set de jucării din cărămidă; fiecare parte se poate fixa și se poate conecta la aproape orice altă parte pentru a realiza construcții mai mari. Acesta este ceea ce face acest instrument, dar orice parte se poate conecta la orice altă parte și, la plasare, piesa le conectează pentru a le face fără sudură și un obiect solid. Puteți plasa colțuri și margini folosind Plasare margini sau, respectiv, Plasare colțuri.
De asemenea, puteți permite instrumentului să decidă cum va fi plasată piesa folosind Smart Placement. Cu Brick Size X/Y/Z, puteți decide, de asemenea, cât de mare sau mică va fi suprafața fiecărei piese.
Modelele create cu Constructor sunt ideale pentru:
– Construirea de lumi de realitate virtuală
– Dezvoltarea jocurilor
– printare 3d
– Învățare bazată pe STEM.
Schiță
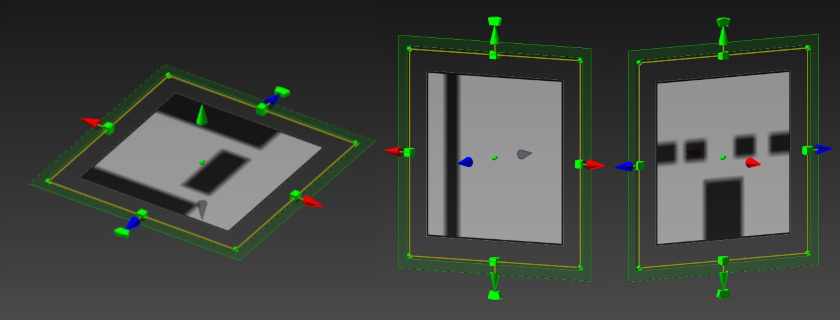
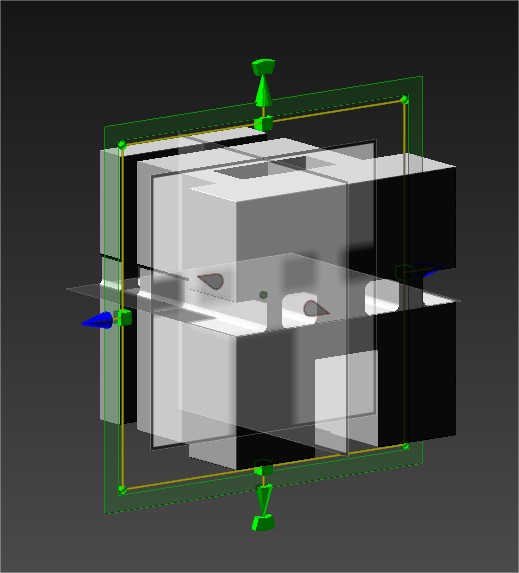
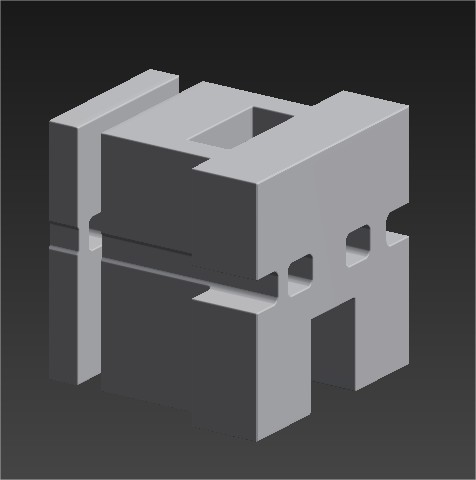
Este un instrument pentru a crea primitive 3D în mod dinamic, pictând măști pe trei planuri în față, lateral și inferioară.
comenzi:
Alb: adăugați geometrie.
Negru: scăderea geometriei.
Ctrl + LMB: pentru a picta negru.
Curent de curățare: umpleți negru, fiecare axă separat.
Curent de umplere: Umpleți alb, fiecare axă separat.
Resetează schița: Resetează toate axele la alb, iar cubul este creat din nou.
Imagine de referință: activați.
Imagine alb-negru 512×512.
Instrument de schiță 2022+ de Anton Tenitsky.
Schiță : Acest instrument este o completare foarte importantă la setul de instrumente. Vă permite să creați un obiect de volum cu 2 sau 3 proiecții de imagine; dacă utilizați trei imagini, obiectul voxel va fi mai detaliat. Este excelent pentru a crea forme de bază pentru obiecte mai detaliate foarte rapid. Acest instrument are câteva operații, toate care se explică de la sine.
Despică
Split : Acest instrument este foarte asemănător cu instrumentul Cut&Clone. Are aceleași setări de chenar. Diferența este că rupe o bucată din obiectul pe care operezi și își creează Stratul de obiect în VoxTree.
Dacă utilizați instrumentul Split cu Split Border Width (controale barei de sus) setată la 1.0 (nu cea mai mică valoare de 0.0), noile straturi vor avea o tăietură curată, spre deosebire de utilizarea Vox Hide + Objectify Hidden Volumes.
Setați Split Border Width la 0 pentru a obține teșituri la marginile despicate.
Clonează
Clonează : Clonează selecția fără a tăia.
Tăiați și clonați
Acest instrument vă va permite să tăiați și să clonați volumul unui obiect voxel pe baza parametrilor tipului de perie. Este implicit la modul de tragere dreptunghi stilou și va copia întregul volum al obiectului de dedesubt. De asemenea, puteți ajusta parametrii de chenar cu trei tipuri diferite:
- Rotund, Plan și Ascuțit.
Vox Extrude
Vox Extrude funcționează în mod similar cu VoxLayer fără a crea un nou strat de obiecte, dar trecând întregul strat în modul Surface. Apăsați „Aplicați” în timp ce țineți apăsat Ctrl dacă doriți să inversați instrumentul.
Stratul Vox
Stratul Vox
Vox Layer creează un strat subțire în jurul zonei înghețate a volumului curent. Pictați cu înghețarea pentru a marca zona și apoi apăsați pe Aplicare.
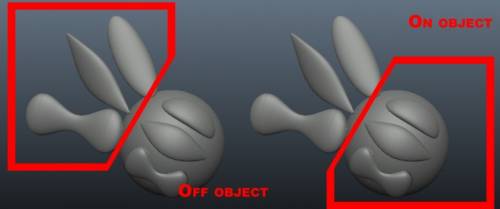
Palton
Acest instrument permite adăugarea de acoperire peste strat într-un mod nedistructiv. Este similar cu VoxLayer, dar puteți defini zona folosind curbe și puteți schimba punctele de colț mai târziu.
Indică poligoane
Adăugați puncte cu LMB. Ajustați punctele și adăugați fețe cu RMB. (Uită-te la previzualizare) Forță triunghiuri cu SHIFT. Țineți cursorul aproape de centrul potențialului quad pentru o plasare mai precisă a quad-ului.
Şarpe
Snake : Făcând clic și trageți cu LMB, se creează o formă asemănătoare unui șarpe în fereastra dvs. de vizualizare. Poziția sa se bazează pe primul clic și pe perspectiva ferestrei. Ca și în cazul instrumentului curbe, îl puteți reseta cu butonul Tub. Puteți selecta mai multe profiluri și, desigur, puteți utiliza și presetări spline.
Un parametru unic pentru acest instrument este * Viteza de netezire: șarpele se va netezi pe toată lungimea, făcându-l să se miște. Cu cât valoarea este mai mare, cu atât mai multă netezire. (Valori min/max: 1-5)
Spikes
Spikes : Funcționează ca instrumentul șarpe, cu excepția faptului că se îngustează la punctul final, provocând un aspect ca un vârf.
Pasta de dinti
Pastă de dinți : acest instrument partajează toate opțiunile cu instrumentul Muschi, cu excepția tipurilor de mușchi. Funcția sa este similară cu numele său: este ca și cum ai aplica pastă de dinți pe o suprafață. Un mare avantaj este că respectă Brush alphas, așa că le puteți folosi pentru a crea perii unice.
Muşchi
Mușchi : Vă permite să sculptați cu ușurință forme cu aspect muscular și tendon. Puteți obține multe efecte diferite, de exemplu, sculptând cu acest instrument în afara unui volum pentru a crea obiecte care arată ca aripi.
Există mai multe setări în acest instrument:
- Viteza de netezire: aceasta vă permite să reglați viteza cu care este netezită cursa.
- Conform : forțează cursa dumneavoastră să adere la suprafața obiectului în loc să treacă prin fața obiectului de bază sau chiar prin el.
- Tipuri de mușchi: Selectați între două tipuri diferite: Muschi și Tendon.
Pânză
– Simularea de cârpă în timp real în 3DCoat este acum la un nou nivel de calitate și viteză .
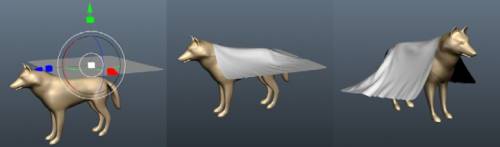
Pânză : Acest instrument este un simulator de pânză pe care îl puteți folosi pentru a întinde o plasă poligonală peste alt obiect. Există o cârpă implicită cu care puteți testa, dar nu vă limitați la aceasta deoarece puteți import și o plasă poligonală externă.
Rețineți că, cu cât rezoluția plasei pe care o utilizați pentru a drapa este mai mare, cu atât simularea va fi mai lentă și va dura mai mult pentru a obține rezultatele dorite. Simularea poate fi pornită cu butonul Start; odată ce simularea rulează, puteți întrerupe/relua, sfârșit și reseta simularea.
Parametrii acestui instrument sunt următorii:
- Selectați rețeaua: vă solicită un dialog de deschidere a fișierului care vă permite să selectați un fișier (.OBJ, .LWO, .FBX, .STL, .PLY și .3b) de pe disc pentru a-l utiliza ca obiect de drapat.
- Subdivide: Subdivizează obiectul pe care îl ai plasă peste alt obiect. Există un test, dar nu vă limitați la acesta, deoarece puteți import și unul extern. Poate fi folosit înainte sau după ce rulați simularea.
- Start/Reset: Aceste două butoane pornesc și resetează simularea.
- Alegeți din retopo: Dacă ați retopologizat ceva și se află în fila Retopo , atunci puteți utiliza acest buton pentru a selecta acea plasă ca obiect de drapat.
- Către retopo: trimite rețeaua drapată recent la fila Retopo pentru o retopologizare ulterioară.
Altele: Setează alți câțiva parametri, cum ar fi gravitația și frecarea obiectului drapat pe obiectul pe care îl draperi, precum și grosimea pânzei. Pentru grosime, cu cât valoarea este mai mare, cu atât pânza este mai groasă.
Respectați obiectul curent:
Gravitație: Schimbați gravitația pentru a face obiectul să cadă mai repede/mai lent și, de asemenea, greutatea generală a draperiei.
Frecare: determină cât de „lipicioasă” este draperiile cu obiectul pe care este drapat.
Grosimea pânzei: După ce v-ați drapat articolul, dar înainte de a-l aplica ca sculptură, trebuie să specificați grosimea.
Rapid: Foarte rapid pentru construirea rapidă a formei.
Instrument îmbunătățit de simulare a pânzei .
Videoclipul demonstrează instrumentul pentru cârpă în acțiune în timp ce modelează un pat.
Instrumentul de pânză în acțiune
Tutoriale
Simulare de cârpă 3DCoat : 3D Coat are o simulare de pânză surprinzător de puternică. Îl poți folosi în camera de voxel sculpting . Puteți fie să utilizați obiectul din pânză, fie să îl utilizați pe cel implicit. Puteți interacționa cu simularea în curs de desfășurare trecând peste ea cu mouse-ul. Acest lucru vă oferă o modalitate frumoasă de a face rezultatul să pară mai organic.
3DCoat Cloth Tool : Folosiți Cloth Tool pentru a crea un articol de îmbrăcăminte. Scuze pentru lipsa editării și audio slab în acest tutorial; Am avut foarte puțin timp, așa că am luat-o dintr-o singură mișcare. Există un link mai jos pentru a-i ajuta pe cei care nu sunt familiarizați cu retopologia (de Ian Thompson).
Tricou în 3DCoat : Iată o demonstrație de realizare rapidă a unui tricou pentru un personaj cu simulatorul de cârpă și instrumentele de retopologie 3DCoat.
Voxel Sketch : 3DCoat v3.01 a adăugat un nou instrument la setul de instrumente voxel numit instrument Sketch. Acest instrument vă permite să import 2 sau 3 imagini ca planuri de referință, iar apoi aplicația va extrapola un obiect volumetric pe baza acelor imagini. Este excelent pentru a crea un volum de bază rapid pentru sculptură sau lucruri precum greebles și nurnies. (De Javis Jones).