• Dansk
  • 3DCoat dokumentation
  • Chapters
    • Introduktion til 3DCoat
    • Kom godt i gang
    • Interface & Navigation
    • Brush
    • Arbejdsrum Rum
    • Scripting & Core API
    • Spørgsmål/svar
    • licensing
    • Træningsvejledninger
  • Pilgway
  • Products
    • 3DCoat
    • 3DCoatTextura
    • 3DCoatPrint
    • PBRLibrary
  • Blog Posts
  • Store
  • Dansk Dansk
    • English English
    • Українська Українська
    • Español Español
    • Deutsch Deutsch
    • Français Français
    • 日本語 日本語
    • Русский Русский
    • 한국어 한국어
    • Polski Polski
    • 中文 (中国) 中文 (中国)
    • Português Português
    • Italiano Italiano
    • Suomi Suomi
    • Svenska Svenska
    • 中文 (台灣) 中文 (台灣)
    • Slovenčina Slovenčina
    • Türkçe Türkçe
    • Nederlands Nederlands
    • Magyar Magyar
    • ไทย ไทย
    • हिन्दी हिन्दी
    • Ελληνικά Ελληνικά
    • Tiếng Việt Tiếng Việt
    • Lietuviškai Lietuviškai
    • Latviešu valoda Latviešu valoda
    • Eesti Eesti
    • Čeština Čeština
    • Română Română
    • Norsk Bokmål Norsk Bokmål
  • Creating 3D Character Using 3DCoat
Expand All Collapse All
  • Introduktion til 3DCoat
  • Kom godt i gang
    • System requirements
    • Why 3DCoat is Unique?
    • Aktivering af 3DCoat
    • Opstartsfejl
      • Startup error Mac
    • Color management
    • Upgrading permanent license
    • Linux Setup
      • Linux initial setup per-user installation
      • Linux initial setup for system
      • Tablet setup
      • To GTK3 from GTK2
    • Mappestruktur
      • Custom documents folder
    • Forskellige former for "opløsning"
    • Tablet on Window
    • Import & Export
    • Applinks i 3DCoat
      • Blender applink
        • Blender with the Applink in Linux
      • Blender 4.2/3/4/5 applink
      • Max Applink
      • Houdini applink
      • Lightwave uplink
  • Navigation
    • Åbningsdialog (hurtig startmenu)
    • Navigationspanel
    • Kamera og navigation
      • Customize Navigation as Blender
    • Viewport Navigation Gizmo
    • Left tool panel
    •  Activity Bar
    • Navigation ved hjælp af 3DConnexion-enheder
      • How to compile Spacenavd on non Ubuntu distro
    • Stylus doesn’t work in sculpting
    • Genvejstaster
  • Interface & Navigation
    • Fil menu
    • Rediger menu
      • Calculate Curvature
      • Calculate Occlusion
      • Light Baking Tool
      • Præferencer
    • Vis menu
    • Symmetri
    • Textures
    • Calculate
    • Menuen Lag
    • Frys menu
    • Hide
    • Bake
    • Kurver 2022
      • Kurver menu
      • Curves Properties RMB
      • Fyld med mesh lag
      • Scale of imported curves
    • Windows menu
      • Windows Popup-paneler med faner
      • Skydere
    • Scripts
    • Addons
    • Capture
    • Hjælp menu
    • Tilpasning
    • Rediger eller opret nyt rum
  • Brush
    • Brush Top Bar
    • Børster til almindelig brug
      • Lav børster og mærkater
      • Fremstilling af alfa fra den nuværende sculpt
      • Opret en Brush fra et 3D-objekt
      • Create brushes based on Curves
      • Load photoshop .abr brushes
    • Slagtilfælde
      • Kurver popup-menu
    • Brush muligheder
    • Betingelsesbegrænser
    • Strips Panel
    • Stencils panel
    • Smarte materialer
      • Tilføj nye billeder eller materialer
      • Vedhæft et Smart materiale til et lag
      • Import Quixel Material
    • Sådan opretter du forudindstillinger til Brush
  • Arbejdsrum Rum
    • Painting
      • Painting og tilstande
        • Per-Pixel Painting
        • Painting (Micro-Vertex)
        • Ptex Painting
        • Painting (polymaling)
      • Importer ind i Painting
        • Initial CC subdivision
        • UV Set smoothing
        • Sharp (hard) edge
        • Lås Normaler
        • Indlæs nyt UV layout efter modelændringer
        • DAZ Genesis models into 3DCoat
        • ID map
      • Menuer i Painting
        • Edit menu
        • Tekstur menu
          • Tekstur Baking
        • Skjule
        • Menu til Bake Paint
        • Farvevælgeren
      • Topstang til Painting
      • Panelet Lag
        • Blandingspanelet
        • Layer and Clipping Masks
      • Værktøj til Painting
      • Opacitet - Gennemsigtighed
      • Tweak arbejdsområde
        • Tweak værktøjssæt
        • Eksporterer fra Tweak Room
      • Maske/materiale Preview Panel
      • Eksporterer fra Painting
    • UV arbejdsplads
      • UV Top Bar
      • UV venstre værktøjspanel
      • UV Preview Panel
      • Eksempel på UV arbejdsgang
      • Importer ind i UV rummet
      • Eksport fra UV rummet
    • Retopologi
      • Importer til Retopo rummet
      • Retopo Mesh Menu og Bake Menu
        • Virtuel spejltilstand
      • Bake menu
        • Treat Poly Groups as Paint Objects
        • Baking guide
      • Top bar
        • Vælg geometri
      • Venstre værktøjspanel i Retopologirummet
        • Overordnet formål og funktion
        • Tilføj geometri
          • Slagværktøj i Retopologi
        • Retopo Tweak-værktøjer
        • UV værktøj
        • Kommandoer til Retopologirummet
      • AUTORETOPO
        • Autopo guide
      • Poly grupper
    • Skulptere
      • Sculpt Layer
      • Skulptér træ
      • Muligheder for Sculpt Brush
      • Top Bar
      • Brush motor
      • Geometri Undermenu
      • Skulptur "højreklik"-menuen
      • Shaders
      • Voxel -tilstand
        • Ren Voxel Sculpting
        • Tæthed og opløsning
        • Ler motor
        • Voxel værktøjer
        • Overfladeværktøjer på Voxels
        • Voxel justeringsværktøjer
        • Volumetrisk Painting
        • Voxel Objects-værktøjer
      • Overfladetilstand
        • Overfladeværktøj
        • Tilpassede overfladeværktøjer
        • Værktøj til overfladejustering
        • Painting
        • Værktøjer til overfladeobjekter
        • Multi Level Opløsning
          • Multires tools
          • Multires adjust
          • Multires commands
      • Skulptur kurver
        • Spline kurver
        • Splines model creation
      • Vektor forskydning
      • Værktøjer til overfladetransformation
        • Voxel transformationsværktøjer
        • Instancer
        • Move
        • Pose
        • Fit
        • Reproject
        • Surface Array
      • Voxel Primitives og Import
      • Levende booleanere
      • Kommandoer til Sculpt room
      • Import til Sculpt Room
      • Eksporterer fra skulpturrummet
    • Render
      • Comparison of different roughness values
      • Render panelfunktioner
      • Pladespiller
      • Fakebake the lighting -ikke PBR-
    • Factures
      • Workflow
    • Det enkleste
    • Modellering
      • Mesh Menu
      • Venstre værktøjspanel i modelleringsrum
        • Tilføj geometri
          • Valgte
        • Tweak
        • Smart Hybrid
        • UV
          • Kommandoer
        • Hele Mesh
      • Loft overflade eksempel af Fluffy
      • Blockout af Poeboi
      • Import Zbrush Polygroups for UV mapping
    • Kitbash - Hurtig oprettelse af 3D-modeller
      • Create kitbash
      • Left tool panel Kitbash
    • 3DPrint
    • Photogrammetry
      • How to install Reality Capture
      • Reality Capture doesn’t show up ?
    • Mesh til NURBS værelse
    • Nodes
      • Sculpt shaders Nodes Library
  • Scripting & Core API
    • Scripting
    • Core API
    • Python API
  • Gratis 3DCoatPrint

Pose

459 views 0

Written by Carlos
May 12, 2025
Pose tool

You can also use Soft Selection feature for the Pose tool in the Sculpt workspace.

Pose: This tool is great for quickly changing the rotation, scale, and translation of a selection.
You can determine the selection in several ways. You can use a line, ring, or sphere, and you can even paint on it with a Brush or an object.
Check the Airbrush mode when using “Select with a pen” to increase the selection area smoothly.

After a selection is made, a special posing gizmo will appear.
Switching off Regular Gizmo, the tool has three states: Rotate, Scale, and Translate.
You can switch modes by clicking on the long red rectangular bar at the base of the gizmo. In each state, the gizmo has a set of parameters in the Tool Options Panel.

Finally, as with all tools in 3DCoat, the pose tool respects symmetry, as well as all selection modes, like drag rectangle, lasso, etc. Now, the Pose tool works on all visible objects (through all volumes).

Let’s now take a look at some of the Pose Mode parameters:

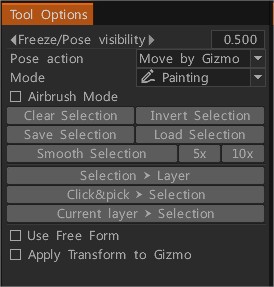
  • Freeze/Pose visibility: The opacity of the pose or freeze selection.
  • Pose Action: you have two options:
  1. Move by Gizmo.
  2. Normal Extrude.
  • Mode: The method of selection for the Pose tool.
    • Line: This mode lets you draw a line-based gradient for use with the pose tool gizmo. It starts with your initial LMB click and ends with the release of the LMB.
    • Ring: This selects a ring-based gradient. It starts with your initial LMB click and ends with the release of the LMB.
    • Sphere: This selects a spherical gradient. It starts with your initial LMB click and ends with the release of the LMB.
  • Snap to angle: Activate if you need the Snap to Angle selection.
  • Paint: Select by brushing over an element. Selecting with pen mode lets you directly brush on your selection. The pen size directly affects the selection area. Furthermore, you can also smooth your selected area by holding “Shift + LMB”. This is a great way to select things quickly if you just need tiny little details selected.
  • Note: “Paint Select” mode is very useful. With the Pose tool, you can use almost any selection method in the “E” Panel, like drag rectangle, lasso, etc. You can also subtract your selection using the normal tool while holding the CTRL key.
    • Airbrush mode: Activate airbrush mode. You can also smoothly select areas instead of having a hard-edged selection. It makes for tidy deformations around the edges of your selection.
  • Select Object: If you have multiple objects in your Sculpt Tree, this mode can come in handy. Simply click on the object you want to deform using the Pose tool, which will place the entire volume as your selection.

  • Edit Pose falloff:
  • Clear Selection:
  • Invert Selection: Invert pose selection.
  • Save Selection: Save pose selection to the file. It is recommended to use this in surface mode. If the mesh structure is changed due to voxelization, you will not be able to apply the previous store selection.
  • Load Selection: Load pose selection from the file. If the mesh structure changes, you cannot restore selection, so use it in surface mode whenever possible.
  • Smooth Selection: Smooth Pose Selection. Smooth all-in pose tool – it smooths all volumes selection if “through all volumes” is selected. Also, there are buttons 5x and 10x near the Smooth command to smooth faster.
  • Store selection to the Layer: Store Pose Selection As Layer.
  • Pick selection from the Layer: Recall Selection By Click. Press the button, then click on the layer in the scene to recall the frozen state. Use SHIFT to add the selection, and CTRL to subtract.
  • Current layer > Selection: Recall the selection from the current layer’s opacity. Use SHIFT/CTRL to add/subtract the selection.

– Use Free Form: This feature allows a lattice to deform the selected Pose area. Select from several lattice shapes to transform the Pose selection.
– Apply Transform to Gizmo: Apply Transform to the entire Gizmo.

  • Regular Gizmo: Use a regular gizmo instead of a line-based one. Below you have settings to select a control type if regular gizmo o line-based is selected.
  • Hide Gizmo: Hide the gizmo to select an area more accurately.
  • Adjust Transition Area: Adjust the area that joins un-selected and completely selected areas. It allows makes bending more accurate and natural.
  • Move Only Gizmo: Move the gizmo but don’t transform the object.
  • Leave Rotated Axes: After rotating, axes will remain in the final state. Otherwise, they will return to X, Y, and Z orientation.
  1. Pick Pivot: Click to pick the pivot point from the surface.
    • Pick Position Only: Pick the position and Y-axis from the pen’s normal; and the position, X, and Z-axis from the pen’s orientation.
    • Pick Normal & Position: Pick the position and Y-axis from the pen’s normal and position X and Z axis from the pen’s orientation.
    • Pick View Direction & Position: Pick gizmo position from the pick point, Y axis from the forward direction, X – right, Z – upper.
  • Reset Axis.
  • Reset Space: Reset the object’s local space so it will be scaled uniformly along all axes, and local axis directions will orient to global X, Y, and Z.
  • Center in Local Space: Center gizmo in local space. Axis will be oriented along the local axis if you check “Leave rotated gizmo”.
  • To Main Axis: Direct gizmo axis along the main geometrical axis of the object.
  • To Center Mass: Move the gizmo to the center of mass.
  • To Bound Center: Move the gizmo to the center of the bound box.
  • Align to View:
  • Apply Transform to Gizmo: Apply to transform to the entire gizmo.

Pose Tool Poly Groups: This video demonstrates a few new feature additions to the Pose Tool in 3DCoat 4.9.
One is angle snapping for precise linear selections. The other is Poly Group functionality built into the Pose tool.

Was this helpful?

Yes  No
Related Articles
  • Factures
  • ID map
  • Surface Array
  • Top Bar
  • Curves Properties RMB
  • Left tool panel Kitbash
Previously
Move
Up Next
Fit
AI:
Hi! How can I help you?
Attention: This is a beta version of AI chat. Some answers may be wrong. See full version of AI chat