• Deutsch
  • 3DCoat Dokumentation
  • Chapters
    • Einführung in 3DCoat
    • Einstieg
    • Schnittstelle & Navigation
    • Brush
    • Arbeitsbereiche Räume
    • Scripting und Core API
    • Fragen & Antworten
    • licensing
    • Schulungs-Tutorials
  • Pilgway
  • Products
    • 3DCoat
    • 3DCoatTextura
    • 3DCoatPrint
    • PBRLibrary
  • Blog Posts
  • Store
  • Deutsch Deutsch
    • English English
    • Українська Українська
    • Español Español
    • Français Français
    • 日本語 日本語
    • Русский Русский
    • 한국어 한국어
    • Polski Polski
    • 中文 (中国) 中文 (中国)
    • Português Português
    • Italiano Italiano
    • Suomi Suomi
    • Svenska Svenska
    • 中文 (台灣) 中文 (台灣)
    • Dansk Dansk
    • Slovenčina Slovenčina
    • Türkçe Türkçe
    • Nederlands Nederlands
    • Magyar Magyar
    • ไทย ไทย
    • हिन्दी हिन्दी
    • Ελληνικά Ελληνικά
    • Tiếng Việt Tiếng Việt
    • Lietuviškai Lietuviškai
    • Latviešu valoda Latviešu valoda
    • Eesti Eesti
    • Čeština Čeština
    • Română Română
    • Norsk Bokmål Norsk Bokmål
  • Creating 3D Character Using 3DCoat
Expand All Collapse All
  • Einführung in 3DCoat
  • Einstieg
    • System requirements
    • Why 3DCoat is Unique?
    • 3DCoat aktivieren
    • Fehler beim starten
      • Startup error Mac
    • Color management
    • Upgrading permanent license
    • Linux Setup
      • Linux initial setup per-user installation
      • Linux initial setup for system
      • Tablet setup
      • To GTK3 from GTK2
    • Ordnerstruktur
      • Custom documents folder
    • Verschiedene Formen der „Auflösung“
    • Tablet on Window
    • Import und Export
    • Applinks in 3DCoat
      • Blender -Applink
        • Blender with the Applink in Linux
      • Blender 4.2/3/4/5 applink
      • Max Applink
      • Houdini applink
      • Lightwave uplink
  • Navigation
    • Dialog öffnen (Schnellstartmenü)
    • Navigationsbereich
    • Kamera und Navigation
      • Customize Navigation as Blender
    • Viewport Navigation Gizmo
    • Left tool panel
    •  Activity Bar
    • Navigation mit 3DConnexion-Geräten
      • How to compile Spacenavd on non Ubuntu distro
    • Stylus doesn’t work in sculpting
    • Hotkeys
  • Schnittstelle & Navigation
    • Dateimenü
    • Menü bearbeiten
      • Calculate Curvature
      • Calculate Occlusion
      • Light Baking Tool
      • Einstellungen
    • Ansicht-Menü
    • Symmetrie
    • Textures
    • Calculate
    • Ebenenmenü
    • Menü einfrieren
    • Hide
    • Bake
    • Kurven 2022
      • Kurvenmenü
      • Curves Properties RMB
      • Mit Maschenschicht füllen
      • Scale of imported curves
    • Windows-Menü
      • Windows-Popup-Bedienfelder mit Registerkarten
      • Schieberegler
    • Scripts
    • Addons
    • Capture
    • Hilfemenü
    • Anpassung
    • Raum ändern oder neu erstellen
  • Brush
    • Brush Top-Leiste
    • Bürsten allgemeine Verwendung
      • Erstellen Sie Pinsel und Abziehbilder
      • Aus der aktuellen Skulptur Alpha machen
      • Erstellen Sie einen Brush aus einem 3D-Objekt
      • Create brushes based on Curves
      • Load photoshop .abr brushes
    • Striche
      • Kurven-Popup-Menü
    • Brush
    • Bedingungen-Limiter
    • Streifen-Panel
    • Schablonen-Panel
    • Intelligente Materialien
      • Fügen Sie neue Bilder oder Materialien hinzu
      • Hängen Sie ein Smart-Material an eine Ebene an
      • Import Quixel Material
    • So erstellen Sie Voreinstellungen für Brush
  • Arbeitsbereiche Räume
    • Painting
      • Painting & Modi
        • Per-Pixel Painting
        • Displacement Painting (Mikro-Vertex)
        • Ptex Painting
        • Painting (Polypainting)
      • Importieren in den Painting
        • Initial CC subdivision
        • UV Set smoothing
        • Sharp (hard) edge
        • Normalen sperren
        • Laden Sie nach Modelländerungen ein neues UV Layout
        • DAZ Genesis models into 3DCoat
        • ID map
      • Menüs des Painting Arbeitsbereichs
        • Edit menu
        • Texturen-Menü
          • Baking für Texturen
        • Verstecken
        • Menü für die Bake Paint
        • Der Farbwähler
      • Obere Leiste für das Painting
      • Das Ebenenbedienfeld
        • Das Blending-Panel
        • Layer and Clipping Masks
      • Painting Werkzeuge
      • Deckkraft – Transparenz
      • Arbeitsbereich optimieren
        • Tweak-Toolset
        • Exportieren aus dem Tweak Room
      • Masken-/Materialvorschaufenster
      • Exportieren aus dem Painting
    • UV Arbeitsbereich
      • UV Leiste oben
      • UV Linkes Werkzeugfeld
      • UV Vorschaufenster
      • Beispiel für einen UV Workflow
      • Importieren in den UV Raum
      • Exportieren aus dem UV Raum
    • Retopologie
      • Importieren in den Retopo Raum
      • Retopo Mesh-Menü und Bake-Menü
        • Virtueller Spiegelmodus
      • Bake menu
        • Treat Poly Groups as Paint Objects
        • Baking guide
      • Obere Leiste
        • Geometrie auswählen
      • Linke Werkzeugtafel im Retopologieraum
        • Gesamtzweck und Funktion
        • Geometrie hinzufügen
          • Striche-Werkzeug in Retopology
        • Retopo Tweak-Tools
        • UV Werkzeuge
        • Befehle für den Retopologieraum
      • AUTORETOPO
        • Autopo guide
      • Poly-Gruppen
    • Bildhauen
      • Sculpt Layer
      • Baum formen
      • Brush Optionen
      • Top Bar
      • Brush
      • Geometrie-Untermenü
      • Gestalten Sie das „Rechtsklick“-Menü
      • Shader
      • Voxel Modus
        • Reines Voxel Sculpting
        • Dichte und Auflösung
        • Ton-Motor
        • Voxel -Tools
        • Oberflächenwerkzeuge auf Voxeln
        • Voxel Anpassungswerkzeuge
        • Volumetrische Painting
        • Voxel Objekte-Tools
      • Oberflächenmodus
        • Oberflächenwerkzeuge
        • Benutzerdefinierte Oberflächenwerkzeuge
        • Werkzeuge zur Oberflächenanpassung
        • Painting
        • Werkzeuge für Oberflächenobjekte
        • Mehrstufige Auflösung
          • Multires tools
          • Multires adjust
          • Multires commands
      • Kurven formen
        • Spline-Kurven
        • Splines model creation
      • Vektorverschiebung
      • Werkzeuge zur Oberflächentransformation
        • Voxel Transformationswerkzeuge
        • Instancer
        • Move
        • Pose
        • Fit
        • Reproject
        • Surface Array
      • Voxel Primitive und Import Tools
      • Live-Boolesche Werte
      • Befehle für den Sculpt-Raum
      • In Sculpt Room Import
      • Exportieren aus dem Sculpt Room
    • Machen
      • Comparison of different roughness values
      • Funktionen des Renderbereichs
      • Drehscheibe
      • Fakebake die Beleuchtung – kein PBR–
    • Factures
      • Arbeitsablauf
    • Am einfachsten
    • Modellieren
      • Mesh Menu
      • Linke Werkzeugtafel im Modellierungsraum
        • Geometrie hinzufügen
          • Ausgewählt
        • Optimieren
        • Smart Hybrid
        • UV
          • Befehle
        • Gesamtes Netz
      • Loft-Oberflächenbeispiel von Fluffy
      • Blockout von Poeboi
      • Import Zbrush Polygroups for UV mapping
    • Kitbash - Schnelle Erstellung von 3D-Modellen
      • Create kitbash
      • Left tool panel Kitbash
    • 3DPrint
    • Photogrammetry
      • How to install Reality Capture
      • Reality Capture doesn’t show up ?
    • Mesh zum NURBS-Raum
    • Nodes
      • Sculpt-Shader Nodes Library
  • Scripting und Core API
    • Scripting
    • Core API
    • Python-API
  • Kostenloser 3DCoatPrint

Sculpt Layer

781 views 2

Written by Carlos
October 15, 2024

Layers are used to add detail to our sculpt model but maintain the original form of the object you’re working with.

You can make layers for texture/damage/detail and if you decide to make changes entirely or create a different look altogether you can remove the layers and make new ones while maintaining your original object.

Sculpt layers are only for surface mode object.

The layers panel at the bottom is multi-purchase.

1. In “Surface Mode” you can have non-destructive sculpting layers, the original sculpt layer object is not altered. Shown in the quick limited video but gives you the idea how it works.

Simple Example:
You have a head object completed. Now you can add wrinkles pores etc, non-destructively.
Plus you can add asymmetrical work to the head without altering the symmetrical base head model.  Sculpt layers are indeed powerful.

2. For surface mode or voxel painting. 

The above is not a tutorial or the best practice of using the layers panel mentioned above.

Side Note. Create a simple model and test the sculpt layers out to see how it works yourself.
Of course, you are not limited to fine details.


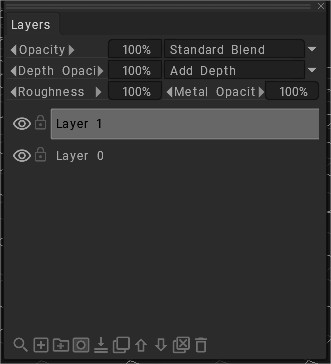
One thing to mention though is never use layer 0, it is for 3DC’s internal use.

When testing the paint mode be sure to select Under the paint room View menu > Show voxels in the painting room.
Your voxel or surface mode will disappear otherwise.

The Sculpt tree panel indicates it is effectively a Hierarchy panel, much like the Outliner panel in Maya or 3ds Max.

The LAYER panel is just like Photoshop’s Layer panel. It stores paint information, as well as Sculpt/Depth information.

We often say “layer” in reference to an object in the Sculpt Tree panel, because it’s the most descriptive name for it, because calling it an OBJECT would not be totally accurate, since you can have multiple objects on the same “Layer”.

So, I guess you would consider it an OBJECT LAYER. 

Tutorials


Preserving Sculpt Layers (When Switching to Voxel Mode): This video demonstrates a method artists can use to preserve Sculpt Layers while switching from Surface mode to Voxel mode… which would otherwise nullify the Sculpt Layer information.

Building Quick Terrains using adjustment layers: This is part of how to build quick and easy terrains in 3DCoat.
I will be going over working with higher quality terrain maps and using adjustment layers to help give more artist controls over the final look of the terrain.

Was this helpful?

2 Yes  No
Related Articles
  • Factures
  • ID map
  • Surface Array
  • Top Bar
  • Curves Properties RMB
  • Left tool panel Kitbash
Previously
Bildhauen
Up Next
Baum formen
AI:
Hi! How can I help you?
Attention: This is a beta version of AI chat. Some answers may be wrong. See full version of AI chat