• Magyar
  • 3DCoat dokumentáció
  • Chapters
    • A 3DCoat bemutatása
    • Elkezdeni
    • Interfész és navigáció
    • Brush alkatrészek
    • Node System
    • GPU Texturing
    • Munkaterületek Szobák
    • Scripting & Core API
    • Kérdések és válaszok
    • Licensing
  • Learn
    • Getting Started
    • Painting
    • Sculpt
    • Modeling
    • Retopology
    • UV
    • Smart Materials
    • Nodes
    • Photogrammetry
    • Render
    • Print
    • Learning
    • Képzési oktatóanyagok
  • Blog
    • 2026 Key Features and Improvements
    • Texturing with nodes
    • Shader Nodes VS. a Material Nodes
    • Multiple UV Tiles/UDIMs to one single UV set ?
    • I want to create geometry only with displacement to be manufactured with a CNC machine
    • Creating 3D Character Using 3DCoat
    • DAZ Genesis models into 3DCoat
    • Cavity and Curvature maps
    • Types of normal maps
    • Texture painting pipeline
    • Load new UV layout After Model Changes
    • Import Zbrush Polygroups for UV mapping
  • Products
    • 3DCoat
    • 3DCoatTextura
    • 3DCoatPrint
    • PBRLibrary
  • Store
  • Pilgway
  • Magyar Magyar
    • English English
    • Українська Українська
    • Español Español
    • Deutsch Deutsch
    • Français Français
    • 日本語 日本語
    • Русский Русский
    • 한국어 한국어
    • Polski Polski
    • 中文 (中国) 中文 (中国)
    • Português Português
    • Italiano Italiano
    • Suomi Suomi
    • Svenska Svenska
    • 中文 (台灣) 中文 (台灣)
    • Dansk Dansk
    • Slovenčina Slovenčina
    • Türkçe Türkçe
    • Nederlands Nederlands
    • ไทย ไทย
    • हिन्दी हिन्दी
    • Ελληνικά Ελληνικά
    • Tiếng Việt Tiếng Việt
    • Lietuviškai Lietuviškai
    • Latviešu valoda Latviešu valoda
    • Eesti Eesti
    • Čeština Čeština
    • Română Română
    • Norsk Bokmål Norsk Bokmål
  • 3DCoat dokumentáció
  • Chapters
    • A 3DCoat bemutatása
    • Elkezdeni
    • Interfész és navigáció
    • Brush alkatrészek
    • Node System
    • GPU Texturing
    • Munkaterületek Szobák
    • Scripting & Core API
    • Kérdések és válaszok
    • Licensing
  • Learn
    • Getting Started
    • Painting
    • Sculpt
    • Modeling
    • Retopology
    • UV
    • Smart Materials
    • Nodes
    • Photogrammetry
    • Render
    • Print
    • Learning
    • Képzési oktatóanyagok
  • Blog
    • 2026 Key Features and Improvements
    • Texturing with nodes
    • Shader Nodes VS. a Material Nodes
    • Multiple UV Tiles/UDIMs to one single UV set ?
    • I want to create geometry only with displacement to be manufactured with a CNC machine
    • Creating 3D Character Using 3DCoat
    • DAZ Genesis models into 3DCoat
    • Cavity and Curvature maps
    • Types of normal maps
    • Texture painting pipeline
    • Load new UV layout After Model Changes
    • Import Zbrush Polygroups for UV mapping
  • Products
    • 3DCoat
    • 3DCoatTextura
    • 3DCoatPrint
    • PBRLibrary
  • Store
  • Pilgway
  • Magyar Magyar
    • English English
    • Українська Українська
    • Español Español
    • Deutsch Deutsch
    • Français Français
    • 日本語 日本語
    • Русский Русский
    • 한국어 한국어
    • Polski Polski
    • 中文 (中国) 中文 (中国)
    • Português Português
    • Italiano Italiano
    • Suomi Suomi
    • Svenska Svenska
    • 中文 (台灣) 中文 (台灣)
    • Dansk Dansk
    • Slovenčina Slovenčina
    • Türkçe Türkçe
    • Nederlands Nederlands
    • ไทย ไทย
    • हिन्दी हिन्दी
    • Ελληνικά Ελληνικά
    • Tiếng Việt Tiếng Việt
    • Lietuviškai Lietuviškai
    • Latviešu valoda Latviešu valoda
    • Eesti Eesti
    • Čeština Čeština
    • Română Română
    • Norsk Bokmål Norsk Bokmål
Expand All Collapse All
  • A 3DCoat bemutatása
  • Elkezdeni
    • System requirements
    • Why 3DCoat is Unique?
    • A 3DCoat aktiválása
    • Indítási hiba
      • Startup error Mac
    • Color management
    • Upgrading permanent license
    • Linux Setup
      • Linux initial setup per-user installation
      • Linux initial setup for system
      • Tablet setup
      • To GTK3 from GTK2
      • Error libicuuc.so.70
    • Mappák szerkezete
      • Custom documents folder
    • A „felbontás” különböző formái
    • Tablet on Window
    • Import & Export
    • Applinks 3DCoat
      • Blender alkalmazáslink
        • Blender with the Applink in Linux
      • Blender 4.2/3/4/5 applink
      • Max Applink
      • Houdini applink
      • Lightwave uplink
  • Navigation
    • Párbeszédpanel megnyitása (Gyorsindítás menü)
    • Navigációs panel
    • Kamera és navigáció
      • Customize Navigation as Blender
    • Left tool panel
    •  Activity Bar
    • Navigáció 3DConnexion eszközökkel
      • How to compile Spacenavd on non Ubuntu distro
    • Quick Access Menu
    • Stylus doesn’t work in sculpting
    • Gyorsbillentyűk
  • Interfész és navigáció
    • Fájl menü
    • Szerkesztés menü
      • Bake Geometry Info
      • Calculate Occlusion
      • Calculate Curvature
      • Light Baking Tool
      • preferenciák
    • Nézet menü
    • Szimmetria
    • Textures
    • Calculate
    • Rétegek menü
    • Menü befagyasztása
    • Hide
    • Bake
    • Görbék 2022
      • Görbék menü
      • Curves Properties RMB
      • Töltsük meg hálós réteggel
      • Scale of imported curves
    • Windows menü
      • Lapos Windows előugró panelek
      • Csúszkák
    • Scripts
    • Addons
    • Capture
    • Súgó menü
    • Testreszabás
    • Módosítás vagy új szoba létrehozása
  • Brush alkatrészek
    • Brush Top Bar
    • Kefék általános használatra
      • Készítsen ecsetet és matricákat
      • Alfa készítése a jelenlegi szoborból
      • Brush létrehozása 3D objektumból
      • Create brushes based on Curves
      • Load photoshop .abr brushes
    • Strokes
      • Curves felugró menü
    • Brush opciók
    • Feltételek korlátozója
    • Strips Panel
    • Stencilek panel
    • Intelligens anyagok
      • Új képek vagy anyagok hozzáadása
      • Rögzítsen egy Smart anyagot egy réteghez
      • Import Quixel Megascans
    • Hogyan készítsünk előbeállításokat az Brush
  • Node System
    • Node Editor
    • Node & Object Inspectors
    • Node Graph
    • NodeGraph Language (NGL)
    • GPU Nodes
      • Color
      • GeometryIn
      • In
      • Layer
      • Material
      • Out
      • Pattern
      • Pattern3D
      • ShaderToy
      • Shape
      • Texture
      • Tilable
      • UV
      • Math
    • Filters
    • Masks
    • Materials
    • Modifiers
    • Volumes
  • Ingyenes 3DCoatPrint
  • GPU Texturing
    • PBM Channels
    • Per-Pixel Painting
  • Munkaterületek Szobák
    • Painting
      • Textúra Painting és módok
        • Per-Pixel Painting
        • Eltolásos Painting (Micro-Vertex)
        • Ptex Painting
        • Painting (polifestés)
      • Importálás a Painting
        • Initial CC subdivision
        • UV Set smoothing
        • Sharp (hard) edge
        • Normál zárolás
        • Új UV elrendezés betöltése a modellváltások után
        • DAZ Genesis models into 3DCoat
        • ID map
      • A Painting munkaterület menüi
        • Edit menu
        • Textúrák menü
          • Textúra Baking
        • Elrejt
        • Menü a Bake Paint
        • A Színválasztó
      • Surface Materials
      • Felső sáv a Painting
      • A Rétegek panel
        • A keverési panel
        • Layer and Clipping Masks
      • Painting Eszközök
      • Átlátszatlanság – Átlátszóság
      • A munkaterület finomítása
        • Tweak Toolset
        • Exportálás a Tweak Room-ból
      • Maszk/anyag előnézeti panel
      • Exportálás a Painting
    • UV munkaterület
      • UV felső sáv
      • UV Bal oldali szerszám panel
      • UV előnézeti panel
      • UV munkafolyamat példa
      • Importálás az UV szobába
      • Exportálás az UV teremből
    • Retopológia
      • Importálás a Retopo szobába
      • Retopo Mesh Menu és Bake Menu
        • Virtuális tükör mód
      • Bake menu
        • Treat Poly Groups as Paint Objects
        • Baking guide
      • Strokes eszköz a retopológiában
      • Legjobb bár
        • Válassza ki a geometriát
      • Bal oldali eszközpanel a Retopológia szobában
        • Általános cél és funkció
        • Geometria hozzáadása
        • Retopo Tweak Tools
        • UV eszközök
        • Parancsok a Retopológiai szoba számára
      • AUTORETOPO
        • Autopo guide
      • Poli csoportok
    • Farag
      • Sculpt Layer
      • Sculp Tree
      • Sculpt Brush opciók
      • Top Bar
      • Brush motor
      • Geometria almenü
      • Alakítsa ki a „jobb gombbal” menüt
      • Árnyékolók
      • Voxel mód
        • Pure Voxel Sculpting
        • Sűrűség és felbontás
        • Clay Engine
        • Voxel eszközök
        • Felületi eszközök a Voxeleken
        • Voxel beállítási eszközök
        • Volumetrikus Painting
        • Voxel objektumok eszközök
      • Felszíni mód
        • Felületi szerszámok
        • Felületi egyedi szerszámok
        • Surface Layer
        • Felületbeállító eszközök
        • Painting
        • Többszintű felbontás
          • Multires tools
          • Multires adjust
          • Multires commands
      • Faragni görbék
        • Spline görbék
        • Splines model creation
      • vektor elmozdulás
      • Felületátalakítási eszközök
        • Voxel transzformációs eszközök
        • Instancer
        • Move
        • Pose
        • Fit
        • Reproject
        • Surface Array
      • Voxel primitívek és Import eszközök
        • Hollow Box
      • Élő logikai értékek
      • Parancsok a Sculpt szobához
      • Import a Sculpt Roomba
      • Exportálás a Szobrászteremből
    • Vakol
      • Comparison of different roughness values
      • Render Panel Funkciók
      • Lemezjátszó
      • Fakebake a világítás - nem PBR-
    • Factures
      • Munkafolyamat
    • A legegyszerűbb
    • Modellezés
      • Mesh Menu
      • Bal oldali eszközpanel a modellező szobában
        • Geometria hozzáadása
          • Make Joints
          • Kiválasztott
        • Csípés
        • Smart Hybrid
        • UV
          • Parancsok
        • Teljes háló
      • Példa a tetőtéri felületre a Fluffy által
      • Blokkolás Poeboi által
      • Import Zbrush Polygroups for UV mapping
    • Kitbash – Gyors 3D modellek létrehozása
      • Create kitbash
      • Left tool panel Kitbash
    • 3DPrint
    • Photogrammetry
      • How to install Reality Capture
      • Reality Capture doesn’t show up ?
    • Háló a NURBS szobához
    • Nodes
      • Texturing with nodes
      • Sculp shader Nodes Library
      • Open PBR
  • Scripting & Core API
    • Core API
    • Python API
    • Extensions and Addons

Bake Geometry Info

23 views 0

Written by Carlos
August 2, 2026

Geometry baking info is the process of saving 3D surface details like normals, curvature, and ambient occlusion.

Geometry baking info is the process of saving physical shape details from a 3D model, such as surface curves, edges, and high-resolution details, into flat 2D image files called texture maps.
3D surface details like normals, curvature, and ambient occlusion are saved for internal calculations. This baking process is needed when you work using Material nodes.
How Baking Works

  • High and Low Models: You compare a very detailed high-polygon mesh with a simple low-polygon mesh.
  • Ray Casting: Software shoots invisible lines (rays) from the low-poly surface to find where the high-poly surface sits.
  • Data Saving: The captured depth and angle data are saved into maps like normal maps, displacement maps, or ambient occlusion maps

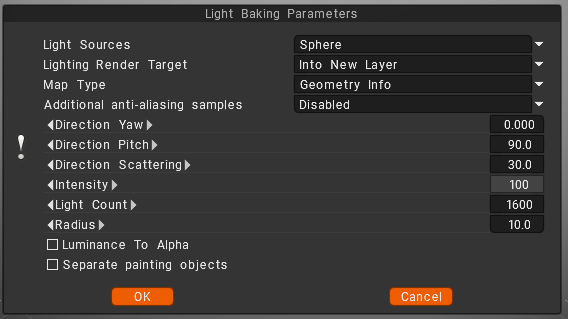
Light sources (distribution of lights)

  • over the hemisphere
  • over the sphere
  • over hemisphere + sphere

Lighting render target

You must choose a layer to which the occlusion calculation is placed. Can choose to add a new layer automatically or overwrite the current layer.
– In the first case, you do not forget to delete a new layer for light calculation. Also, a new color option, “To time,” is installed for a new layer.
– In the case of rendering the former layer, all its color information will be deleted.
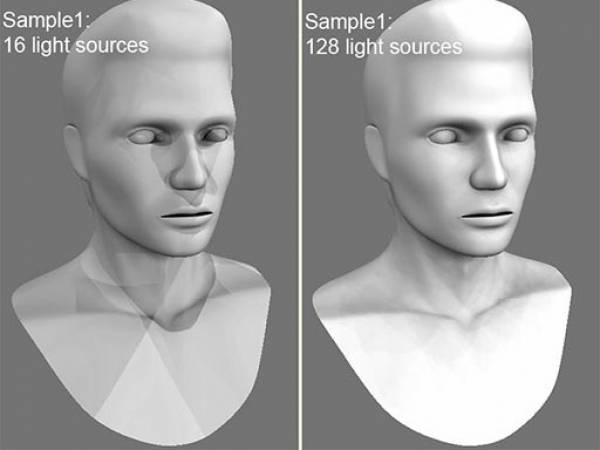
Lights count: The more lights, the longer the calculation. The more light sources there are the better the quality of lighting and the longer its calculation.
The maximum value is 256, and the minimum value is 16.

Additional anti-aliasing samples: Amount of post-smoothing steps after occlusion calculation. The calculation will be used the texture several times bigger. This allows you to get rid of some artifacts if there are too small UV islands or long pixels.
Warning: this function will slow down the calculation and consume more RAM and VRAM.

Direction Yaw: Yaw means turning or rotating an object left or right around a vertical axis (like shaking your head “no”). It defines the compass direction or heading that the front of an object is facing.
Direction Pitch: Pitch is the vertical tilt angle that determines if a direction or object points:

  • Up (positive tilt)
  • Down (negative tilt)
  • Flat/Horizontal (zero degrees)

Direction Scattering: Scattering, waves, light, or particles spread out in a full three-dimensional space (x, y, and z directions) after hitting an object.
Intensity: Intensity means the strength of the signal, light, or reflection returned at a specific 3D point or voxel (3D pixel).
Light count: is the total number of active light sources (like points, spots, or directional lights) illuminating a scene or allowed per object.
Radius: a light’s radius controls source size and falloff distance, which determine shadow softness and the area the light reaches.

Luminance to Alpha: turn the brightness (light and dark parts) of an image into a transparency mask.
Bright white areas become solid, dark black areas become see-through (transparent), and gray areas become partly see-through.
Separate paint objects: Explode the object on parts to avoid wrong AO contact projections.

Was this helpful?

Yes  No
Related Articles
  • Make Joints
  • Texturing with nodes
  • Hollow Box
  • GPU Texturing
  • Math
  • Volumes
Previously
Szerkesztés menü
Up Next
Calculate Occlusion
AI:
Hi! How can I help you?
Attention: This is a beta version of AI chat. Some answers may be wrong. See full version of AI chat