• Italiano
  • Documentazione 3DCoat
  • Chapters
    • Introduzione a 3DCoat
    • Iniziare
    • Interfaccia e navigazione
    • Componenti Brush
    • Aree di lavoro Stanze
    • Scripting e Core API
    • Domande e risposte
    • licensing
    • Tutorial di formazione
  • Pilgway
  • Products
    • 3DCoat
    • 3DCoatTextura
    • 3DCoatPrint
    • PBRLibrary
  • Blog Posts
  • Store
  • Italiano Italiano
    • English English
    • Українська Українська
    • Español Español
    • Deutsch Deutsch
    • Français Français
    • 日本語 日本語
    • Русский Русский
    • 한국어 한국어
    • Polski Polski
    • 中文 (中国) 中文 (中国)
    • Português Português
    • Suomi Suomi
    • Svenska Svenska
    • 中文 (台灣) 中文 (台灣)
    • Dansk Dansk
    • Slovenčina Slovenčina
    • Türkçe Türkçe
    • Nederlands Nederlands
    • Magyar Magyar
    • ไทย ไทย
    • हिन्दी हिन्दी
    • Ελληνικά Ελληνικά
    • Tiếng Việt Tiếng Việt
    • Lietuviškai Lietuviškai
    • Latviešu valoda Latviešu valoda
    • Eesti Eesti
    • Čeština Čeština
    • Română Română
    • Norsk Bokmål Norsk Bokmål
  • Creating 3D Character Using 3DCoat
Expand All Collapse All
  • Introduzione a 3DCoat
  • Iniziare
    • System requirements
    • Why 3DCoat is Unique?
    • Attivazione di 3DCoat
    • Errore di avvio
      • Startup error Mac
    • Color management
    • Upgrading permanent license
    • Linux Setup
      • Linux initial setup per-user installation
      • Linux initial setup for system
      • Tablet setup
      • To GTK3 from GTK2
    • Struttura delle cartelle
      • Custom documents folder
    • Diverse forme di "risoluzione"
    • Tablet on Window
    • Import ed Export
    • Applinks in 3DCoat
      • Collegamento all'app Blender
        • Blender with the Applink in Linux
      • Blender 4.2/3/4/5 applink
      • Max Applink
      • Houdini applink
      • Lightwave uplink
  • Navigation
    • Finestra di dialogo di apertura (menu di avvio rapido)
    • Pannello di navigazione
    • Fotocamera e navigazione
      • Customize Navigation as Blender
    • Viewport Navigation Gizmo
    • Left tool panel
    •  Activity Bar
    • Navigazione tramite dispositivi 3DConnexion
      • How to compile Spacenavd on non Ubuntu distro
    • Stylus doesn’t work in sculpting
    • Tasti di scelta rapida
  • Interfaccia e navigazione
    • Menù File
    • Menù Modifica
      • Calculate Curvature
      • Calculate Occlusion
      • Light Baking Tool
      • Preferenze
    • Visualizza Menù
    • Simmetria
    • Textures
    • Calculate
    • Menù Livelli
    • Congela il menu
    • Hide
    • Bake
    • Curve 2022
      • Menù Curve
      • Curves Properties RMB
      • Riempi con uno strato di rete
      • Scale of imported curves
    • Menù di Windows
      • Pannelli popup di Windows a schede
      • Cursori
    • Scripts
    • Addons
    • Capture
    • Menù di aiuto
    • Personalizzazione
    • Modifica o crea una nuova stanza
  • Componenti Brush
    • Brush superiore
    • Spazzole uso generale
      • Crea pennelli e decalcomanie
      • Creare alfa dalla scultura attuale
      • Crea un Brush da un oggetto 3D
      • Create brushes based on Curves
      • Load photoshop .abr brushes
    • Colpi
      • Menu a comparsa Curve
    • Opzioni Brush
    • Limitatore di condizioni
    • Pannello a strisce
    • Pannello degli stampini
    • Materiali intelligenti
      • Aggiungi nuove immagini o materiali
      • Attacca un materiale Smart a un livello
      • Import Quixel Material
    • Come creare i preset per il Brush
  • Aree di lavoro Stanze
    • Painting
      • Texture Painting e modalità
        • Painting Per-Pixel
        • Painting di spostamento (micro-vertice)
        • Painting Ptex
        • Painting superficiale (polipittura)
      • Importazione nella stanza Painting
        • Initial CC subdivision
        • UV Set smoothing
        • Sharp (hard) edge
        • Blocca normali
        • Carica il nuovo layout UV dopo le modifiche al modello
        • DAZ Genesis models into 3DCoat
      • Menu dell'area di lavoro Painting
        • Edit menu
        • Menù Texture
          • Strumenti Baking delle trame
        • Nascondere
        • Menu per il Bake Paint
        • Il selettore di colori
      • Barra superiore per la Painting
      • Il pannello Livelli
        • Il pannello di fusione
        • Layer and Clipping Masks
      • Strumenti della stanza Painting
      • Opacità - Trasparenza
      • Modifica l'area di lavoro
        • Strumenti di modifica
        • Esportazione dalla Tweak Room
      • Pannello anteprima maschera/materiale
      • Esportazione dalla stanza Painting
    • Area di lavoro UV
      • Barra superiore UV
      • Pannello strumenti sinistro UV
      • Pannello di anteprima UV
      • Esempio di flusso di lavoro UV
      • Importazione nella stanza UV
      • Esportazione dalla sala UV
    • Retopologia
      • Importazione nella Sala Retopo
      • Retopo Mesh Menu e Bake Menu
        • Modalità specchio virtuale
      • Bake menu
        • Treat Poly Groups as Paint Objects
        • Baking guide
      • Barra superiore
        • Seleziona la geometria
      • Pannello degli strumenti a sinistra nella stanza Retopology
        • Scopo generale e funzione
        • Aggiungi geometria
          • Strumento Tratti in Retopology
        • Strumenti di modifica Retopo
        • Strumenti UV
        • Comandi per la stanza Retopology
      • AUTORETOPO
        • Autopo guide
      • Poli gruppi
    • Scolpire
      • Sculpt Layer
      • Scolpire l'albero
      • Opzioni Brush scultura
      • Top Bar
      • Motore a Brush
      • Sottomenu Geometria
      • Scolpisci il menu "tasto destro".
      • Shader
      • Modalità Voxel
        • Scultura in puro Voxel
        • Densità e risoluzione
        • Motore di argilla
        • Strumenti Voxel
        • Strumenti di superficie su Voxel
        • Strumenti di regolazione Voxel
        • Painting volumetrica
        • Strumenti per gli oggetti Voxel
      • Modalità superficie
        • Strumenti di superficie
        • Strumenti personalizzati di superficie
        • Strumenti di regolazione della superficie
        • Painting superficiale
        • Strumenti degli oggetti di superficie
        • Risoluzione multilivello
          • Multires tools
          • Multires adjust
          • Multires commands
      • Scolpisci le curve
        • Curve spline
        • Splines model creation
      • Spostamento del vettore
      • Strumenti di trasformazione della superficie
        • Strumenti di trasformazione Voxel
        • Instancer
        • Move
        • Pose
        • Fit
        • Reproject
        • Surface Array
      • Primitive Voxel e strumenti Import
      • Booleani in tempo reale
      • Comandi per la stanza Sculpt
      • Import in Sculpt Room
      • Esportazione dalla Sculpt Room
    • Rendering
      • Comparison of different roughness values
      • Funzioni del pannello di rendering
      • Giradischi
      • Fakebake l'illuminazione -non PBR
    • Factures
      • Flusso di lavoro
    • Più semplice
    • Modellazione
      • Mesh Menu
      • Pannello degli strumenti a sinistra nella stanza Modellazione
        • Aggiungi geometria
          • Selezionato
        • Modificare
        • Smart Hybrid
        • UV
          • Comandi
        • Intera maglia
      • Esempio di superficie loft di Fluffy
      • Blocco di Poeboi
      • Import Zbrush Polygroups for UV mapping
    • Kitbash - Creazione rapida di modelli 3D
      • Create kitbash
      • Left tool panel Kitbash
    • 3DPrint
    • Photogrammetry
      • How to install Reality Capture
      • Reality Capture doesn’t show up ?
    • Mesh nella stanza NURBS
    • Nodes
      • Scolpisci la libreria dei nodi degli shader
  • Scripting e Core API
    • Scripting
    • Core API
    • API Python
  • 3DCoatPrint gratuito

Blender 4.2/3/4/5 applink

4878 views 1

Written by Carlos
July 31, 2024

Blender AppLink updated to be able to exchange data with 3DCoat just from scratch install.

So, just install 3DCoat, Blender, follow what 3DCoat tells (easy to follow) and then you may easily drop assets to Blender, including Factures.

Import/Export Scale Applink


If the model size is to big when you GetBack the mesh to Blender, change this on preferences.

The popup warning refers to this values

On preferences I/O

On Export PPP

Installation folders


There are 2 new paths in Blender: 

1. addons_core (shipped with blender) or 
2. the new extensions folder from blender.

You need to use the extensions folder.

Put the files shared on github in the extension folder. This is the Blender app link (4.2, 4.3) shipped with the 3DCoat.
All changes there are automatically included in the 3DCoat’s distro.

Blender portable


If you have blender 4.2/3 portable and all the config and extensions are in portable folder, the python pop-up menu warning about data.json not found.

Do this workaround:

Created a symbolic link to where the program wanted the data.json file to be. ie C:\Users\admin\AppData\Roaming\Blender Foundation\Blender\4.3\extensions\blender_org\coat_applink\data.json

Don’t make the symbolic link only for the data.json file but the whole folder coat_applink.

Folders for Applink


There are a lot of folders for Applink. I try to clarify the dependencies in the Image. The most important file/folders seem to be:

->’documents\3DC2Blender\exchange_folder.txt’
->’documents\Applinks\3D-Coat\Exchange\’ 

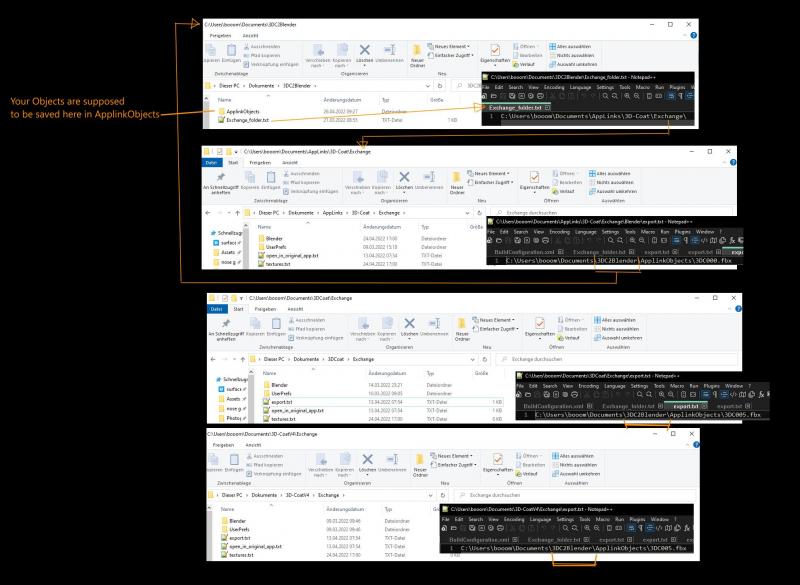
Look If you have the same or similar folders. If Applink is not working, then one of the files is maybe pointing to wrong or outdated direction.

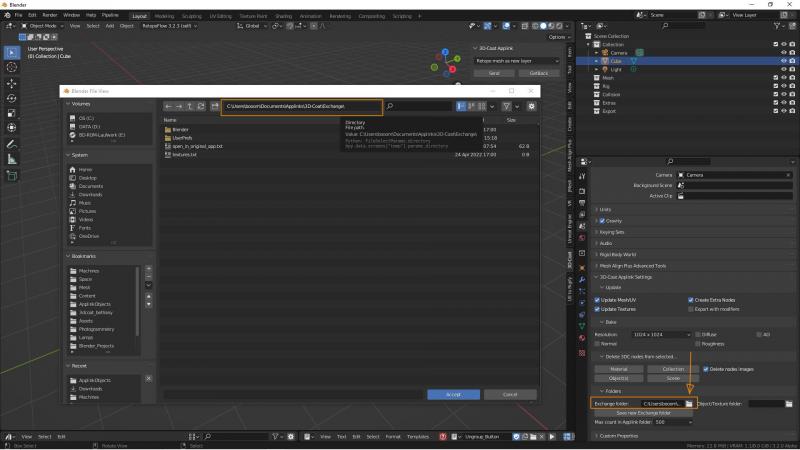
3. Open Blender and make sure 3DC Plugin is enabled. Then look on the right for scene properties. There you can set the exchange Folder, which should be:

C:\Users\’Username’\Documents\Applinks\3D-Coat\Exchange\
The other ‘Object/Texture’ Field can be left empty.

4. Open 3DCoat, we take Modelling Room.

5. Back in Blender select the fancy Cube. In the 3D View ‘Applink Window’ select ‘Retopo mesh as new layer’ and Send.

6. In 3DCoat you should now see the placement arrow.
Scale it Up or Down to see if something arrived in Coat and hit Apply. There should now be a new layer named ‘__something’.

7. If you get so far then there should be ‘Export to Blender’ under File.
If 3DCoat asks for a filename it is working. The Folder should already be ‘ApplinkObjects’.

8. Choose Name and use fbx format.

9. In Blender hit ‘GetBack’ from Retopo.

10. On new versions the last step changed a little. Before had send the mesh from Blender to 3DCoat, to get Getback applink working, you need to use this command first: File > Open in external app.
Do not use Export to Blender and then GetBack.

Missing folder Applink


To anyone who is missing the ‘Export to: Blender’ Button in 3DCoat 2024

For it to work you need to have a folder called ‘Blender’ in the Exchange folder.
Or setup Applink manually because of the portable Blender Versions. 

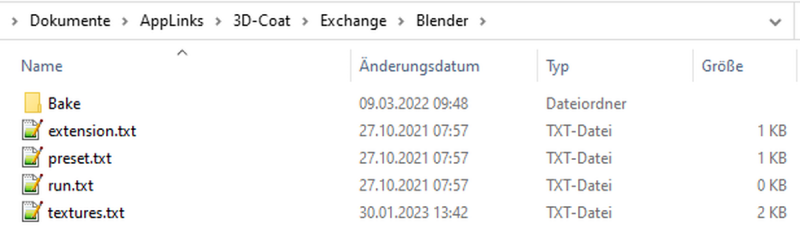
Bake: is an empty folder
extension.txt: contains three letters ‘fbx’ without the quotes
preset.txt: contains ‘Blender Cycles’ without the quotes
run.txt and texture.txt are both empty.

Tags:blender 4.2

Was this helpful?

1 Yes  12 No
Related Articles
  • Surface Array
  • Top Bar
  • Curves Properties RMB
  • Left tool panel Kitbash
  • Create kitbash
  • Color management
Previously
Blender with the Applink in Linux
Up Next
Max Applink
AI:
Hi! How can I help you?
Attention: This is a beta version of AI chat. Some answers may be wrong. See full version of AI chat