• Polski
  • Dokumentacja 3DCoat
  • Chapters
    • Wprowadzenie do 3DCoat
    • Pierwsze kroki
    • Interfejs i nawigacja
    • Komponenty Brush
    • Pomieszczenia robocze
    • Scripting i Core API
    • Pytania i Odpowiedzi
    • licensing
    • Samouczki szkoleniowe
  • Pilgway
  • Products
    • 3DCoat
    • 3DCoatTextura
    • 3DCoatPrint
    • PBRLibrary
  • Blog Posts
  • Store
  • Polski Polski
    • English English
    • Українська Українська
    • Español Español
    • Deutsch Deutsch
    • Français Français
    • 日本語 日本語
    • Русский Русский
    • 한국어 한국어
    • 中文 (中国) 中文 (中国)
    • Português Português
    • Italiano Italiano
    • Suomi Suomi
    • Svenska Svenska
    • 中文 (台灣) 中文 (台灣)
    • Dansk Dansk
    • Slovenčina Slovenčina
    • Türkçe Türkçe
    • Nederlands Nederlands
    • Magyar Magyar
    • ไทย ไทย
    • हिन्दी हिन्दी
    • Ελληνικά Ελληνικά
    • Tiếng Việt Tiếng Việt
    • Lietuviškai Lietuviškai
    • Latviešu valoda Latviešu valoda
    • Eesti Eesti
    • Čeština Čeština
    • Română Română
    • Norsk Bokmål Norsk Bokmål
  • Creating 3D Character Using 3DCoat
Expand All Collapse All
  • Wprowadzenie do 3DCoat
  • Pierwsze kroki
    • System requirements
    • Why 3DCoat is Unique?
    • Aktywacja 3DCoat
    • Błąd uruchamiania
      • Startup error Mac
    • Color management
    • Upgrading permanent license
    • Linux Setup
      • Linux initial setup per-user installation
      • Linux initial setup for system
      • Tablet setup
      • To GTK3 from GTK2
    • Struktura folderów
      • Custom documents folder
    • Różne formy „rezolucji”
    • Tablet on Window
    • Import i Export
    • Applinks w 3DCoat
      • Link do aplikacji Blender
        • Blender with the Applink in Linux
      • Blender 4.2/3/4/5 applink
      • Max Applink
      • Houdini applink
      • Lightwave uplink
  • Navigation
    • Otwieranie okna dialogowego (menu szybkiego startu)
    • Panel nawigacyjny
    • Aparat i nawigacja
      • Customize Navigation as Blender
    • Viewport Navigation Gizmo
    • Left tool panel
    •  Activity Bar
    • Nawigacja za pomocą urządzeń 3DConnexion
      • How to compile Spacenavd on non Ubuntu distro
    • Stylus doesn’t work in sculpting
    • Skróty klawiszowe
  • Interfejs i nawigacja
    • Menu plików
    • Edytuj menu
      • Calculate Curvature
      • Calculate Occlusion
      • Light Baking Tool
      • Preferencje
    • Wyświetl menu
    • Symetria
    • Textures
    • Calculate
    • Menu Warstwy
    • Zamroź menu
    • Hide
    • Bake
    • Krzywe 2022
      • Menu krzywych
      • Curves Properties RMB
      • Wypełnij warstwą siatki
      • Scale of imported curves
    • Menu Windowsa
      • Panele wyskakujące systemu Windows z kartami
      • Suwaki
    • Scripts
    • Addons
    • Capture
    • Menu pomocy
    • Dostosowywanie
    • Zmodyfikuj lub utwórz nowy pokój
  • Komponenty Brush
    • Górny pasek Brush
    • Pędzle ogólnego zastosowania
      • Twórz pędzle i kalkomanie
      • Tworzenie alfy z obecnego sculpt
      • Utwórz Brush z obiektu 3D
      • Create brushes based on Curves
      • Load photoshop .abr brushes
    • Uderzenia
      • Wyskakujące menu Krzywe
    • Opcje Brush
    • Ogranicznik warunków
    • Paski panelu
    • Panel szablonów
    • Inteligentne materiały
      • Dodaj nowe obrazy lub materiały
      • Dołącz inteligentny materiał do warstwy
      • Import Quixel Material
    • Jak tworzyć ustawienia wstępne dla Brush
  • Pomieszczenia robocze
    • Painting
      • Painting tekstur i tryby
        • Painting na Per-Pixel
        • Painting przemieszczeń (mikro-wierzchołki)
        • Painting Ptex
        • Painting powierzchni (Polypainting)
      • Importowanie do pokoju Painting
        • Initial CC subdivision
        • UV Set smoothing
        • Sharp (hard) edge
        • Zablokuj normalne
        • Załaduj nowy układ UV po zmianach modelu
        • DAZ Genesis models into 3DCoat
      • Menu obszaru roboczego Painting
        • Edit menu
        • Tekstury
          • Narzędzia do Baking tekstur
        • Ukrywać
        • Menu dla Bake Paint
        • Próbnik kolorów
      • Górny pasek do Painting
      • Panel warstw
        • Panel mieszania
        • Layer and Clipping Masks
      • Narzędzia do Painting pokoju
      • Nieprzezroczystość — przezroczystość
      • Dostosuj obszar roboczy
        • Zestaw narzędzi do poprawek
        • Eksportowanie z Tweak Roomu
      • Panel podglądu maski/materiału
      • Eksport z Painting
    • Przestrzeń robocza UV
      • Górny pasek UV
      • Lewy panel narzędzi UV
      • Panel podglądu UV
      • Przykład przepływu pracy UV
      • Importowanie do pomieszczenia UV
      • Eksport z pomieszczenia UV
    • Retopologia
      • Importowanie do pokoju Retopo
      • Menu Retopo Mesh i menu pieczenia
        • Tryb wirtualnego lustra
      • Bake menu
        • Treat Poly Groups as Paint Objects
        • Baking guide
      • Górny pasek
        • Wybierz geometrię
      • Lewy panel narzędziowy w pokoju Retopologii
        • Ogólny cel i funkcja
        • Dodaj geometrię
          • Narzędzie Strokes w Retopology
        • Retopo Tweak Tools
        • Narzędzia UV
        • Komendy dla pokoju Retopologii
      • AUTORETOPO
        • Autopo guide
      • Grupy poli
    • Rzeźbić
      • Sculpt Layer
      • Drzewo rzeźbiarskie
      • Opcje Brush rzeźbiarskiego
      • Top Bar
      • Silnik Brush
      • Podmenu Geometria
      • Rzeźbij menu „kliknij prawym przyciskiem myszy”.
      • Shadery
      • Tryb Voxel
        • Rzeźbienie czystego Voxel
        • Gęstość i rozdzielczość
        • Silnik z gliny
        • Narzędzia Voxel
        • Narzędzia powierzchniowe na wokselach
        • Narzędzia dopasowywania Voxel
        • Painting wolumetryczne
        • Narzędzia obiektów Voxel
      • Tryb powierzchniowy
        • Narzędzia powierzchniowe
        • Niestandardowe narzędzia powierzchni
        • Narzędzia dopasowujące powierzchnię
        • Painting powierzchni
        • Narzędzia obiektów powierzchniowych
        • Rozdzielczość wielopoziomowa
          • Multires tools
          • Multires adjust
          • Multires commands
      • Rzeźbij krzywe
        • Krzywe splajnu
        • Splines model creation
      • Przemieszczenie wektora
      • Narzędzia do przekształcania powierzchni
        • Narzędzia do przekształcania Voxel
        • Instancer
        • Move
        • Pose
        • Fit
        • Reproject
        • Surface Array
      • Prymitywy Voxel i narzędzia do Import
      • Żywe wartości logiczne
      • Polecenia dla pokoju rzeźbienia
      • Import do Sculpt Room
      • Eksportowanie z Sculpt Room
    • Renderowanie
      • Comparison of different roughness values
      • Funkcje panelu renderowania
      • Obrotnica
      • Fakebake oświetlenia -nie PBR-
    • Factures
      • Przepływ pracy
    • Najprostszy
    • Modelowanie
      • Mesh Menu
      • Lewy panel narzędziowy w Modelarni
        • Dodaj geometrię
          • Wybrany
        • Dostrajać
        • Smart Hybrid
        • UV
          • Polecenia
        • Cała siatka
      • Przykład powierzchni Loft firmy Fluffy
      • Blockout autorstwa Poeboi
      • Import Zbrush Polygroups for UV mapping
    • Kitbash - Szybkie tworzenie modeli 3D
      • Create kitbash
      • Left tool panel Kitbash
    • 3DPrint
    • Photogrammetry
      • How to install Reality Capture
      • Reality Capture doesn’t show up ?
    • Siatka do pokoju NURBS
    • Nodes
      • Sculpt shadery Biblioteka węzłów
  • Scripting i Core API
    • Scripting
    • Core API
    • API Pythona
  • Bezpłatny 3DCoatPrint

Baking guide

520 views 0

Written by Carlos
January 11, 2025

Let we have mesh like on example. This is pictured schematically as side view, objects to be baked are
grey and blue, red is retopo mesh.
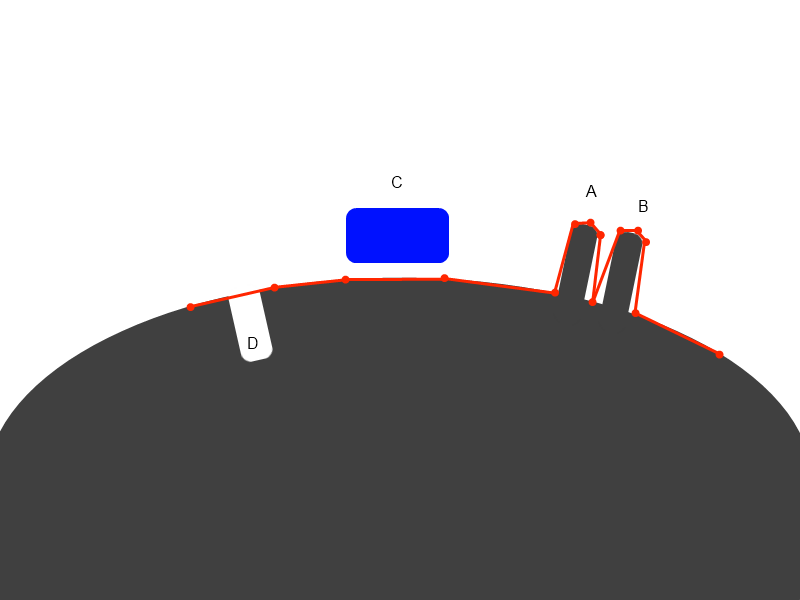
If you will try to bake in retopo room using Retopo->Bake with NM (to get normalmap) you will see the
dialog:
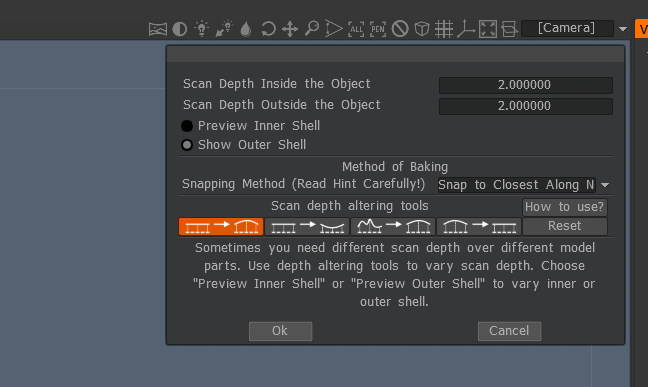
Let us look on settings. The principle of baking is scanning along retopo mesh normal to get to the baked
object surface. Later we will describe several approaches for this purpose.

Scan depth settings are well understood from this picture:
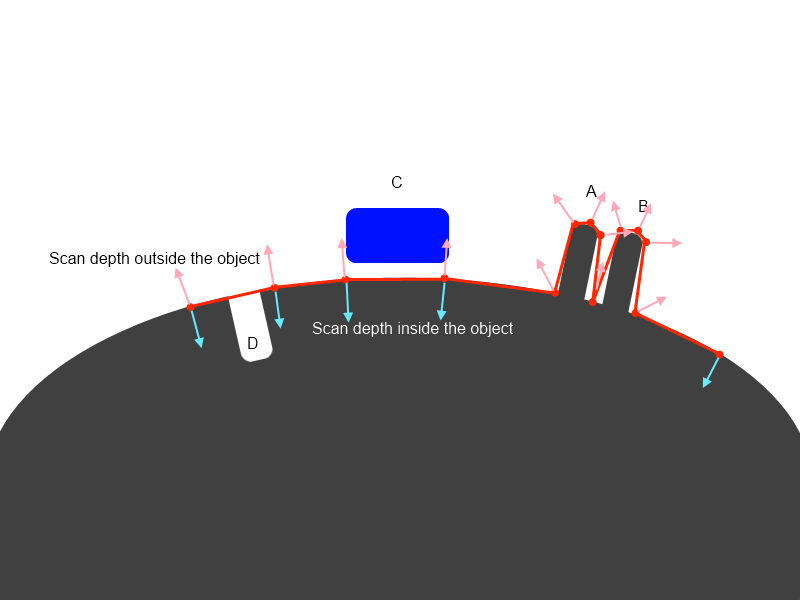
It are lengths or rays that follow normal direction. The longer rays, the more distant objects will be
taken into account. But if you will make it too long A and B will be baked incorrectly, if you will set it too
short, C and D will not be captured. We will describe later how to solve such problems in 3D-Coat. Let us
continue options discovering.

There are 2 methods of baking


1) Snap to closest along normal:
It is simplest approach that will work well in simple cases. It is default mode. In this case the point
closest to the retopo mesh will be baked. You may set bigger scan depth for this method and it still will
work. In our example you may set it twice longer and it will correctly capture details A, B, D. But C will
not be captured at all because grey surface is closest to the retopo mesh.

2) Snap to outer surface:
This method is intended for complex cases and rather pro users. It captures most distant details in
normal direction. Let us look on our example. If we will set outer scan distance twice longer then C will
be correctly baked, but A and B will not because of most outer will be neighbor spike and you will get
mess on normalmap. So you should not set big scan distance for this method. But if you will set it too
small so that A and B will be captured, C will not be captured.

For this purpose “Scan depth altering tools” introduced. Use the tools to alter scan depth, separately for
outer and inner shells of scanning depth. Grow, decrease, smooth or erase field. Use CTRL to invert
action and SHIFT to smooth field.

There are several additional tips for baking:


  • If you made not successful pass of baking and want to try it again, delete object that was add during
    baking process in paint room using Objects palette. Usually it is last object in Objects palette (Windows-Popups->Objects).
  • If you like result and want to export lowpoly mesh and textures – delete your reference objects (hide voxel objects or delete paint object) and export from paint room using File->Export or Textures->Export.
  • It is convenient to hide reference objects after baking to estimate result. Use VoxTree to hide voxels and Objects to hide paint and reference objects. Don’t forget to turn it on again if you want to bake them again!
  • It is much better to use Retopo->Bake with NM / Bake into scene (microverts) / Bake with Ptex instead of using Retopo->Texture baking tool because of much better flexibility.
  • If you are baking for microverts/ptex to get displacement and can’t get good result because of spikes in just several single points, use Layers->Clamp depth of the layer to cut off problematic spikes.
  • If you retopo each voxel layer separately you will get set of intersecting retopo layers. It usually happens if you are using Autopo. It is problematic to bake all that straightforward. If you have same names for retopo and voxel layers use Retopo->Use names correspondence for baking.
    You may also check if all is correct using Retopo->Check groups and volumes correspondence.
  • If you have huge reference mesh 5-100 M don’t try to import it as reference mesh, it will fail anyway. Use File->Import for vertex painting instead. It will work much better. You may use startup screen options.
  • It is better to avoid sharp angles between faces (like in example, retopo mesh between A and B), even angle a little less 90 degrees are not recommended, it will lead to problems if you are using 3DCoat’s method for calculating normals (Edit->Preferences->Normals calculation).
    Maya normals calculation method will work correctly in this case, so if you need sharp angles, use Maya normals calculation in Preferences.
    This is related to method of calculation. 3DCoat calculates normals as weighted average of neighbor faces, weight is proportional to face square. It allows to display bevel between faces correctly.
    But if there is sharp angle between big and small faces then vertex normal will be negative to small face normal and baking on that face will fail. Maya’s method calculates vertex normal as arithmetical average of neighbor faces normals. It is more appropriate for baking, but not good to display meshes without normalmap.
    Generally we recommend to add bevel between sharp edges.
Tags:baking guide

Was this helpful?

Yes  No
Related Articles
  • Surface Array
  • Top Bar
  • Curves Properties RMB
  • Left tool panel Kitbash
  • Create kitbash
  • Color management
Previously
Treat Poly Groups as Paint Objects
Up Next
Górny pasek
AI:
Hi! How can I help you?
Attention: This is a beta version of AI chat. Some answers may be wrong. See full version of AI chat