Modelinizin Görünüm Alanında nasıl görüneceğini ayarlamak için bu Menüdeki öğeleri kullanın: Düz Gölge, Tel Kafes, vb.
3B Izgara veya 2B Izgaranın görüntülenip görüntülenmeyeceği (arttırma ayarlarıyla birlikte), koordinat eksenlerinin görüntülenip görüntülenmeyeceği, Fırçalama işlemleri için Yakalamanın etkinleştirilip etkinleştirilmediği, Perspektif ve Ortografik Görünümler arasında geçiş yapmak ve tam ekran arayüz görüntüsü arasında geçiş yapmak için veya varsayılan ekran.
gölgeleme
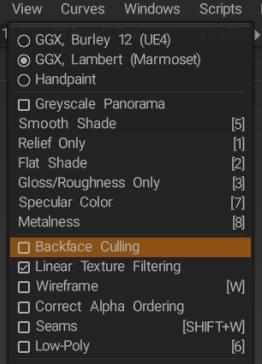
GGX, Burley 12 (UE4): Unreal4, 4A Games boru hattı, Disney, Unity vb. ile uyumlu GGX. GGX, Lambert (Marmoset): GGX – Marmoset ile uyumludur. Ek yaygın modülasyon olmaması nedeniyle normal GGX’ten farklıdır. Handpaint: Elle boyanmış dokular için en iyisidir. Bu, pürüzlü plastikte sıfır spekülariteye sahip bir GGX gölgelendiricidir.
3DCoat ve Blender farklı pürüzlülük değerlerinin DMG tarafından karşılaştırılması: Bir şey için istediğim tatlı noktaya ulaşmaya çalışırken biraz 3DC ve Blender arasında gidip geliyordum ve özellikle değişen pürüzlülük değerlerinden kaynaklanan iki işleme arasında farklılıklar fark ettim. . ..
Gri Tonlamalı Panorama: Herhangi bir renk bozulmasını önlemek için gri tonlamalı panoramalar kullanın. Pürüzsüz Gölge: Pürüzsüz gölge (kısayol tuşu “5”). Yalnızca Kabartma: Kabartma haritalarını yalnızca görüntü alanında görüntüler. Düz Gölge: Görünüm alanında düz gölgeli bir görünüm görüntüler. Yalnızca Parlaklık/Pürüzlülük: Görüntü alanında yalnızca bu haritalarınızı görüntüler. Aynasal Renk: Görünüm alanında bir Speküler Renk gölgeli görünümü görüntüler. Metallik: Metallik haritasını yalnızca görünüm alanında görüntüler.
Arka Yüz Kaldırma: (Fluffy tarafından)
Sadece bu iki görüntüden anlamak zor ama eksik çokgen sorununuz tek taraflı çokgenlere kadar inebilir. Durumun böyle olup olmadığını kontrol etmenin en kolay yolu, Görünüm menüsünde Arka Yüz Kaldırmayı kapatmayı denemektir.
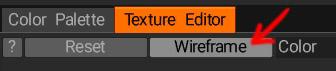
Birden fazla rasgele yerde görünen fırça darbeleri vb. sorununa gelince, olası bir açıklama, Doku Düzenleyici penceresinde Tel Kafes seçeneğini açarsanız görebilmeniz gereken örtüşen UV adalarıdır.
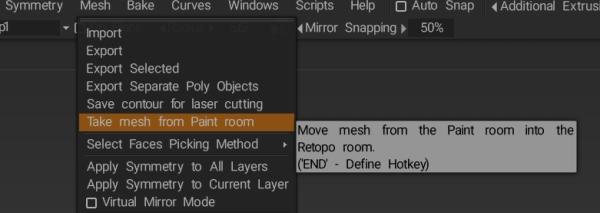
Modelin Blender doğru şekilde açılıp açılmadığından emin değilseniz, sorunu çözüp çözmediğini görmek için her zaman 3D Coat tekrar açabilirsiniz. Doğrudan UV odasında boya modelindeki UVs ayarlayabilir veya modeli oraya import için Retopo odasının Mesh menüsündeki Take mesh from Paint odası seçeneğini kullanabilirsiniz.
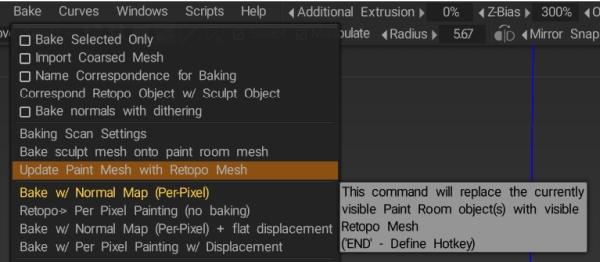
ve UV paketini açmayı tamamladığınızda Boya odasındaki modele değişiklikleri uygulamak için Fırında menüsündeki Boya Ağını Retopo Mesh ile Güncelle seçeneği.
( UV odasını kullanmak, modelinizde zaten uygulanmış dokular varsa en iyi şekilde çalışır, çünkü UVs yapılan değişiklikler dokuları da etkiler, oysa değişiklikleri Retopo odasında yapar ve sonra modeli Boya odasında güncellerseniz yalnızca UVs etkilenir)
Doğrusal Doku Filtreleme: Renk dokusu için doğrusal doku filtrelemeyi kullanın. Nokta filtrelemeyi almak için kapatın. Pikselli dokulara sahip oldukça düşük poli modellerden oluşan bir sanat stilini çoğaltmak için çok küçük dokuları boyamak istiyorsanız, Turn Point filtrelemeyi kapatmak hassas boyama ve piksel boyama sanatı stili için kullanışlıdır.
Tel Kafes: Modelin tel kafesini gösterin. Doğru Alfa Sıralaması: Yarı saydam modelleri doğru görüntülemek için yüzleri arkadan öne doğru sıralamamız gerekir. Genellikle hızlı bir işlemdir, ancak oluşturmayı yavaşlattığını düşünüyorsanız kapatabilirsiniz. Dikkat edin, alfa sıralaması artık sadece boya nesneleri için çalışıyor. Dikişler: Modelin tel kafesi üzerindeki dikiş kenarlarını gösterin. Low-Poly: Low-poly modeli normal map ile görüntüleyebilir ve düzenleyebilirsiniz.
3B Izgarayı Göster: 3B görünüm alanında 3B ızgara düzlemini açın/kapatın. 3B Izgaraya Yapış: İmleci ekrandaki 3B ızgaranın izdüşümüne yaslayın. Birkaç ızgara görünüyorsa, ekrana en çok döndürülen seçilecektir. Ortogonal projeksiyonda kullanılması tavsiye edilir. Gizmos ve ilkellerin konumları ve boyutları, uzayda ayrık konumlara yapıştırılacak. Izgara Yerleşimi: ZX, XY, YZ düzlemleri açıklayıcıdır. Otomatik Yerleştirme, boşluktaki yönlendirme nedeniyle karşılık gelen ızgara düzlemini otomatik olarak gösterir. Izgara Yoğunluğu: Küçük, orta, büyük ve özel de açıklayıcıdır. Özel ızgara parametrelerini ayarlamak için Izgarayı Özelleştir’i kullanın. Yalnızca “Özel” boyut seçilirse kullanılacaklardır.
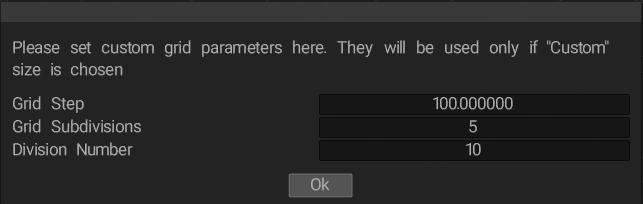
Varsayılan ızgara (Izgara Yoğunluğu Yüksek olarak ayarlıyken), Izgarayı Özelleştir kullanılarak aşağıdaki ayarlara eşittir
Izgara Adımı, her bir ızgara bölümünün birim boyutudur, Bölüm Numarası ise ızgaranın her çeyreğindeki Bölümlerin sayısıdır. Bu nedenle, aynı birim boyutunu ve alt bölümleri korurken varsayılan yüksek yoğunluklu ızgarayı etkili bir şekilde genişletmek istiyorsanız yukarıdaki ayarları kullanın ancak Bölüm Numarasını buna göre artırın.
Yazdırma Alanını Ayarlayın:
baskı alanı
Eksen: Ekseni Göster/Gizle. Ayrı Eksen: X,Y,Z
Ölçü kılavuzlarını göster: Ölçü aracında ölçü kılavuzları oluşturabilirsiniz. Bu onay kutusu, kılavuzların ölçüm aracının dışında gösterilmesini sağlar.
Ölçüm kılavuzlarına tutturun:
Eğriye Yapış: Şu anda değiştirilenler dışında en yakın eğriye tutturun.
Eğri Noktalarına Yapış: Eğri kontrol noktalarına yapışır.
Ortaya Yasla: Eğrilere bağlı kutuların ortasına yaslayın.
2B Izgarayı Göster: 2B Izgarayı Göster/Gizle. Ctrl+’ 2B Izgaraya Yapış: İmleci ızgaraya yaslayın. Bu genellikle eğri araçlarıyla birlikte kullanılır (Eğri çizgi ile çizim, bir eğriye metin koymak ve eğri çizgisi boyunca resim koymak); Izgaraya yapıştır açıkken, eğrinin noktalarını 2B ızgaraya yapıştırabilir, ardından çok kesin şekiller çizebilirsiniz. Low-Poly Vertexs’e Yapış: Fırçayı low-poly mesh vertex konumlarına tutturun. Yeniden topoloji yaparken veya tekstüre ederken bazen yardımcı olur.
Boya Odasında Vokselleri Göster:
Ortografik Projeksiyon: Perspektif ve ortografik projeksiyon arasında geçiş yapın.
Projektör: Projektör tipi görüntü referansını etkinleştirin. Tam Ekranı Değiştir: Tam ekran modunu değiştirin.
Yer Değiştirme ağını göster: Mevcut ağ yer değiştirmesini göster. Ağın tepe noktaları, displacement map uygun olarak normal boyunca kaydırılacaktır. Döşemeyi Ayarla: Yüzlerin ek döşemesini kullanarak ağ kaydırmanın görsel görünümünü iyileştirebilirsiniz. Yüz, her yüz üzerinde bir ızgara NxN olarak temsil edilir. Bu seçenekleri yalnızca video kartınızın ek işlemeyi destekleyebileceğinden eminseniz kullanın. Voxtree görünürlüğünü Yükle/Kaydet durumları:
Öğreticiler
Izgaralar, Çalışma Düzlemleri ve Eksen Tutamaçları : Bu video, 3B Izgaraların (dikey Çalışma Düzlemi dahil), 2B Izgaranın, Eksen Tutamaçlarının kullanımını, ölçü birimlerini ayarlamayı, yakalamayı ve Kamera Kısayolları ile 2B Izgara değişikliklerini saklamayı gösterir. Sunulan özelliklerden bazıları 3DCoat V4’te nispeten yenidir.
Izgaralar, ÇalışmaDüzlemlerive Eksen Tutamaçları : Bu video, 3B Izgaraların (dikey Çalışma Düzlemi dahil), 2B Izgaranın, Eksen Tutamaçlarının kullanımını, ölçü birimlerini ayarlamayı, yakalamayı ve Kamera Kısayolları ile 2B Izgara değişikliklerini saklamayı gösterir. Sunulan özelliklerden bazıları 3DCoat V4’te nispeten yenidir.
 Türkçe
  English
 Українська
 Español
 Deutsch
 Français
 日本語
日本語 Русский
 한국어
한국어 Polski
 中文 (中国)
 Português
 Italiano
 Suomi
Suomi Svenska
 中文 (台灣)
 Dansk
Dansk Slovenčina
 Nederlands
 Magyar
 ไทย
ไทย हिन्दी
 Ελληνικά
 Tiếng Việt
 Lietuviškai
 Latviešu valoda
 Eesti
Eesti Čeština
 Română
 Norsk Bokmål
