 Dansk
Dansk  English
 Українська
 Español
 Deutsch
 Français
 日本語
日本語 Русский
 한국어
한국어 Polski
 中文 (中国)
 Português
 Italiano
 Suomi
Suomi Svenska
 中文 (台灣)
 Slovenčina
 Türkçe
 Nederlands
 Magyar
 ไทย
ไทย हिन्दी
 Ελληνικά
 Tiếng Việt
 Lietuviškai
 Latviešu valoda
 Eesti
Eesti Čeština
 Română
 Norsk Bokmål
Located near the top of the interface is the Top Bar.

This panel includes the functions needed to select every type of component from you brush settings.
The Top Tool Bar menu is customized according to which workspace you are working on.
As some pen options are on the top menu bar, you’ll notice that when you change your tool, so will a portion of the menu bar.
These options are On Plane, Steady Stroke, Pressure Dependencies, Radius, Smoothing, Depth, etc.
Conform Retopo Mesh
Conform Retopo Mesh is a functional setting within the Retopology workspace that automatically snaps (conforms) low-polygon retopo vertices to the surface of the underlying high-poly voxel/sculpted mesh. It ensures that as you edit, move, or brush the retopo mesh, it continuously sticks to the high-poly surface, maintaining accurate, tight, and aligned topology.
Key Aspects of Conform Retopo Mesh:
- Automatic Snapping: It acts as an automatic, real-time “snap-to-surface” mechanism, reducing the need to manually move vertices.
- Workflow Application: It is often used with the Move brush or while building meshes to ensure the new geometry matches the high-poly sculpture, often alongside Retopo Relax.
- Performance Note: Enabling this feature may cause temporary drops in frame rate (FPS) because it performs a, calculation at the end of each stroke.
- Use Cases: It is ideal for adjusting existing retopo meshes to fit modified sculptures, particularly during large-scale edits.
It can be used in combination with tools like Retopo Relax to keep the mesh both conforming to the surface and properly spaced
On Plane

This option let you to constraint strokes to a plane. If you use this option “with Plane Tool” this tool acts just like a carpenter’s wood plane does. It will scrape the volume away from the set position and the normal of the brush cursor.
You set the brush cursor’s position and normal by clicking and holding the RMB and then dragging along the surface of a voxel object.
Use RMB to define plane. Click the Type of Surface button to further edit how the plane functions.
The Type of Surface show modes by which you decide the position of the brush:
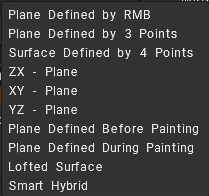
- To Plane Parameters “Lofted Surface” add offset and extend
RMB Action: What action will be performed when the RMB is pressed
Pay attention; if you click quickly, the RMB menu appears. Click longer to select a point and a plane. Hold RMB to move the plane’s central point over the surface, but keep it normal.
Press CTRL to move the plane along the normal.
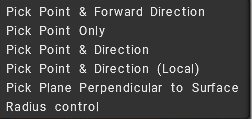
1. Pick Point & Forward direction: This will place the cursor at the last location you used the RMB, facing toward the camera.
2. Pick Point only: This will place the cursor at the last location you used the RMB only. Its direction is based on the settings in the parameters tab.
3. Pick Point & Direction: This will place the cursor at the last location you used the RMB, and its direction will be based on the average normals of the voxels that your brush covers.
4. Pick Point & Direction (local): This will place the cursor at the last location you used the RMB, and its direction will be based on the single normal of the voxel your brush is centered on.
5. Pick Plane Perpendicular to Surface: Position and direction of the drawing plane will be selected perpendicular to the surface on which the cursor is positioned.
5. Navigate: It lets you navigate the viewport. This can also be done while holding the ALT key.
Steady Stroke

In this mode, strokes will be more accurate because of the additional smoothing of trajectory.
It is a similar feature named to Lazy Mouse (ZBrush/Substance).
Steady Stroke on 3DCoat are similar features that smooth digital brush strokes by trailing the actual paint point behind the cursor, creating fluid, controlled lines.
However, Lazy Mouse offers deeper settings (Radius, Step) for custom smoothing/spacing, while Steady Stroke is simpler, like a brush with long bristles.
Think of Lazy Mouse as a “string” controlling the brush for complex shapes and Steady Stroke as an intuitive pull for clean curves.
Invert Tool: Invert Tool. Toggle the function of the current tool, like holding down the CTRL key.

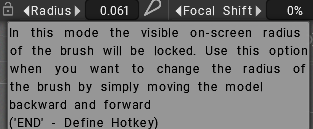
Brush Radius: This allows you to scale up and down the size of your pen in the viewport with a slider or by manually keying in a value. It is relative to the scale of the scene you have set.
Radius lock mode: the wrench icon let lock visible on-screen radius.
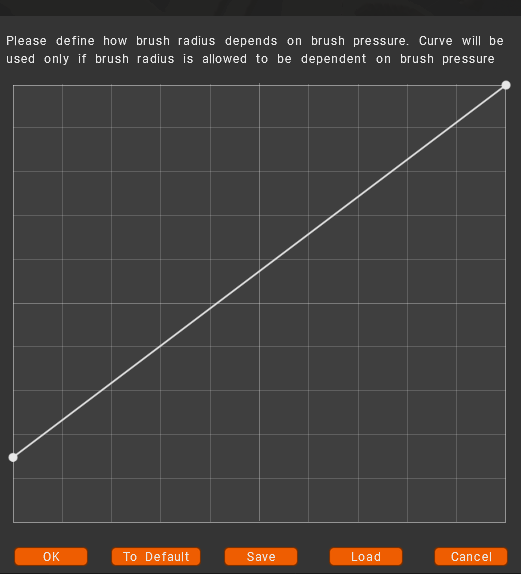
Brush Radius pressure curves Curves
Define how the brush radius depends on brush pressure. The curve will be used only if the brush radius is allowed to be dependent on brush pressure.
Tapper (for both sculpting and painting brushes)
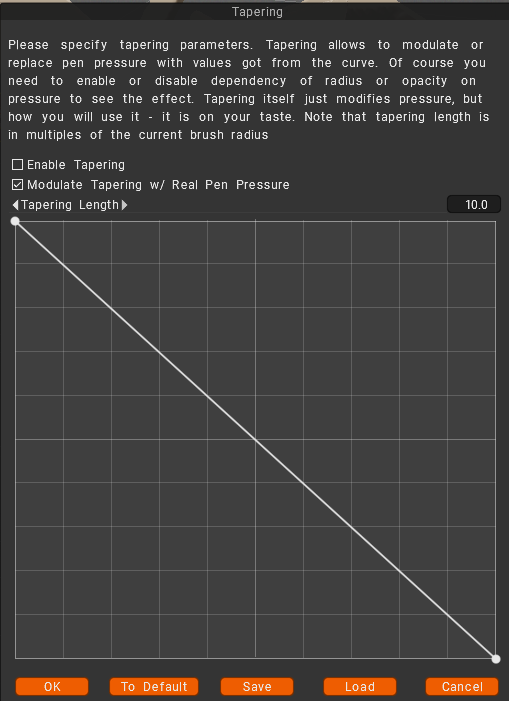
Taper Modifier: Tapering allows to modulate or replace pen pressure with values got from the curve. Of course, you need to enable or disable the dependency of radius or opacity on pressure to see the effect. Tapering itself just modifies pressure, but how you will use it – it is on your taste. Note that the tapering length is in multiples of the current brush radius.
Focal Shift: This slider adjusts the crispness of the alpha, corrected around the center point. Higher values produce softer edges on most shapes (activate this option on Preferences).
Falloff: This allows you to control the brush with a falloff curve, giving tighter control over the radial area the brush will affect depth.

Depth: This allows you to turn the intensity of the depth of your strokes with a slider or by manually keying in a value.
Lock depth mode: use this option to separate brush depth from brush radius.

Smoothing: This allows you to turn the intensity of the smoothing up and down with a slider or by manually keying in a value.
Paint Tools for Voxel Paint and Vertex Paint
Opacity: This allows you to turn the intensity of the color channels’ transparency up and down with a slider or manually keying in a value.
Glossiness Intensity: This allows you to turn the intensity of the Glossiness channel up and down with a slider or manually keying in a value. A lower value produces a diffuse highlight, higher values produce a sharper highlight.
Roughness: Controls the sharpness of the reflections.
Metalness: Change the Metalness intensity. A higher value produces a higher reflectivity, lower values produce a lower reflectivity.
Conditions Limiter: Another important feature on the Top Bar is the Height/Color Limiter or Conditions.
Select how depth, color and Gloss of your brush strokes are affected by colors, height and other parameters. Remember to set to “Always” when you finish using this option.
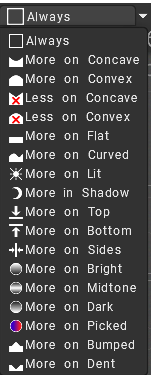
This function allows you to, for example, paint more in a cavity, more on peaks, or more on a specific color or even a mask.
Pen, Mouse, and Lock Icons
These three icons indicate what mode your style is currently in. You can toggle from one to the other simply by LMB clicking on the icon.
The mouse icon locks pen pressure to whatever value you have in the respective setting the icon is next to.
The pen icon allows for pen pressure directly from your stylus. The lock icon will lock the “on screen” size of the pen. It is convenient when you want to change the radius of the pen by simply moving the model back and forward.
The lock icon near the depth slider allows you a variety of pen radius without variation of absolute pen depth. In standard mode, radius and depth are proportional.
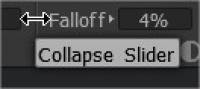
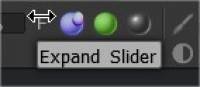
Minimizing on the Tool Bar
You can also collapse/expand settings on the toolbar, such as Falloff, Depth, etc. This can be done by clicking in the immediate area around the setting you wish to minimize. The image here shows the area to click to achieve this.
Layer Ghosting Options (For Sculpt Room)
Layer Ghosting Options: There is some capacity to unghost all layers through the “GEOMETRY menu > VISIBILITY/GHOSTING > ISOLATE GHOSTING (SHIFT + G hotkey combo)”.
Tutorials
Conform Retopo Mesh with Sculpting Brushes: This video demonstrates the new feature in 3DCoat 2021 that conforms a low poly Quad Mesh (in the Retopo Workspace, generally intended to be the baking target) beneath a Sculpting brush while they sculpt on a High Poly version (Sculpt Mesh)