
As with all modeling and sculpting applications, primitives form the basis for many and varied starting shapes. Almost any model can be composed, almost entirely, from a positive and negative combination of basic primitive shapes. Each can be modified using variation transform tools, placement, posing, and sculpting.
– Add your custom primitives by importing your mesh files (.obj, .lwo, .fbx, etc.), adding to the Models and/or Splines panels. Using these two panels and their functions, you can interactively add new basic and custom shapes to your scene with various boolean operations to interact with existing forms.

– When using the Primitives tool, you may toggle between two different transformation modes with the Transform/Lattice Toggle function in the Tool Options panel of the Primitives Tool. The Import tool has two modes you can use as well, the standard Transform and “On Brush”. Let’s look at these modes now.
Import Settings
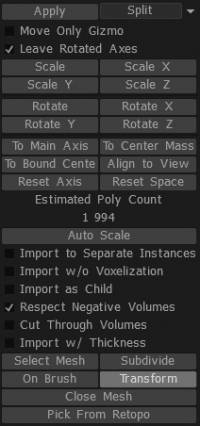
Import to Separate Instances: Creates a new VoxTree layer.
Import w/o Voxelization: Creates the mesh as a polygonal surface rather than voxels.
Import as Child: If a VoxTree layer is currently selected, and this option is turned on, then the mesh will be created in a new VoxTree layer as a child to the selected layer.
Respect Negative Volumes: If the imported object has a secondary mesh item/object and has “_negative” in its name, this option will allow subtracting this volume from the scene and creating the primary mesh item/object with whatever boolean operation you decide to use.
Cut Through Volumes: Cuts through the selected VoxTree layer and all child layers.
Import w/ Thickness: If the mesh you are attempting to import is a single-sided polygonal mesh or has holes, or you generally want to import something with walls, use this option to thicken the surface.
Select Mesh: This allows you to browse a mesh stored on your computer or another drive.
Subdivide: Subdivides mesh to be imported, giving it more initial resolution before importing.
Close Mesh: Closes any holes in the mesh upon importing.
Pick From Retopo: If you have retopology mesh in the Retopo Room, then you can use the mesh to merge to voxels. Note that all visible meshes from the Retopo Groups panel will be used. If you do not want this to happen, hide the meshes you don’t want to use first.
Shift (X, Y & Z): Shifts the mesh to be imported along the selected axis.
Primitive types
3DCoat’s arsenal of usual and unusual Primitives proves to be the most powerful and flexible set available. Each can be modified, within the Primitive Workspace, using unique Transform, Placement, and Distortion interface elements.
Let’s look at these modes:
1. Common Primitives
2. Free-Form Primitives
3. Merging & Positioning “On pen.”
As with all modeling applications, using Primitives forms the basis for many and varied starting shapes. Many mechanical models can be composed almost entirely from a positive and negative combination of basic primitive shapes. Edit
Common Primitives
When choosing from any of the Primitive varieties, you are presented with a temporary representation of that Primitive, complete with its unique “Gizmo” or “Widget” for manipulating and placing this Primitive into the scene with the desired orientation, distortion, scale, and position.
You can adjust all of these parameters visually, or if you prefer, use the numerical entry fields provided in the Primitives Panel.
If you’d like to use another point in space to base your Primitive Transform value, choose the “Move only gizmo” option – and then reposition that Gizmo.
At any time, you may “Reset” any axis or position of your Primitive shape.
Free-form Primitives
Derived from the Standard Primitives, this variety allows you to define and use a Distortion Frame composed of rows and columns of movable Points and Edges that determine the nature of the distortion you wish to impose upon your Primitive.
It is possible, to begin with a very basic Primitive shape and alter it substantially using the Free-form lattice (or Distortion Frame), making extremely complex forms practical.
- Add your Custom Primitives using the “More Primitives” option.
- Adding your .obj files to a standard folder gives you access to your Custom Primitives.
It is important to note that the Primitives Panel is the only limited method of adding and subtracting generic shapes from your Voxel sculpture. For even more convenience and flexibility, choose to use the “Merge Panel” and its functions to interactively add new basic and custom shapes to your scene or as boolean shapes to interact with existing forms.
Also, the “Models Panel” provides a visual interface and storage facility for your most often used Custom models, shapes, greebles, and nurnies.
A few of the parameters for the new Free-form Primitives are as follows:
Transform as a whole: Gives you the ability to translate, rotate and scale using the default transform tool.
Local Symmetry: Enables local symmetry of the Free-form Primitive, which gives you more creative freedom and control.
Misc.
ResetPrim: It lets you reset any changes you’ve made to the object.
EditPoints: Allows numerical values for each visible point of the lattice cage. Inner/Outer Radius & Thickness are only applied to some Free-form Primitives, such as Free-form Disc and Free-form Tube; they allow for the radius of the inner section or outer section of the tube and the thickness of some of the primitives with keyable values. The drop-down list also has a few more options, usually different OBJ files with different cages for similar shapes, such as Free-form Discs. When holding “Ctrl”, you can constrain the movement of your selection along its normal.
Edit
Merging On Pen
One of the most fluid and spontaneous ways to add nearly any predefined shape, model, greeble, or nurnie to your existing sculpture is to use the “Merge Panel” or, for more frequently used elements, the “Model Panel”.
Just choose the “On Brush” option to access this powerful set of functions.
When this option is chosen, you can assemble a composite of any number of shapes, the on-the-fly – interactively changing the shape’s position, scale, rotation, and “penetration” or “levitation” on, into, or above the surface of another object or shape.
Every shape added in this way can be positively combined or negatively subtracted from any existing shape.
Mouse gestures adjust the scale, position, and penetration depth of your “Merged” object.
- Use the “Right Mouse Button” and drag to the left or right to Scale the Merged object.
- Use the “Right Mouse Button” and drag up or down to adjust the surface penetration of the Merged object.
Change the position of this object, respecting the orientation “Normals” of the object that is being added simply by moving the mouse cursor where desired and sliding its preview along the surface of the existing object.
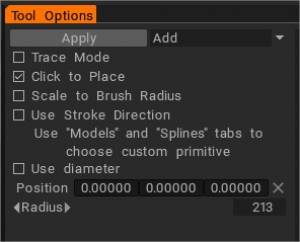
If you’d like to use another point in space to base your primitive transform value from, choose the “Move Only Gizmo” option and then reposition that gizmo. At any time, you may reset any axis or position of your primitive shape.
Boolean Operators
As mentioned above, you can import with this tool using boolean operations. These boolean operations allow you to create very complex shapes quickly with basic shapes and are especially good for hard surface sculpting. These boolean operators are:
- Add: Adds the mesh you’re using with the Import tool to the current VoxTree layer, combining them into one sculpt.
- Subtract: Subtracts the mesh you’re using with the Import tool from the current VoxTree layer, removing the said piece from the current sculpt.
- Intersect: Retains the area inside the Primitive tools mesh of a selected VoxTree layer and removes everything outside the Primitive tools mesh.
- Split: Separates, or splits, the area within the Primitive tools mesh from the currently selected VoxTree layer and creates a new layer in the VoxTree for the split item.
Transform Tool Options
Move Only Gizmo: When turned on, it allows you to move the gizmo without transforming the mesh so that you can position it in another place in the scene.
Leave Rotated Axes: When turned on, it allows you to rotate the axes after you rotate. Otherwise, if this is off, the gizmo will reset back to world space for all rotational axes.
Scale (and Scale X, Y, or Z): Allows you to scale by keying values numerically.
Rotate (and Rotate X, Y, or Z): Allow you to rotate by keying values numerically.
To Main Axis: Aligns the gizmo to the geometrical axis based on the object’s overall shape.
To Center Mass: Moves the gizmo center to the center of the current VoxTree layer or still to be applied primitive.
To Bound Center: Moves the gizmo to the bounding box center of the current VoxTree layer or still to be applied primitive.
Align to View: Aligns the gizmo axis to the camera view.
Reset Axis: Resets the gizmo axis.
Reset Space: Zeros out the local coordinates of the currently selected VoxTree layer or still to be applied primitive, and orients the gizmo axes to global coordinates.
Edit
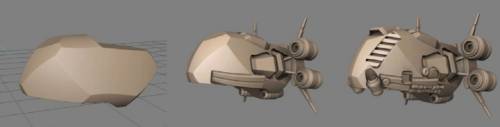
Kitbashing
Let’s take a more detailed look at this feature. (Thanks to our users Tinker and Daniel Yarmak for the descriptions). Greebles or Nurnies can be created in any 3D modeling application, usually with arbitrary extrusions.
This method was referred to as “kit-bashing”.
To make your models look more interesting, you would probably want to create your own unique models for this purpose.
Details with angled surfaces look better than surfaces that are all parallel. For easier placement of details on a model, create a contour for the detail, an object with the name “_negative,” which subtracts automatically from the model and leaves a slot for the detail.
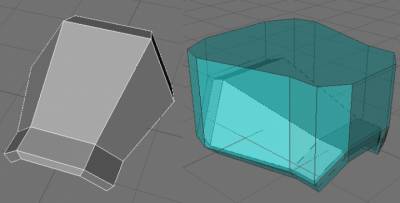
Turning on “Respect negative volume” in the Merge Params Panel is important to permit contour exclusion. Because the “negative volume” width is larger than the width of the detail, we get an interesting effect. There is an automatically generated joint between the body and the object.
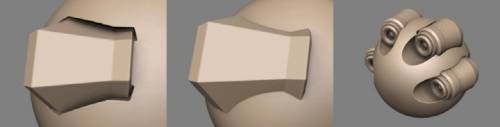
The detail looks as if it stands right in its place, and the body looks as if it has a special slot for the detail. Such joints look good with ambient occlusion. Above is an example of how it would look without that effect. Looks not so interesting, and also, there is a problem that was caused by different curvatures of the body and the detail – the detail looks tumbled down (it wouldn’t happen with negative volume). Negative volume shouldn’t have the exact form of the body. You may change its form to get various effects. It’s time to detail the object.
Load the Greebles using the “Import” tool. Use the “On pen” mode and the “9” and “0” keys to rotate the brush.
Primitives Library from Tinker
Tutorials
New Primitives Tool Options: Quick Placement & Boolean Modes: This video demonstrates some new options in the Primitives tool in 3DCoat. Namely, the ability to quickly place, scale, and align the orientation of a Primitive onto another object in the scene. It also covers some Boolean options (Add, Subtract, Intersect, Split).
New Primitives Tool Options: Lathe Modifier: This video demonstrates the usage of the new Lathe Modifier, a component of the Primitives Tool. Other techniques are shown to create objects similar to what the lather can produce for comparison’s sake.
Primitives Tool: Fillet Option
Primitives Tool additions: This video demonstrates some of the new additions to the Primitives tool in 3DCoat 4.5, including a new Text Primitive that can “Click to Place” and conform to the shape of another object.
Kitbashing
Kitbashing with the Primitives tool: This video demonstrates the ability to take any model from the Kitbashing Toolset and immediately use it as a Freeform Primitive. Making very fast work of scaling and shaping an object on the fly.
Kitbashing Tools : This video demonstrates the Kitbashing Tools in 3D Coat, which allow for fast and efficient storage or retrieval of Voxel Layer content or standard OBJ format files. 3DCoat creates thumbnail images for each and displays them within a dockable pallet for easy access.