 Lietuviškai
  English
 Українська
 Español
 Deutsch
 Français
 日本語
日本語 Русский
 한국어
한국어 Polski
 中文 (中国)
 Português
 Italiano
 Suomi
Suomi Svenska
 中文 (台灣)
 Dansk
Dansk Slovenčina
 Türkçe
 Nederlands
 Magyar
 ไทย
ไทย हिन्दी
 Ελληνικά
 Tiếng Việt
 Latviešu valoda
 Eesti
Eesti Čeština
 Română
 Norsk Bokmål
Vokseliai sukuria virtualų tinklelį 3D erdvėje, o tinklelis užima šio tinklelio dalis, kad suformuotų savo formą. Žodis vokselis kilęs sujungus terminą pikselis su garsumu. Mažos skiriamosios gebos vokseliai yra įprastas vaizdo žaidimų meno stilius, pavyzdžiui, „Minecraft“ ar „Roblox“.
Nors vokseliai yra pagrįsti kubeliais, didelė tinklelių skiriamoji geba reiškia, kad vis tiek galimos lygios kreivės. Panašiai, kaip daugiakampiai tinkleliai yra plokščios plokštumos, kurios gali sudaryti lygias kreives, turinčias daug daugiakampių ir naudojant išlyginimo grupes.
Kadangi „3D Coat“ tinklelis naudoja vokselius, jums nereikia skirstyti daugiakampių, nes tai gali užtikrinti geresnį našumą naudojant kai kurias kompiuterio sąrankas. Kitas privalumas yra tas, kad jūsų 3D objektas yra tvirtas ir nėra tik apvalkalas kaip daugiakampis tinklelis. Tai palengvina kai kuriuos skulptūros ir deformavimo būdus menininkui tiek skaičiavimo, tiek kūrybiškumo požiūriu.
„Voxel“ aplinkoje galima pradėti nuo „tuščios“ vietos arba pradėti tam tikru garsu.
Viskas, ką pridedate ar atimate, daroma taip, kaip tikitės dirbdami su tikromis medžiagomis, tokiomis kaip molis, vaškas, mediena ar akmuo.
Neįprastesni yra tie įrankiai ir funkcijos, kurios sukuria arba atima daugiau objekto tūrio juos naudojant, pvz., įrankis Perkelti arba Didinti.
Tikslios organinės ir mechaninės formos gali būti sukurtos naudojant įdubas ir kreives.
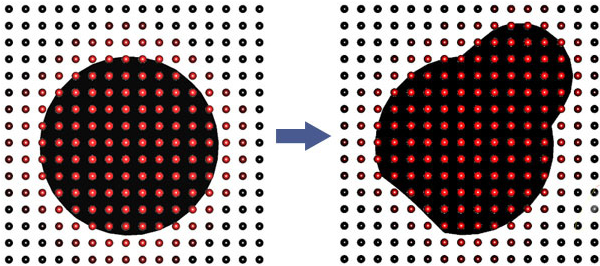
Aukščiau pateiktame paveikslėlyje iliustruojami svarbūs vaizdiniai ir techniniai paviršiaus ir voxel sculpting skirtumai.
Tačiau, žinoma, turėtumėte žinoti kai kuriuos šios technologijos apribojimus; vokselio atvaizdavimo paviršius negali būti per plonas. Jei norite, kad paviršius būtų per plonas, padidinkite scenos skiriamąją gebą arba naudokite „Paviršiaus režimą“.
Tai galima padaryti spustelėjus V piktogramą šalia konkretaus sluoksnio, kurio paviršių norite apdoroti, ir jis pasikeis į [S]. Reiškia šį „paviršiaus režimą“.
Taigi, kas yra šie vokseliai?
Matematiškai vokseliai yra skaitinės reikšmės [0..1], patalpintos į kubinį tinklelį. Objekto paviršius yra ten, kur reikšmė lygi 0,5
Paprasčiau tariant: vokseliai yra 3D erdvės taškai, kuriuose yra informacijos apie garsumą ir spalvą.
Šis unikalus vokselių lipdymo būdas yra panašus į tradicinį molio lipdymą. Jei jums reikia iškirpti ausį, tiesiog pradėkite lipdyti ausį. Tas pats pasakytina apie rankas, kojas ar bet ką kitą. Jei jums to reikia, iškirpkite.
Kas yra vokseliai?
Trumpai tariant, vokseliai yra 3D pikselių versija. Pikselis pavaizduotas kvadratu, kurio aukštis ir plotis yra vienodi – ir tam tikras dydis.
Atsižvelgiant į bet kurią dvimatę sritį, šioje srityje gali būti tik nustatytas taškų skaičius.
Voxel yra naujas žodis, reiškiantis „tūrinį pikselį“, nes jis turi gylį, aukštį ir plotį.
Kaip ir pikseliai, vokseliai yra vienodo pločio ir aukščio, bet taip pat turi matmenis išilgai „z“ ašies, kuri yra tokia pati kaip atstumas nuo jo aukščio ir pločio. Iš esmės vokselis yra kubas, plaukiojantis nematomoje masėje. vokseliai, užimantys begalinį plotą.
Bet kuriame trimačiame tūryje šią erdvę gali užimti tik nustatytas skaičius vokselių.
Nespalvotoje dažymo programoje „dažai“ užtepami tam tikroje srityje, suteikiant bet kokiam skaičiui nematomų pikselių, užimančių tą sritį, juodos arba baltos reikšmės (pikselis yra „įjungtas“ arba „išjungtas“). Atrodo, kad kai kurios vietos yra „tuščios“, o kitos nudažytos kaip juodi dažai ant balto popieriaus.
Vokselių programoje nupieštas „tūris“ pritaikomas „tuščiai“ erdvei, suteikiant bet kokiam skaičiui nematomų vokselių kubelių reikšmę „įjungta“ arba „išjungta“, o tai sukuria 3 dimensijos formos, plaukiančios „tuščioje“ vietoje, įspūdį. erdvė. Kai kurie kubeliai yra „įjungti“, o kiti – „išjungti“ (kai kurie reiškia užimtą erdvę, o kiti – „tuščią“).
Papildomas vokselių privalumas 3D-Coat yra galimybė jiems priskirti spalvą ir „medžiagą“ arba „šešiklį“ (suteikiančią papildomą tikrosios ar kitos „pasaulinės“ medžiagos iliuziją).
Naudotojui ši patirtis imituoja darbą su kieta arba pusiau kieta medžiaga (pvz., moliu ar išlydytu vašku), naudojant funkcijas, imituojančias realaus pasaulio skulptūrų įrankius.
Beveik kiekviena kita 3D skulptūrų kūrimo programa yra daugiakampė, o tai reiškia, kad jos veikia tik su 3D objektų paviršiumi; jie manipuliuoja „oda“, kuri neturi storio. Tačiau vokseliu pagrįstos skulptūros programos veikia su 3D objektų tūriu, manipuliuodamos tam tikru kubiniu masyvu arba „kieta mase“.
Šis metodas leidžia formuoti be jokių topologinių suvaržymų: jis leidžia sukurti sudėtingus objektus iš „nieko“ ir be galo pridėti bei atimti tūrio „masę“ ir lengvai pramušti objektuose skylutes. Šis metodas suteikia jums visišką 3D skulptūrų laisvę.
Naudodami vokselius galite dirbti kaip senamadiškas realaus pasaulio molio skulptorius. Tas, kuriam niekada nereikia galvoti apie niūrius techninius dalykus, tokius kaip daugiakampiai ir topologija, ir kuris todėl gali laisvai ir lengvai išreikšti save.
Jei jums reikia nupiešti ausį, ranką ar koją, tiesiog pradėkite dėlioti skaitmeninio molio luitus!
Kad ir kaip fantastiški būtų vokseliai, taip pat turėtumėte suprasti kai kuriuos šios technologijos apribojimus. Pavyzdžiui, vokselio formos objektai negali būti itin ploni. Jei norite padaryti labai ploną paviršių, pvz., audinį, turite padidinti vokselio objekto skiriamąją gebą, kad neatsirastų 3D „žaliukų“.
Patogesnis būdas dirbti su labai plonais sluoksniais yra naudoti “Paviršiaus režimą” vokseliams. Tai galima padaryti spustelėjus kubo piktogramą šalia Voxel sluoksnio, su kuriuo norite dirbti. Piktograma [S] nurodo, kad įjungėte paviršiaus režimą
Baigę savo skulptūrą 3DCoat, galite tiesiogiai export ją 3D spausdinimui naudodami jų vedlį. Dėl to 3DCoat yra puikus pasirinkimas trokštantiems 3D spausdintuvams.
Dėl vokselių, kurie sukuria vientisą modelį, panašų į CAD programinės įrangos modelį, daug lengviau konvertuoti jį į 3D spausdintuvams suprantamą formatą. Tai naudinga funkcija, jei norite atspausdinti nedidelius savo skulptūrų modelius.