Principala modalitate de a import active în Camera de Painting este prin dialogul de deschidere și subopțiunile sale. Pentru a picta unele texturi, trebuie îndeplinită 1 din 2 condiții:
Un model cu topologie și UVs creat în 3DCoat a fost copt cu succes în camera de Painting (ceea ce nu se poate întâmpla fără o hartă UV ).
Un model creat extern, care a fost mapat UV , este importat în 3DCoat pentru texturare folosind una dintre metodele de Painting (care plasează automat orice hărți și texturi UV existente în camera UV și în camera de Painting ). Modelul poate avea mai multe plăci UV ; vezi mai jos.
În acest context, meniul Texture devine disponibil și în panoul meniului principal. Așa cum este descris în secțiunea „Importul în camera UV ” – opțiunile disponibile în acest meniu vă permit să import elementele de textură existente în Camera de Painting pentru modificări ulterioare.
Cu selectarea coloanei din mijloc, alegeți unul dintre aceste fișiere OBJ pe care le puteți vedea în meniul din captura de ecran de mai jos.
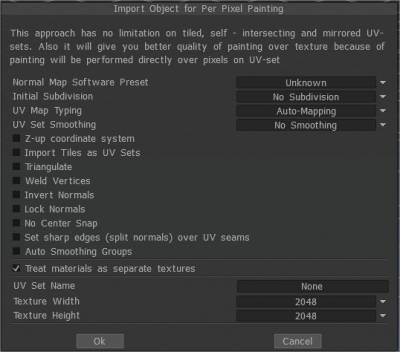
Sau selectați meniul fișier și faceți clic pe Fișier → Import → Model pentru pictura per pixel , apoi alegeți fișierul „eșantion .obj” (se află în folderul Sample). La importarea unui obiect, vi se va solicita următoarea imagine. Există multe opțiuni pe care le veți vedea în acest prompt. Acestea sunt după cum urmează:
Import obiect pentru Painting Per Pixel
Presetare software normală pentru hărți: Subdiviziunea inițială: setați subdiviziunea inițială a obiectului pentru un aspect mai fin (dacă este necesar). Tip de UV-mapping : păstrați UV ul original sau alegeți Cartografiere automată. Netezire setată UV: această opțiune funcționează numai dacă subdivizați modelul în timpul import.
Sistem de coordonate Z-up Sistem de coordonate Z-up pentru compatibilitate cu Rhino, 3DS-Max și alte aplicații cu axa Z în sus. Import plăci UV multiple ca seturi UV Import plăci UV separate ca seturi UV separate. Triangulare: Triangulați o plasă pentru a evita erorile UV . Sudați vârfuri Sudați vârfuri separate care sunt în același punct în spațiu. Inversează normalurile Blocarea normalelor Nu recalculați valorile normale, utilizați valorile normale direct din fișierul obiect. Dacă subdivizați plasa, această opțiune va fi ignorată. Nu fixați vârfurile de subdiviziune la suprafață: Această opțiune ajută la evitarea prinderii rețelei subdivizate pe suprafața rețelei de înaltă poli. Face plasa Layer0 foarte netedă. În acest caz, toate deplasările (hărțile normale) vor fi plasate pe straturi mai înalte. Această opțiune este foarte utilă dacă export o rețea low poly și o displacement map. No Center Snap 3D-Coat încearcă să mute implicit o casetă legată a modelului la originea scenei. Bifați această casetă dacă doriți să import modelul așa cum este, fără nicio centrare. Setați muchii ascuțite (normale împărțite) peste cusăturile UV Grupuri de netezire automată: Această opțiune permite crearea automată a grupurilor de netezire. Prin specificarea valorii în opțiunea „Unghi maxim” responsabilă pentru unghiul maxim dintre fețe atunci când muchia devine ascuțită, este necesar să activați opțiunea Grupuri de netezire automată. Pentru a utiliza această opțiune, activați grupurile de netezire automată.
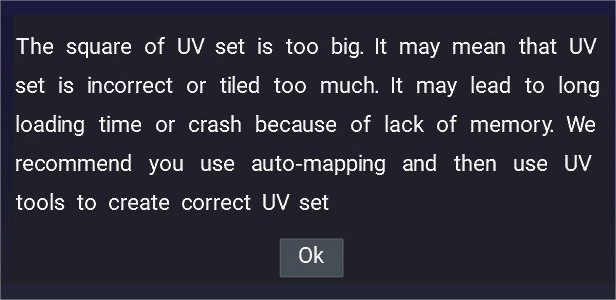
Dacă vedeți această fereastră de avertizare la import, problema se întâmplă adesea dacă modelul are un set UV aleatoriu sau incorect.
Deci, astfel de modele ar trebui să fie încărcate cu Auto-mapping și apoi să obțină corecția setată UV .
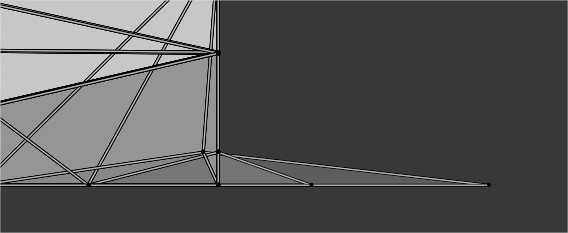
UVset vertează în afara spațiului UV 0,1
Uneori, UVsetul este placat sau unele verturi sunt în afara spațiului uv 0-1, de asemenea, problema pare să se întâmple atunci când aveți alte canale UV care nu sunt desfășurate corespunzător.
Tratați obiectele Retopo ca obiecte de Painting : în acest mod, fiecare material al obiectului va fi tratat ca un set UV separat (textură separată), indiferent de seturile UV inițiale. Dacă deselectați „Tratați obiectele Retopo ca obiecte de Painting , obiectele de pictură sau straturile de obiecte retopo vor fi convertite în materiale de suprafață și abia acum veți avea un obiect de pictură cu mai multe materiale de suprafață. Redenumiți obiectul dvs. de Painting ca o combinație de nume a tuturor straturilor de obiecte retopo .
UV-set name: Introduceți UV-set name. Lățimea texturii: setați lățimea texturii. Înălțimea texturii: setați înălțimea texturii. • Notă: Dacă placa video are mai puțin de 2 GB de Vram, ar trebui să evitați texturile mai mari de 2000 x 2000.
Milioane de poligoane: Acesta este responsabil pentru rezoluția rețelei, numărul de milioane de poligoane după netezirea rețelei în timpul încărcării. Această cantitate ar trebui să fie mai mare decât numărul de pixeli de pe textură. Aceste poligoane sunt folosite pentru a crea normal map din mers. Rezoluția rețelei de afișare (poligoane): rețeaua constă din două nivele de detaliu: rețea carcasă (plasă de mijloc poli) și rețea de înaltă rezoluție. De obicei, veți vedea o plasă de polietilenă mijlocie în fereastra de vizualizare cu o normal map creată folosind o plasă de polietilenă înaltă. Neteziți obiectul: puteți, de asemenea, să „neteziți” obiectul în timp ce deschideți fișierul. În acest caz, să bifăm „Obiect neted”. Tip de mapare: Specificați ce coordonate texturi trebuie utilizate în timpul procesului de editare. În mod implicit, tipul de UV-mapping este „Keep UV”. Pentru această opțiune, desigur, trebuie să aveți o plasă preexistentă cu cartografiere UV care rămâne așa cum a fost. Dacă doriți, îl puteți schimba.
Păstrați UV: Păstrați coordonatele UV : alegeți această opțiune numai atunci când întregul model este mapat fără suprapuneri.
UV Sub-Patch Smoothing: Tipul de netezire care va fi aplicat pe insulele UV .
Fără netezire: patch-urile UV-sub nu vor fi netezite.
Netezi, păstrează marginile:
Netezirea completă a setului UV : Setul UV va fi netezit complet.
Neteziți, dar păstrați colțurile: netezește setarea UV și uniformizează limitele, dar păstrează colțurile nenetezite.
Păstrați clustere (insule): alegeți această opțiune dacă modelul dvs. are suprapuneri în UV mapping. Acest lucru va muta grupurile, astfel încât acestea să nu se suprapună. Când textura este exportată, aceasta va fi salvată folosind coordonatele UV originale. Dacă este detectat un conflict de mapping , vor fi preferați mai mulți pixeli pictați.
Grupuri de netezire automată: Opțiunea „Grupuri de netezire automată” permite crearea automată a grupurilor de netezire. Prin specificarea valorii în „Max. unghi” responsabilă pentru unghiul maxim dintre fețe atunci când muchia devine ascuțită, este necesară activarea opțiunii „Grupuri de netezire automată”. Această opțiune oferă UV mapping automată. Deși rezultatul este de obicei satisfăcător, formele convexe nemapate sau complexe ar trebui mapate manual.
Inversare normale: bifați această opțiune dacă doriți să inversați valorile normale ale modelului. Noduri de sudare: Sistem de coordonate Z-up: Fără aprindere la centru: Păstrare poziții: Cu ajutorul opțiunilor „Păstrare poziții”, puteți specifica pozițiile inițiale ale vârfurilor care vor fi salvate, compensând deplasarea lor la netezire prin presiune suplimentară. Ignorați grupurile de netezire: acest lucru vă permite să import rețele fără informații normale. Modelul va fi netezit după import în acest caz. Numele setului UV , lățimea și înălțimea texturii sunt aceleași pentru pictura pe per-pixel .
Import imaginea ca rețea
Oferă un set cuprinzător de opțiuni pentru importarea modelului în Painting Room, făcându-l pregătit pentru Vertex Painting. Opțiunile furnizate în dialogul de deschidere permit o anumită texturare preliminară folosind hărți de imagine ca bază pentru hărțile finale Bump, Stencil și Color (disponibile pentru export și utilizare în aplicații terțe).
Peisaj hărți de înălțime pentru motoarele de joc : Acest tutorial arată cum să creați o plasă dintr-o hartă de înălțime alb-negru și o textură de culoare, dacă o aveți, retopo -o și pictați pe texturi, culori și detalii fine bump etc. De Psionic Games.
Tutoriale
Import obiectul pentru îmbinare : acest videoclip rapid demonstrează pașii pentru a Import un obiect pentru a fi îmbinat într-o scenă curentă, mai degrabă decât într-o scenă nouă. Primim întrebări despre asta, deci video-modelul de bază, prin amabilitatea lui Fellipe Beckman.
Opțiunile de Import în Microvertex Note : Acest videoclip menționează câteva note rapide și importante despre importarea unui model în Camera de Painting folosind opțiunea MicroVertex (canal aprofundat al displacement map ).
 Română
  English
 Українська
 Español
 Deutsch
 Français
 日本語
日本語 Русский
 한국어
한국어 Polski
 中文 (中国)
 Português
 Italiano
 Suomi
Suomi Svenska
 中文 (台灣)
 Dansk
Dansk Slovenčina
 Türkçe
 Nederlands
 Magyar
 ไทย
ไทย हिन्दी
 Ελληνικά
 Tiếng Việt
 Lietuviškai
 Latviešu valoda
 Eesti
Eesti Čeština
 Norsk Bokmål