Agregar/Dividir : agrega polígonos usando las líneas entre puntos. Puede agregar nuevos polígonos, dividir caras, aristas y conectar vértices en este modo. Utilice RMB para modificar bordes/vértices. Puede utilizar la herramienta Agregar/Dividir como herramienta de soldadura de destino. Utilice la combinación de teclas de acceso rápido ZX… para mover los puntos en el plano.
O teclas de acceso rápido x, y, z para moverse a lo largo de los ejes.
Seleccionar: en este modo, puede seleccionar vértices, aristas y caras individuales. Utilice CTRL para eliminar elementos de la selección. Seleccione un elemento con LMB, luego muévalo (deslícelo) con RMB. En el modo ‘Cara’, use INSERTAR para subdividir caras y DEL para eliminar. En el modo ‘Borde’, use INSERTAR para dividir bordes, BKSP para contraer, DEL para eliminar bordes, L para seleccionar bucles de bordes, R para seleccionar anillos de bordes y MAYÚS para seleccionar/resaltar anillos de bordes.
Este comando abre nuevas herramientas del panel en la parte inferior (Malla seleccionada y completa); consulte debajo de esta página para conocer nuevos comandos.
Menú de inicio rápido En el modo ‘Cara’, use INSERTAR para subdividir caras y DEL para eliminar. En el modo ‘Borde’, use INSERTAR para dividir bordes, BKSP para contraer, DEL para eliminar bordes, L para seleccionar bucles de bordes, R para seleccionar anillos de bordes y MAYÚS para seleccionar/resaltar anillos de bordes.
Herramienta de selección
Puede iniciar Gizmo en la herramienta Seleccionar haciendo clic con el botón derecho del mouse mientras mantiene presionada la tecla Mayús. Cuando haces SHIFT+Clic DERECHO en el vértice , el gizmo no está alineado con la Normal de este vértice. Si desea moverse a lo largo del borde , puede hacer clic en el borde.
Haga una selección y haga clic derecho en CUALQUIER OTRA parte de la geometría, y el widget se alineará con eso, lo que permitirá mover la selección en una dirección que coincida con cualquier geometría existente.
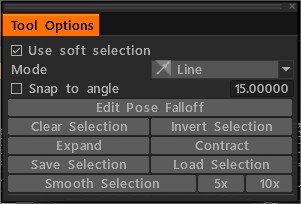
Función de selección suave en 3DCoat 2023, para los espacios de trabajo de Retopo y Modelado. También incorpora los mismos modos de selección de la herramienta Pose en el espacio de trabajo Esculpir.
Seleccionar ruta : Puntos a polígonos: agregue puntos con LMB. Modifica puntos y agrega caras con RMB. (mirar vista previa) Forzar triángulos con SHIFT. Mantenga el cursor cerca del centro del quad potencial para una ubicación más precisa del quad. Cambie al grupo de comando especial para borrar puntos. Trazos: dibuje trazos y presione ENTRAR para crear una superficie polivinílica. Presione ESC para borrar los trazos. Dibuja con CTRL para agregar splines y conectar y dividir trazos existentes. También puedes dibujar curvas/splines cerradas. Empiece a dibujar en el espacio para cortar. Para crear cilindros, puedes unir varios cortes o círculos con un solo trazo. Curvas/Trazos: Funciona de manera similar a la herramienta Trazos pero usa curvas en lugar de trazos. ¡Opera sólo sobre las curvas creadas dentro de esta herramienta! Generalmente, sólo considera curvas dentro de la carpeta ‘CurvesStrikes’ en el árbol de curvas.
Smart Retopo El vídeo muestra lo que llamamos la función Smart-Retopo, basada en el uso del conjunto de herramientas Curves.
Retopo inteligente
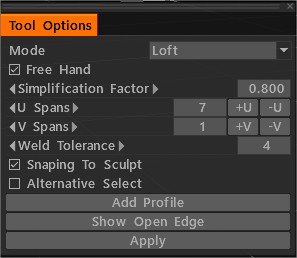
En el modo Loft, dibuje trazos y presione ENTRAR (Aplicar) para crear una polisuperficie loft (Retopo Mesh). Puedes dibujar una tira de superficie simple en el modo Tira. Puedes dibujar el límite de la malla en el modo Cuadrangulación. Después de presionar Enter, se crea una malla preparatoria. Puede editar la línea límite. presione ENTRAR (Aplicar) para crear una Retopo Mesh. Presione ESC para borrar los trazos. Mantenga presionada la tecla Mayús para desactivar el ajuste. Empiece a dibujar en un espacio vacío para cortar. Edite los bordes con el botón derecho del mouse. Si mantiene presionada la tecla Ctrl, active Slide Edge. Si mantiene presionado Ctrl+Shift, active Splite Rings. U Spans Especifica el número de nodos en la curva más larga. El número de pasos en otros depende de la longitud de la curva. Si mantiene presionada la tecla Ctrl, puede cambiar los intervalos U con la rueda del mouse. Correspondencia de Cant. USpans/VSpans con Cant. de cara. Se agregó el botón de verificación “Selección alternativa”.
R-Fill: Esta es una herramienta Quad Fill diseñada para rellenar agujeros en una malla con el flujo topológico adecuado. Cuchillo: Corta una cara con un cuchillo. Dibuja la línea y presiona ENTER. Extrusión libre: Extrusión en cualquier dirección. Recuerde que los nuevos vértices no se ajustarán automáticamente, pero se ajustarán en operaciones posteriores si no desactiva el ajuste automático. Extrusión inteligente: extruya una cara o un borde en cualquier dirección. Al presionar la tecla ENTER se crea una nueva extrusión. También puede escalar interactivamente (RMB + Arrastrar) y rotar (MAYÚS + Arrastrar) las caras o bordes seleccionados. Extrusión inteligente parte 2 Extrusión inteligente en 3DCoat Part2 : las herramientas de extrusión se han modificado según lo solicitaron los usuarios. Con una nueva selección, la extrusión es automática cuando comienza el movimiento. La posibilidad de trabajar como hasta ahora queda para Smart Extrude. Extrusión inteligente parte 3 Inserción y extrusión inteligente
Herramienta Spline: extruye las caras seleccionadas a lo largo del arco. Un Transform Gizmo puede editar el ángulo y el eje del arco. Puede editar el número de segmentos y el factor de escala. En el modo Spline, puede arrastrar puntos con LMB para moverse en el espacio 3D y usar la rueda de desplazamiento del mouse (o equivalente en la tableta Wacom) para escalar interactivamente la geometría del bucle de borde que rodea el punto sobre el que se encuentra el cursor. Cada punto spline representa una nueva extrusión. Al presionar la tecla ENTER o el botón NUEVA EXTRUSIÓN en el panel Opciones de herramienta se crea una nueva extrusión/punto. Al hacer doble clic a lo largo de la spline se crea un punto de extrusión/spline de bucle de borde intermedio, mientras que al hacer doble clic en un punto se elimina un punto de extrusión/spline de bucle de borde.
Movimiento libre: Mover caras/aristas/vértices seleccionados. Usando un mouse o Gizmo. Si no se selecciona nada, toda la malla se moverá. Puede mover un grupo o punto previamente seleccionado con el cursor del mouse presionando el botón izquierdo. La opción [Selección automática] debe estar activada.
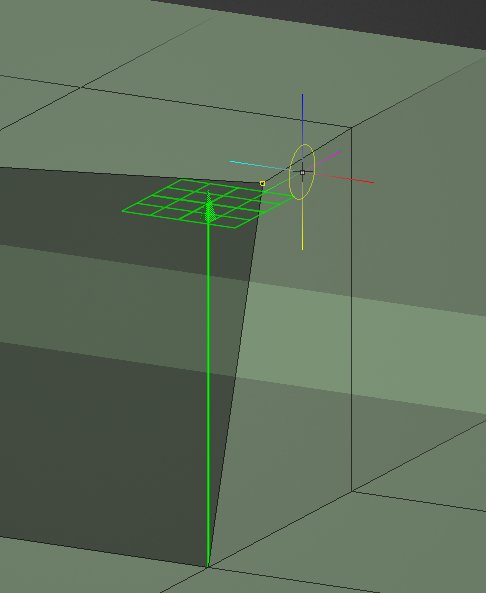
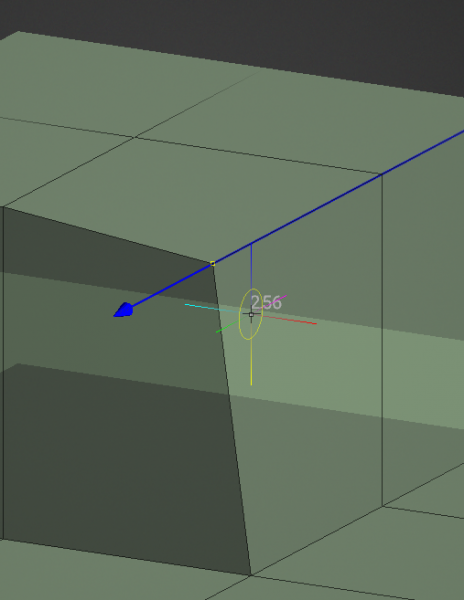
Barrido de superficie: Generación de malla moviendo el perfil a lo largo de la guía de curva seleccionada. La frecuencia de paso de la red está regulada en 2 direcciones por U y V Spanse. También es posible insertar anillos de borde adicionales en la ubicación deseada con un doble clic cerca de la curva gruesa rosa o azul. Modo agregado: “Gráficos de torsión editables”. La capacidad de controlar la rotación a lo largo de las secciones de la vía. Herramienta de barrido de superficie : en este modo, la escala está disponible a lo largo de los ejes X/Y. Perfil: Generación de malla moviendo el perfil a lo largo del eje o guía de curva seleccionada. La frecuencia de paso de la red está regulada en 2 direcciones por U y V Spanse. Franja de superficie: se puede crear una franja dibujando una línea central. El ancho de la tira se puede editar cerca de los puntos spline con la rueda del mouse. Puede insertar y eliminar puntos spline con DblClick. Presione Esc para comenzar a dibujar otras curvas. Barrido de superficie 2: Generación de malla moviendo el perfil a lo largo de dos guías de curva seleccionadas. La frecuencia de paso de la red está regulada en 2 direcciones por U y V Spanse. Generadores de superficie barrida N: Las superficies de barrido se generarán moviendo N perfiles a lo largo de dos guías de curvas. Después de que aparezca el cuadro de diálogo Opciones de herramienta, debe seleccionar la segunda guía y los perfiles de curva. Se creará el nuevo elemento en VoxTree y la malla se colocará allí. Seleccione el objeto correspondiente en SculptTree para poder cambiar parámetros como grosor, cantidad de facetas y suavizado. Elimine el elemento SculptTree correspondiente para dejar de rellenar la curva.
La superficie de revolución: la superficie de rotación se generará mediante la revolución del perfil seleccionado alrededor del eje de curva seleccionado. La frecuencia de paso de la red está regulada en 2 direcciones por U y V Spanse. Superficie por 2 vistas: la malla generada al mover dos cónicas a lo largo de la guía de curvas. Puedes editar la curva. “Superficie por 2 vistas” no está habilitada en el sistema de coordenadas Z-Up. Superficie loft: Las superficies loft son superficies generadas por múltiples curvas que crean una tangencia suave entre las curvas seleccionadas. Generación de malla moviéndose a través de la sección de curva seleccionada. La frecuencia de paso de la red está regulada en 2 direcciones por U y V Spanse.
Parche de superficie: las curvas seleccionadas definen el límite y la geometría de la malla. La frecuencia de paso de la red está regulada por U Spanse. Bisel: crea un bisel en los bordes. Matriz de copias: puede crear copias para caras seleccionadas o para los grupos de polietileno actuales. Debe especificar el número de copias para los tipos lineales y radiales. Para copias a lo largo de una spline, especifique el número de pasos. Celosía: La celosía se generará a partir de aristas o caras seleccionadas. El ancho se puede cambiar usando el círculo sensible. Mover el cursor horizontalmente cambia el ancho y la profundidad vertical.
En la versión 2023.25 se eliminó la herramienta “Malla a NURBS” de la sala de modelado. La herramienta “Mallar a NURBS” ahora solo está en la sala Malla a NURBS .
 Español
  English
 Українська
 Deutsch
 Français
 日本語
日本語 Русский
 한국어
한국어 Polski
 中文 (中国)
 Português
 Italiano
 Suomi
Suomi Svenska
 中文 (台灣)
 Dansk
Dansk Slovenčina
 Türkçe
 Nederlands
 Magyar
 ไทย
ไทย हिन्दी
 Ελληνικά
 Tiếng Việt
 Lietuviškai
 Latviešu valoda
 Eesti
Eesti Čeština
 Română
 Norsk Bokmål