 Français
  English
 Українська
 Español
 Deutsch
 日本語
日本語 Русский
 한국어
한국어 Polski
 中文 (中国)
 Português
 Italiano
 Suomi
Suomi Svenska
 中文 (台灣)
 Dansk
Dansk Slovenčina
 Türkçe
 Nederlands
 Magyar
 ไทย
ไทย हिन्दी
 Ελληνικά
 Tiếng Việt
 Lietuviškai
 Latviešu valoda
 Eesti
Eesti Čeština
 Română
 Norsk Bokmål
En savoir plus sur la Painting Ptex
Ptex est l’une des technologies les plus étonnantes, vous permettant de peindre des textures extrêmement haute résolution sur une base par polygone, ainsi que de contourner complètement tout travail UV – car il ne nécessite aucune entrée manuelle pour la création des cartes UV . Ptex, dans son implémentation actuelle, ne prend en charge que les polygones quadruples, pas de triangles ni de N-gons.
Il est important de noter que lors de l’utilisation de Ptex dans 3DCoat , vous pouvez augmenter la résolution de polygones individuels si vous avez besoin de plus de détails de texture dans la zone locale de ce polygone. En augmentant la résolution d’un polygone ou d’un groupe de polygones, cela augmente effectivement la taille de ce polygone sur la carte UV Ptex générée automatiquement.
Par exemple, vous pouvez peindre de très petits détails à l’intérieur de zones sur un maillage qui nécessite un gros plan extrême ou nécessite simplement plus de détails dans une zone – pourtant, vous ne voulez pas créer beaucoup de texture à très haute résolution Plans. Ptex fonctionne assez bien à cette fin.
Ce qui est encore plus remarquable, c’est que le format .ptex peut stocker des centaines de milliers de textures directement dans un seul fichier .ptex. Pour le moment, seule une application externe prenant en charge le format .ptex pourra import/ export le fichier .ptex à utiliser. Pour combler cette lacune dans le support .ptex, nous avons prévu l’ export d’une carte de texture ordinaire, basée sur la technologie Ptex , aux formats TGA, BMP et PNG.
Lors de l’importation d’un maillage pour la peinture Ptex , vous serez invité à sélectionner un certain nombre d’options :
Millions de polygones : il s’agit de la résolution du maillage telle que subdivisée après l’exécution de l’opération “Lisser l’objet”.
Cela devrait être supérieur au nombre de pixels de votre carte de texture.
Résolution de la carcasse : Il s’agit de la résolution mi-poly ; cela n’affecte que les performances de la fenêtre et l’affichage du maillage dans la fenêtre.
Taille de texture Ptex pour Export
Vous pouvez sélectionner une résolution de texture entre 512×512 et 8192×8192. Vous pouvez également modifier cela à tout moment si vous avez besoin d’augmenter ou de réduire la résolution de votre texture.
Souder les sommets : cela soudera tous les sommets qui partagent la même position.
Échanger Y et Z : cela permutera les axes Y et Z. Cela permet d’apporter plus facilement des maillages à partir d’applications telles que Rhino ou 3DSMax.
Ignorer les groupes de lissage : Cochez cette case pour ignorer tous les groupes de lissage que vous avez sur votre maillage.
Inverser les normales : cela inversera les normales de chaque polygone. Groupes de lissage automatique : ceci analysera automatiquement le maillage à la recherche d’angles nets entre les polygones et leur appliquera automatiquement des groupes de lissage, en conservant les arêtes vives présentes.
Chacune des fonctions Ptex suivantes nécessite une sélection. Pour faire une sélection, activez simplement l’outil de résolution locale Ptex et “peignez par-dessus” les polygones dans la fenêtre.
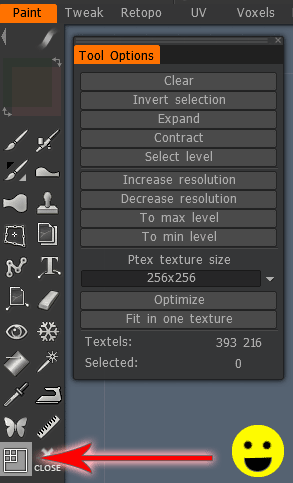
Paramètres de résolution locale
Effacer : efface toute sélection.
Inverser la sélection : Inverse votre sélection.
Développer : élargit votre sélection d’un polygone contigu.
Contracter : contracte votre sélection d’un polygone contigu.
Sélectionner le niveau : saisissez manuellement un niveau de subdivision polygonale local.
Augmenter la résolution : augmente la résolution locale des polygones actuellement sélectionnés. Cela augmente efficacement la taille du polygone sur les cartes UV Ptex générées automatiquement.
Diminuer la résolution : Diminue la résolution locale des polygones actuellement sélectionnés. Cela réduit efficacement la taille du polygone des cartes UV Ptex générées automatiquement.
Au niveau max : définit votre sélection actuelle sur le niveau maximum autorisé pour Ptex. Ils augmentent efficacement les polygones sélectionnés, occupant presque leur carte UV .
Au niveau minimum : définit votre sélection actuelle sur le niveau minimum autorisé pour Ptex. Réduction efficace des polygones sélectionnés, permettant plus de polygones par carte UV .
Taille de texture Ptex : vous pouvez choisir la résolution de texture pour chaque texture générée par ptex. Les résolutions sélectionnables vont de 512 × 512 à 8192 × 8192. Vous pouvez modifier cela à tout moment en fonction de vos besoins, ainsi que lors de l’importation du maillage pour la peinture Ptex .
Optimiser : organise les polygones sur chaque carte UV Ptex générée automatiquement pour s’adapter à davantage de polygones en fonction de la résolution locale (taille du poly par espace UV ).
REMARQUE : lorsque vous l’utilisez, gardez à l’esprit que si vous avez utilisé un maillage avec des cartes UV Ptex générées automatiquement, il réorganisera complètement les polys sur toutes les cartes UV , rendant inutiles vos cartes UV générées automatiquement.
Cependant, vous pouvez toujours bake les détails d’un maillage à l’autre. Assurez-vous simplement de sauvegarder deux maillages :
Votre maille cible d’origine et de cuisson. Pour plus d’informations sur Ptex, veuillez visiter le site Web officiel de Ptex à l’adresse
http://ptex.us/
– Ptex est un mapping spécial où la texture 2^nx 2^m est associée à chaque face. La résolution de chaque face peut être modifiée dynamiquement.
– Ptex est très proche de l’approche micro vertex car le patch N x M était associé à chaque face dans l’approche micro vertex.
– Les gros avantages par rapport au micro vertex painting sont – ne pas avoir besoin UV; chaque pixel sur la texture correspond à un seul sommet sur le patch, ce qui se traduit par une bien meilleure qualité de peinture.
– Ptex est bon pour les surfaces de subdivision mais mauvais pour les objets avec des surfaces irrégulières qui deviennent fausses après la subdivision. Actuellement, seuls les quads sont pris en charge dans 3DC ; peut-être que je soutiendrai les triangles plus tard.
– Ptex peut être défini en correspondance avec l’approche UV-mapping car toutes les petites textures seront placées sur plusieurs grandes textures, de sorte que 3DC peut export des objets et des textures à utiliser dans n’importe quel autre package de jeu/rendu. La fluidité est assurée car chaque patch/petite texture est placé sur une grande texture avec une bordure large de 1 pixel composée de manière spéciale pour imiter le filtrage.
– Les objets exportés à l’aide de Ptex peuvent être utilisés dans les jeux, mais ce n’est pas trop efficace maintenant car chaque face produira quatre sommets (au lieu de 1-2) qui seront amenés au moteur de rendu. Ce n’est pas un problème trop critique, mais de toute façon cela donnera une petite pénalité de vitesse. Bien sûr, le moteur de jeu peut être optimisé pour éviter ce problème en utilisant un shader de géométrie, mais il a besoin de quelques améliorations dans le moteur lui-même. Cela fonctionnera dans les moteurs de jeu; c’est juste un avertissement de performance. Si une optimisation appropriée est effectuée dans les moteurs de jeu, cette technique peut très bien montrer les objets déplacés. Par exemple, supposons que le moteur de jeu obtienne en entrée trois flux (position des sommets + indices quad + paramètres de patch) au lieu de 2 (coordonnées des sommets et UV + indices des triangles). Dans ce cas, le rendu peut être effectué même de manière plus efficace.
– Les objets peuvent être utilisés dans tous les moteurs de rendu/packages 3D habituels sans coutures pour la raison mentionnée précédemment (bordure spécialement filtrée).
– Si le futur proche export/ import natif Ptex se fera aussi, mais ce n’est pas trop critique car le problème des coutures n’existe quasiment pas là-bas.
– Ptex est idéal pour la cuisson des voxels à l’approche de la peinture car il n’y aura pas de problèmes de chevauchement UV qui sont tout simplement impossibles dans cette approche.
Lorsque votre modèle ne nécessite pas de déplacement extrême (au moyen de cartes de texture) – et que vous souhaitez travailler sans les considérations des coutures UV Map (très rapide), essayez le mode Ptex .
Avec le panneau “Texture Editor” ouvert, ainsi que le Ptex “Tool Options Panel”, vous pouvez ajuster la résolution Ptex localement et à tout moment pendant le processus de peinture de texture – en voyant instantanément les modifications de la carte UV en temps réel.
Après avoir cliqué sur “l’icône Ptex ” en bas du “Panneau d’outils de Painting “, vous pouvez désigner des zones de résolution accrue en peignant les polygones souhaités dans la fenêtre et en appuyant sur “Augmenter la résolution” dans le “Panneau d’options d’outils”.
Quelles que soient les fonctionnalités que vous ajoutez dans la salle de Painting , elles peuvent être automatiquement converties en cartes de texture standard pouvant être lues par de nombreuses applications tierces. Ptex offre une répartition optimisée de l’espace de texture et vous permet de travailler très rapidement.
Sachez que les cartes de texture converties à partir du mode Ptex ne peuvent pas être modifiées dans des applications de peinture externes telles que Photoshop. À l’heure actuelle, le Ptex est toujours considéré comme un procédé expérimental de texturation.
Le gros avantage de Ptex était la possibilité d’augmenter la résolution de la texture dans des zones spécifiques. Si vous n’aviez pas assez de résolution pour un ensemble de polygones (comme une zone avec du texte), vous pouvez simplement sélectionner la zone et augmenter la résolution.
Il y a un bouton dans la palette d’outils qui indique la résolution locale Ptex lorsque vous le survolez. C’est l’image d’un carré avec quatre petits carrés dans le coin supérieur gauche. Cliquer dessus fera apparaître un tas d’options, à quel point vous pouvez sélectionner les polygones que vous souhaitez affecter en cliquant dessus avec le bouton gauche (maintenez la touche de contrôle enfoncée et cliquez avec le bouton gauche pour désélectionner).
Baking des textures Ptex sur un maillage avec des UVs existants : comment bake des textures après avoir utilisé la méthode Ptex UV/Texturing sur un maillage avec une carte UV existante.
Très pratique si vous souhaitez utiliser le format Ptex dans 3DCoat comme format de “stockage” avec vos détails haute résolution et bake des textures de résolution inférieure si nécessaire.