 Latviešu valoda
  English
 Українська
 Español
 Deutsch
 Français
 日本語
日本語 Русский
 한국어
한국어 Polski
 中文 (中国)
 Português
 Italiano
 Suomi
Suomi Svenska
 中文 (台灣)
 Dansk
Dansk Slovenčina
 Türkçe
 Nederlands
 Magyar
 ไทย
ไทย हिन्दी
 Ελληνικά
 Tiếng Việt
 Lietuviškai
 Eesti
Eesti Čeština
 Română
 Norsk Bokmål
Šajā sadaļā mēs apspriedīsim visu, kas saistīts ar Render cilni programmā 3DCoat.
Pirmkārt, NEspiediet ESC, lai atceltu renderēšanu, ja joprojām vēlaties izmantot attēlu. Jums OBLIGĀTI jāgaida, līdz tas ir pabeigts, lai iegūtu galīgo, lietojamo attēlu. Atceļot renderēšanu, tas netiks darīts. Renderēšanas dzinējam jāļauj turpināt darbu, līdz tas ir pabeigts!
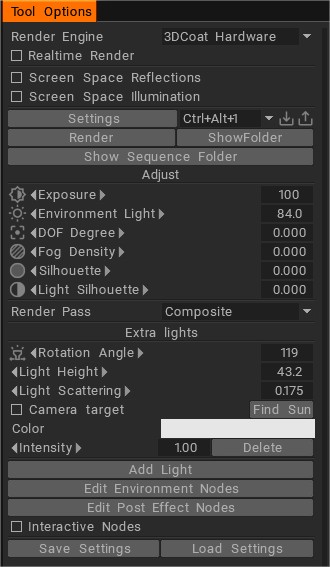
Vispārīgie parametri
Renderēšanas programma: atlasiet, kuru renderēšanas programmu izmantot renderēšanai. Pašlaik lietošanai ir gatavi tikai iekšējais renderētājs un Renderman (šis pēdējais ir jāinstalē). Turpmākajā attīstībā tiks pievienots vēl vairāk.
Reāllaika renderēšana: reāllaika renderēšana skata logā. Pilna renderēšana ir iespējama un ļoti praktiska programmā 3DCoat, pateicoties tā ātrajam iekšējam renderētājam. Tādējādi ir praktiski atjaunināt renderēto skatu, kad pārvietojat kameru attiecībā pret modeli vai ainu, ļaujot interaktīvi redzēt vairāku krāsainu gaismas avotu, mīksto ēnu un lauka dziļuma efektu. Varat arī tos apvienot ar Retopo Mesh pārklājumu efekta vai atsauces nolūkos.
Ekrāna telpas atspulgi un gaismas. Renderētājs tagad nodrošina daudz reālistiskākus rezultātus. Iespējojiet Beta rīkus, lai piekļūtu funkcijai, un pēc tam atzīmējiet atbilstošās izvēles rūtiņas Renderēšanas telpā.
Ekrāna telpas apgaismojums un atspoguļojums
Ekrāna telpas apgaismojums un atspoguļojums — 2. daļa
Iestatījumi
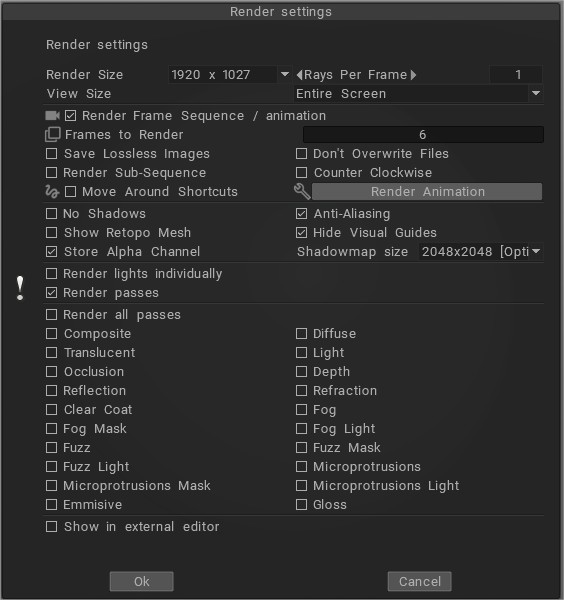
Renderēšanas izmērs: izvadītā attēla izmērs. Izvadītā attēla izmērs ir proporcionāls skata loga izmēram.
Stari vienā kadrā: iestatiet maksimālo izsekoto staru skaitu, kas tiek renderēts vienā animācijas kadrā. Renderēšanas laiks ir tieši proporcionāls šai vērtībai. Lielāku skaitļu renderēšana prasa ilgāku laiku.
Renderēt kadru secību/animāciju : renderēšanas kadru secība, kas rotē ap objektu vai pa kameras īsinājumtaustiņu secību.
Renderējamie kadri: iestata kopējo renderēto kadru skaitu, lai pabeigtu kameras renderēšanas pozīciju ķēdi.
Saglabāt attēlus bez zudumiem: saglabājiet attēlus bezzudumu formātā (TGA vai BMP).
Nepārrakstīt failus: secības renderēšanas laikā faili netiks pārrakstīti.
Renderēt apakšsecību: atzīmējiet šo opciju, ja vēlaties renderēt vai atkārtoti renderēt nevis visus kadrus, bet tikai dažus. Ja atzīmēta, ir jāiestata pirmais un pēdējais renderējamais kadrs.

Pretēji pulksteņrādītāja virzienam: apgrieziet noklusējuma kameras renderēšanas pozīciju virzienu.
Pārvietošanās saīsnes: pārvietojiet kameru pa interpolētu trajektoriju, kas iet caur kameras īsceļiem.
Renderēšanas animācija: uzsāk kadru secības renderēšanu starp vairākām saglabātajām ainām.
Pārvietošanās saīsnes: pārvietojiet kameru pa interpolētu trajektoriju, kas iet caur kameras īsceļiem.
Slēgts splains: kustības trajektorija ir slēgta.
Bez ēnām: atveidojiet ainu bez ēnām.
Anti-aliasing: izmantojiet anti-aliasing, lai vēl vairāk uzlabotu atveidojumu.
Show Retopo Mesh: Rādīt retopo sietu renderēšanas telpā.
Paslēpt vizuālos norādījumus: paslēpiet simetrijas plakni, 3D režģi un asi.
Veikala alfa kanāls: tiks renderēts arī alfa kanāls. Lai pareizi izmantotu šo opciju, kā izvadi jāizvēlas TGA. Ja renderējat secību, TGA tiks izvēlēta automātiski.
Ēnu kartes izmērs: ēnu kartes attēla izmērs, kas tiek renderēts, veidojot ēnas.
Atsevišķi atveidot gaismas: ja pievienojat vairāk gaismas, lai renderētu ainu, visas garāmejošās gaismas tiek renderētas atsevišķi.
Render Passes: 3D mākslinieki atveidos tā saukto vairākkārtēju piegājienu vai renderēšanas piegājienu. Šis atveidojums atdala 3D elementa gaišās sastāvdaļas atsevišķos failos . Šajos failos var būt ietverta tāda informācija kā objektu atdalītās ēnas vai izolēti atspulgi.
Renderēt: šī poga sāk renderēt vienu kadru.
Skatīt mapi : atveriet renderēšanas faila atrašanās vietu.
Rādīt secības mapi: atveriet renderēšanas secību failu atrašanās vietu.
Pielāgojiet vides apgaismojumu
Iestatījumi, kas jāmaina, ja kā vides gaismas avotu izmantojat Panorāmu . Pretējā gadījumā kā vide tiks izmantota vienmērīgi sadalīta balta gaisma.
Ekspozīcija: renderētā attēla kopējais spilgtums.
Vides apgaismojums: izmantojot šo parametru, varat mainīt apgaismojuma veidu. Nulles vērtība nodrošinās tiešu apgaismojumu, 100 – Hemitype apgaismojumu.
DOF grāds. Fokusa lauka dziļums. Šī opcija radīs jūsu attēla objektīva fokusa efektu, ar šo parametru iestatot attālumu no DOF plaknes, kurā objekti paliek fokusā.
DOF plaknes pozīcija: šis slīdnis pārvieto sarkano plakni uz priekšu vai atpakaļ no ekrāna, lai iestatītu fokusa dziļuma centru. Izmantojiet augstāk esošo slīdni, lai iestatītu attālumu no plaknes (priekšpusē un aizmugurē), kurā objekti paliek fokusā.
Miglas blīvums: miglas blīvuma lielums
Miglas spēks: miglas līdzsvars priekšplānā un fonā.
Miglas krāsa: miglas krāsas līdzsvars.
Tilpums migla: tilpuma miglas blīvuma lielums.
Miglas ēnas: apjoma ēnu blīvums.
Siluets: renderē sieta kontūru.
Gaismas siluets: šis parametrs ļauj redzēt siluetu, ko veido gaisma un ēna.
Renderēšanas kārta: tikai vienas atsevišķas renderēšanas gājiena parādīšana (piem., atspulgi, migla, izkliede pa virsmu utt.) var būt noderīga, lai precizētu atsevišķas ainas vai materiālu īpašības.
Papildu gaismas
Rotācijas leņķis: gaismas griešanās leņķis ap objektu 3D skatā.
Gaismas augstums: gaismas augstums attiecībā pret horizontu.
Gaismas izkliede: ar šo parametru varat pielāgot gaismas daudzumu, kas tiks izkliedēts. Augstākas vērtības nodrošinās maigākas ēnas un maigāku spīdumu uz spīdīgiem objektiem.
Kameras mērķis: izgaismo objektu no kameras pozīcijas, padarot ēnotās zonas redzamākas.
Atrast sauli: norādiet spožāko vietu panorāmā.
Krāsa: iestatiet gaismas avota krāsu.
Intensitāte: iestatiet gaismas avota spilgtumu.
Dzēst: dzēst pašreizējo apgaismojumu.
Pievienot gaismu: pievienojiet savai ainai papildu gaismas avotus — tos visus var kontrolēt, kā norādīts tālāk.
Dzēst: dzēst pašreizējo apgaismojumu.
Rediģēt vides mezglus:
Rediģēt Post Effect mezglus:
Interaktīvie mezgli: tiek ieviests jauns mezglu redaktors. Apskatiet šīs VIP funkcijas video, lai redzētu, kā tā darbojas kopā ar Nodes Editor
Pamācības
Renderman integrācija : šajā videoklipā ir sniegts īss pārskats par Renderman integrāciju 3DCoat 4.8 (no būvējuma 4.8.04). Šī ieraksta laikā tas joprojām ir nepabeigts darbs, taču ļoti funkcionāls/lietojams. Sekojiet līdzi rīkkopas atjauninājumiem.
HDR vides kartes opcijas : šajā video ir aprakstītas vairākas jaunas iespējas priekšskatīt un izmantot HDR vides kartes apgaismojuma un fona ietvaros.